As you know, files with the extension mkv is a special multimedia container for storing video, audio paths and subtitles. She is Matryoshka. Below will be described how to work with audio tracks correctly.
It often happens that there are several audio paths and subtitles in a container, and some of them are not needed. For example, roads with an unfamiliar language or several Russians. Or another option, when the sound road has the format dts, which is not always reproduced by "iron" players. It can be recoded to ac3.
I will describe the most optimal, in my opinion, actions for performing these tasks.
You only need two programs.
The first one is Mkvtoolnix for working with mkv containers.
The second - Xilisoft Video Converter Ultimate... Besides coding dts v ac3 has many other useful features.
Take the once popular Slumdog Saints as an example.
Launch mkvmerge GUI from the kit Mkvtoolnix
Choosing a movie and getting something like this:

In addition to the video and subtitles, the container contains four more roads. English, two Russians and a road by Goblin. Here it is exactly what you need. Remove the checkboxes from unnecessary elements, select the final path and the name of the reassembled container and click Start muxing.

After mixing is complete, the new container looks like this. Video and one audio track.

Now it can be recoded into ac3.
Launch Xilisoft Video Converter Ultimate... Add a file, in the Profiles tab, select ac3 and the path to save. Also on the right side of the program, you can change the settings for the encoded track.
We press the red button at the top and wait.

It turned out to be a separate track ac3... Now you need to replace the track with the extension with it. dts... To do this, open the mkvmerge GUI again, select the file mkv with one track dts and add a track with the add button ac3, while from the track dts uncheck the box accordingly.


You ask why all this was needed?
The original file with all tracks weighed 6.56 GB, the final file was 3.78 GB. Besides what it takes less space, it can be copied relatively quickly to a USB flash drive and watched from a device that does not support sound in the format dts(for example, SAMSUNG TVs of the sixth series of 2009, which even new firmware did not help to learn to read dts).
It is not recommended to use mkvmerge versions higher than 4.0.0. This is especially true for owners of Samsung TVs of 2009 release. (2009 is the letter "B" in the model name. For example LE37 B*****) Most of the reassembled containers refuse to run on the built-in player of the above TVs.
UPDATE2:
And how to extract subtitles separately or sound track? It's simple. To do this, you need a program MKVExtractGUI... It must be placed in a folder with Mkvtoolnix.

Everything here is intuitively clear: select a file, an output folder and check the boxes required to extract the files from the container.
Recently, a considerable number of films, especially versions processed from a DVD or Blu-ray source, may contain 2 or more sound versions. A high-quality duplicated translation is standardly supplemented by the original, and sometimes by several versions from enthusiasts or other professional translation and dubbing studios. A simple viewer only benefits from such a variety, because now there is a choice - you can also listen to sometimes "insipid" dubbing or the savory style of the Goblin. Most often, to change the audio track in KMPlayer, it is enough to use the CTRL + X keyboard shortcut, all other options are discussed in more detail later in the article.
Types of audio tracks
The sound, or audio track, is of two types - built-in and external. The first is a more convenient option, because all the voiceovers in the video are "wired" into one file and switch faster. The second, on the other hand, makes it more convenient to distribute the translation among users, although video and sound synchronization is required for different files, it connects a little slower.
Adding an external audio track
Launch the desired video file and pause it. Right click in the active KMPlayer window → “Open” → “Load external audio track”. Next, you need to find (usually located in the folder with the movie itself) and select the audio file that we want to connect as an audio track, then click "Open". After completing this procedure, two options are possible: either the external track will connect itself and become active, or it should appear in one of the lists of the "Filters" item (it will become available after clicking RMB in the active KMPlayer window) and you will need to select it already there.
How to change the built-in audio track
The built-in audio track is changed in the "Filters" item (it will become available after clicking RMB in the active KMPlayer window). Then there are two options, depending on the default splitter. If Matroska is active, then you should look for a list called "KMP Matroska Reader", if LAV Splitter - we are looking for an item with a corresponding name, there will be a list of available audio tracks with the ability to select the option you need.

Russian audio tracks by default
In the latest versions of KMPlayer, a rule is hardcoded in the settings, which gives priority to voiceovers in English. As a result, you have to switch tracks yourself each time. This rule can and should be changed. To do this, go to the player's settings using the F2 hotkey. In the vertical block on the left we find the item "Subtitle processing" and select the sub-item "Languages / Speech". Next, we edit the line "Preferred subtitle language", in the end there should be two words rus ru. In other words, we made it so that audio tracks containing the abbreviations rus or ru have priority over the rest. To set a different priority of languages, for example, Russian, Japanese, English, one could write rus jpn eng. Now it remains to click the "Close" button at the bottom right of the window and the settings are saved.

Some dvd or mpeg movies have multiple audio tracks. As a rule, this is the original voice acting and several dubbing options. And if, after starting the movie, you suddenly hear a foreign speech, do not panic: you just have the wrong audio track. The way to switch the audio track depends on which video player you are using.
Instructions
This video player is the most widely used because it is installed with Windows by default.
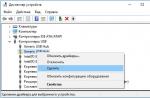
In order to switch the audio track in this player, hover the cursor over the player screen and right-click, then select the Playback item in the menu that appears, then Select the playback language.
If you have a different player installed, read below how to select an audio track.
In the top menu of the player, select Play - Audio.
Right click on the screen, select Sound - Switch audio track from the menu.
Right-click on the screen, in the menu that appears, select Audio - Select Stream. You can also use the CTRL + X keyboard shortcut to switch the audio track.
In the top menu, select Audio - Audio Track.
Right-click on the screen, select Audio Track from the menu that appears.
Right click on the screen, select Audio - Audio Streams from the menu. Tip added on April 11, 2011 Tip 2: How to change the audio track We are all great experimenters. It would seem that everything is there, but we want to do something in our own way in order to see what comes of it. If you wanted to connect an audio file to a movie or clip, you shouldn't think that it is available only to professionals. Our step-by-step instruction will tell you how you can change any audio track yourself.
Instructions
movie rus dubbing.dts
- how to change music
There are many programs for playing video, and the methods for selecting the audio track vary. In some players, the settings are intuitive, in others - everything is not so obvious. Therefore, we will select the most popular players and describe in detail how to change audio tracks in them.
Windows Media Player. One of the most common players has rather limited functionality. In some cases, you will not be able to switch the track - in this case, download and install a more advanced player. But still, try pressing Ctrl + S after starting the video. This will stop playback. Right-click on the player screen and select Sound & Duplicated Tracks. There should be a list of voices here. Oddly enough, every time you switch between tracks, Windows Media Player needs to be restarted. VLC Media Player. Right-click on the player screen, select the "Audio" - "Audio track" option. Select the desired track from the list of tracks provided. Another way is to go to the "Audio" section of the player, which is at the top of VLC, find "Audio" and set the track. Media Player Classic (MPC). Go to the "Play" tab, find "Audio" and set the track. An even easier way is to right-click on the player's screen, point to Audio from the list of options and select a track. Light Alloy. Press Shift + A and you will find yourself in the sound settings. At the very bottom of the window, select a track from the drop-down list. By right-clicking on the speaker icon on the player screen, you can also select a track - they will all be displayed at the very bottom of the list of sound settings. BSPlayer. This player is notable for the fact that it detects and installs the missing video codecs for normal playback. To change the track, right-click on any area of the player, designate "Audio" - "Audio streams", and then the track marked as "stream". KMPlayer. To change the track, press the CTRL + X combination or right-click on the player and select "Audio" - "Select stream" - the desired stream.


As you can see from the article, changing the audio track is quite simple. The exception is simple programs with weak functionality, for example, Windows Media Player, or limited to work with audio files like Winamp. Remember to keep your players up to date and download the latest video codec sets to avoid problems with playback and audio settings.
Let's look at a simple example of replacing the audio track for a TV show. We import the video into the Virtual Dub program for this we execute the command: File> Open Video file ... (Ctrl + O). Select the video and click on the button: Open.
If we are greeted by the following dialogue:

Then you need to install the Xvid decoder to import the series. After installing the decoder in the system, launch Virtual Dub and press the key combination Ctrl + O and import the video. We expose: Audio> Direct stream copy.

And execute the command: File> Save WAV. We save the soundtrack of the series. Press the key combination Ctrl + O and import the video to which we want to attach the sound. We execute the command: Audio> Audio from other file ...

And we indicate the path to the extracted sound.

And to export the video, press the F7 key or execute the command: File> Save as AVI ... Press the button: Save.

The process of compiling the movie will start:

If, when playing a series in a media player, there is a slight out of sync between sound and video, for example, in a VLC player, this can be corrected. We execute the command: Tools> Track Synchronization. In the Adjustments and Effects window, switch to the tab: Synchronization and in the Audio / Video section in the item: Shift between audio and video - drives in a negative or positive value.