Unexpectedly, we managed to find out that the old garland, which had been decorating the Christmas tree for many years, no longer works, you should not rush to buy a new one, because there is always a chance to repair it yourself. As a rule, such Christmas tree lamps are not such a complicated design.
Therefore, if you carefully check the possible malfunctions, then you don’t have to wonder how to fix the Chinese garland, the circuit of which is not difficult. So, if the contact wires came off in the garland, the light bulb burned out, or the mode switching was disturbed, then you should not throw it away. It is enough to use some effective tips.
The colors in the garland do not burn: what to do?
The most time-consuming breakdown is the one when the change of colors in the Chinese garland is disturbed. The scheme for solving the problem, if it is simple, then restoring the previous state of the device will not be easy. Violation of the color mode indicates that the bulbs in the corresponding section have burned out.
Before proceeding directly to the repair, it is recommended to disassemble the cover of the switch, which acts as a control unit, and check the reliability of the connections, especially the contacts soldered to the board.
Chinese garland repair: scheme

If at first glance there are no signs of a breakdown, then it means that it is safe to say that the light bulb has burned out. Modern Chinese garlands are arranged in such a way that all bulbs of the same color are connected in series. And if one of them burns out, the light on the entire electrical branch will go out. To fix the breakdown, you must use the Chinese LED garland circuit.
First you need to cut the garland into two equal parts and ring both sections. Then similar actions should be performed with the non-working side - cut into two halves and check again. Similar actions are carried out until it is possible to determine which of the bulbs is inoperative. It should be noted that this method is recommended to be used only if the electric Chinese garland, the circuit of which allows you to speed up the process, is not disassembled.
Methods for determining the malfunction
The process of restoring the health of the garland can be accelerated. To do this, you need to take a tester and attach needles to its ends instead of probes. Then, sequentially, with their help, punch through each of the sections of the chain so that the needle passes to the current core. It is necessary to determine where the section resistance differs significantly. In a similar way, you can determine the breakdown and repair it much faster, without making a lot of effort.

As a rule, the old Soviet garlands for the New Year tree are much more convenient in this regard than the Chinese garland. Their schemes are almost similar, but the design is noticeably different. In Soviet light bulbs are screwed into cartridges. Therefore, it is possible to determine which of them is in working condition, without a soldering iron and an ohmmeter, only by elimination. This method consists in taking a working light source and screwing it into the cartridges one by one. Another way with the help of a tester is that it is necessary to measure the resistance of each individual lamp until you can find a burnt one.
Before trying to fix the garland, it is recommended to check the integrity of the common wire. For accuracy, you can refer to the scheme of the Chinese garland. On one side of the board, you can see 5 soldered wires, 4 of which are for glowing colors, and one is common. And if the common wire breaks, then it must be soldered.
What to do if the light does not turn on at all?
If, after studying the scheme of the Chinese Christmas tree garland, it was not possible to find the cause of its breakdown, it is recommended to make sure that it is not the LEDs. In this case, check the control unit and power cord. First you need to make sure that the cord is intact, since there is a possibility that it was interrupted, or there was a break in the contact connections at the connection to the microcircuit. Then you need to try to check the reliability of the soldering of the contact connections to the board. Of course, in order not to suffer, you can purchase a new garland, however, if you want to fix the device, then you should act.

So, the control unit can be replaced with a starter from a 220 volt fluorescent lamp. First, it is recommended to check the connection of the LEDs. If the extreme elements of the groups are connected by anodes to each other, then it will be necessary to redo the circuit and connect the LEDs with cathodes. The point is that the voltage to the anode to normalize the operation of the starter must be supplied through a 5-watt resistor, while the resistance is 15-20 kOhm. In addition, additional diodes will need to be included in the circuit, which will pass the reverse current of the network through itself. In this way, the LED Chinese garland is repaired at home.
As you can see, you will have to spend a lot of time and patience to repair the garland. Therefore, if it is not so expensive, it is recommended to simply replace it with a new, better one. It is important to note that if it was the LED that burned out, after which the operation of the entire section was disrupted, then the serviceable element should be soldered, strictly observing the polarity.
Broken light bulbs
If the light bulbs are broken and there is a desire to repair the device, then it is advisable to simply replace the damaged light source. It should be noted that the replacement is carried out only with the power turned off to avoid electric shock. In such situations, you should pay tribute to unbreakable light bulbs, since you do not always have to deal with malfunctions.

So, if it turns out that the garland does not work, then you should try visually and with the help of a tester to determine the problem area and cut it out. After that, the working sections must be connected using special connectors. On this repair can be considered completed.
Finally
As a rule, breaking a garland before the New Year is not always pleasant, but it is quite possible to repair the old one or purchase a new one. It is important to remember that for repairs you need to have special knowledge, for example, work with the board and change light bulbs. Therefore, in order not to lose nerves and time, it is recommended to buy a new New Year's garland.
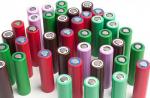
The New Year is coming - and Christmas tree decorations and garlands come out of the boxes. And if the toy is simply hung on the place chosen for it, then there are various accidents with garlands. This is especially true for cheap options. Everyone who has ever repaired this miracle of technology knows that the Chinese garland, the scheme of which is simple, has some features.
Features of a garland from China
Most often, the New Year decoration of Chinese masters attracts with a pleasant price (from 150 rubles apiece) and bright lights that flash in several modes. Four types of light bulbs, and sometimes LEDs, are pleasing to the eye and wallet. True, after a while one or several colors stop burning at once. There may be several reasons, but the fact remains - the garland no longer works at 100%.
If the product has deteriorated, it is not necessary to change it for a new one. Although it is customary to enter the New Year in everything new, our hands are not created for boredom. Is it hard to change a burned out light bulb? The point here is not the price and not the time spent on repairs. It's a matter of principle. And every person who first decides to repair a Chinese garland begins to be surprised.
misunderstandings
The most unpleasant surprise during the repair is thin strands of wires. You begin to wonder how it all works and still has not crumbled. It becomes clear both the price of the product and the reliability of operation. This is the Chinese garland. Scheme, repair and search for gaps - this is your further fate. The wiring connection, of course, is the weakest point. Therefore, the search for a gap should begin with a switching box.

In addition to surprisingly thin wiring, the Chinese product can please with a quick failure of the thyristors that control the color lines, as well as the main controller. To replace faulty elements, most often you have to look for domestic analogues or redo the entire circuit.
Types of faults
Consider some of the possible cases when a Chinese garland scheme is not needed. From the course of electrical engineering, only 2 problems associated with electrical malfunctions are known: a short circuit and an open circuit. In the case of a non-working garland, you need to look for a gap. Let's say the blue color is off. 2 options are possible:
- somewhere the wire connecting the blue bulbs broke;
- one of the blue elements burned out.
Now you should find a gap or a burned out light bulb. As a rule, a visual inspection will help us with this. Most often, the gap is visible to the naked eye, and the repair quickly ends there. To connect the two ends of the wire, you do not even need to have a soldering iron on hand - the simplest twist helps. must be wrapped with electrical tape.

Attention! Any repair of an electrical product is carried out without connecting to the network.
If the gap is not visible, you should pay attention to the box with the button. The Chinese garland, the scheme of which does not differ from the standard one, has a control unit in a flat box. By unscrewing 2 or more screws, you can see a small printed circuit board with several elements. 2 wires from the plug are suitable for it: phase and zero, as well as 4 wires with bulbs of four different colors. Breaks most often occur at the junction of the conductors of the wiring.
A number of malfunctions are associated with a malfunction. Here, the mode switch button itself may fail. Such a problem is "treated" by cleaning the contacts or a complete replacement. The Chinese garland, the scheme of which is standard, necessarily includes a controller. It can also deteriorate and can be replaced too. The weak link can be any of the 4 thyristors - one for each color.
Item replacement problem
To replace faulty elements, Chinese colleagues offer their own. The whole problem is that the lamps become obsolete quickly enough, and it can be problematic to find the right version of Chinese production. In this case, the domestic element base comes to the rescue. The most important thing is to choose the right analogue.

To select an analogue of the desired element, it is important to know the parameters of the Chinese product. Often on the forums they look for the PCR406J transistor. The Chinese garland, the scheme of which is made on such elements, is familiar. Only the desired element actually turns out to be a thyristor, and its Russian counterpart MCR100 is almost identical in parameters.
Looking to break the chain
What to do if no breaks are found? The scheme of the Chinese garland is simple. All bulbs are connected in series. So, if the blue line is off, you need to find at least one burned out line. There are two options.
- Check successively all the elements in the chain.
- Search for a faulty light bulb by dividing the line in half. Having found a half that does not pass current, you need to divide it in half again. And so on until a problem is found. After replacing the lamp, all pieces must be reassembled. It is better to do this with a soldering iron, but you can get by with twisting or electrical tape.

The second method can be omitted if you use a multimeter with thin needles attached to the ends of the probes. However, the veins of the conductors used in Chinese products are so thin that they can be torn even with a needle.
It happens that there is no second damaged garland and a new light bulb at hand. In this case, you can simply connect the two ends together. This is fraught with an increase in voltage on the remaining bulbs, since, according to the laws of electrical engineering, in a series circuit, the voltage is divided equally. But if you remove one or two elements, this will not greatly affect the service life. Despite the fact that the Chinese, everything works on general principles.
LED garlands
Such products have become widespread in recent years. In this regard, low-power elements appeared on the garlands instead of light bulbs. The Chinese scheme differs little from the standard one. But, given the fact that the LED is designed for a much lower voltage, each of them will have a resistor in the circuit for a 220 V network. In another option, a step-down transformer will be implemented at the input of the system.

In addition to the usual scheme, where the elements are arranged in series, there is a scheme of a Chinese garland on LEDs placed in parallel. With this option, even the burnout of several light elements at once will not introduce dissonance into the overall picture.
Advantages of LED products
The Chinese garland, the circuit of which is built on LEDs, has a number of advantages.
- Profitability. This is due to the low power consumption of LEDs. The following two advantages immediately follow from this.
- Durability. The service life of LED products is two or more times longer than the service life of incandescent lamps.
- Safety. LEDs, unlike incandescent lamps, can heat up to a maximum of 60 degrees. Therefore, they are less flammable than their counterparts.
- Brightness. Garlands on LEDs are brighter and more pleasing to the eye.
- Frost resistance. LED products can withstand temperatures down to 40 degrees below zero without a change in performance.
- Moisture resistance. Such garlands can be used to decorate bathrooms and wet greenhouses.

LED Chinese garlands are very convenient to use to decorate the outdoor part of the house. Due to the high moisture and frost resistance, such products will please the eye for a long time without repair.
Conclusion
Buying such a product, it is not always possible to please yourself and loved ones with a quality decoration. Sometimes a rather simple and cheap Chinese garland is hidden behind bright lights and attractive prices. Its scheme will be easy to learn and convenient for the application of electrical skills. Repair of the product can also bring moral satisfaction. Everyone decides for himself whether it is worth the time and effort. Or maybe it's better to immediately take the more expensive option? After all, even Chinese garlands for a high price are much better than their cheap "compatriots". The choice is yours!
It often happens that a garland that has lain all year in the closet stops working. Many find a way out in buying a new garland. However, if you wish and have minimal knowledge, you can repair the LED garland with your own hands.
Components of an LED garland
Outwardly, a garland based on LEDs is similar to an old type device: the same wires, light bulbs, control unit. However, the technical essence of the system lies in the control unit. It is a small plastic box, which displays the various options for the operation of the backlight. To change the lighting mode, just press the corresponding button. Blocks of various designs are produced, including those with a high level of protection against moisture and dust (protection class - IP44).

To see the inside of the unit, you need to remove the protective cover. To do this, use a thin screwdriver or a knife to pry off the cover. On some models, the lid is snap-on, so no special tool is needed. Inside the block there are conductors soldered to the board. The thickest wire is usually the mains wire (it supplies voltage).
The board contains the following components:
- controller for creating lighting effects;
- thyristors (one for each channel);
- resistors;
- capacitor;
- diode bridges.
The number of board components is determined by the number of garland channels. The most expensive modifications are equipped with fuses.
Garland scheme
The operation diagram of the LED garland is shown below. Mains voltage is supplied to the supply controller, passing through resistors and a diode bridge. The voltage enters the controller in a rectified and smoothed state (thanks to the capacitor).

Voltage passes through the button, open in the normal position. If the button is closed, the controller modes are changed. As for the controller, this component is responsible for controlling the thyristors. The number of thyristors is determined by the number of channels in the lighting system.
After passing through the thyristors, the output power is sent to the light diodes in the garland. The number of outputs directly affects the variety of colors produced by the lighting device. If there is only a pair of outputs, then the simplest scheme is implemented, in which one half of the bulbs fades out, and the other lights up.
Two diode lines are connected to two channels in series. The connection is made at the last point - the light diode.
Note! One of the mains voltage wires is always sent straight (bypassing all circuit components) to the end diode of the garland.
Causes of failure
There are many reasons that can cause a garland to malfunction:
- insufficient contact on the conductors;
- a failed light diode in one of the lamps;
- failure of a capacitor or thyristor;
- burnt controller chip.
The microcircuit on the board does not burn often. Among all the reasons, burnt microcircuits are found in about every tenth case.

Problems and Solutions
Below are the most common breakdowns. Repairing the garland is really do-it-yourself: this will require care and accuracy.
Poor solder quality
Poor soldering of the supply and outgoing conductors is the most common cause of backlight failure. In some cases, the contact is held solely on hot-melt adhesive, so its performance is out of the question. It is enough to lightly touch the conductor, and the contact is completely broken.
Especially often low-quality connections are found in Chinese-made garlands. Also, manufacturers from China, in order to save money, often use too thin wires that easily break at the junction with the board.
Advice! To avoid tearing off the contacts, the soldering points must be filled with a layer of hot melt adhesive of sufficient thickness.

Another way to avoid wire problems is to stop stripping the wires with a knife. During such an operation, it is easy to overthinn the wire. It is better to strip the conductor using heat treatment with a lighter fire.
LED damage
To find a faulty diode, turn off the garland from the power supply. We start the test from the last LED in the circuit (a conductor from the power supply goes directly to it). An outgoing wire is attached to the same leg, going further to the next branch of the light channel.
You will need to test the LED between a pair of power wires (input and output). As a test device, we use a multimeter with slightly modified probes. To upgrade the probes, we attach thin needles to their ends with a thread. The tip of the needles should protrude quite a bit - by 5-7 millimeters. Apply a layer of insulating tape on top.

Since all the diodes are connected to the soldering circuit, simply removing them from the lamp (as is the case with a conventional garland) will not work. We pierce the insulating layer of the cores to find copper wires.
We switch the device to the LED ringing mode. We begin to pierce the supply conductors near each diode over and over again.
If the tested garland is not 220 V, but 12 or 24 V, the working LED will light up. If we check the system for 220 V, we pay attention to the indicators of the multimeter. On serviceable parts of the circuit, the indicators will be approximately equal, but the defect will reveal itself as a break.
Chaotic flicker
Another common problem is erratic flickering of light bulbs. Diodes blink for no apparent reason, their brightness changes randomly.
The cause of this malfunction is the improper operation of the electrolytic capacitor. This element is usually deformed - it looks somewhat swollen.
The way out of this situation is to replace the capacitor. Its nominal value is always written on the case.

If the situation does not improve after replacing the capacitor, the problem may be a blown resistor. Visually, such a defect cannot be detected, therefore, in this case, you can not do without a tester. We measure the resistance, not forgetting to know in advance the value for the component. If the result obtained does not correspond to the nominal value, we change the resistor.
No light in one of the areas
If any of the channels is completely out of light, the cause may be one of two factors:
- Breakdown on the thyristor or diode of this channel. To make sure that the cause of the malfunction is correctly determined, we unsolder the channel wire on the board and connect a new channel instead of the old one (which definitely works).
- If the above method did not bring a positive result, the problem is not in the garland, but in one of the elements of the board - a diode or thyristor. Using a multimeter, we check these components and, if necessary, change them to working ones.

dim lighting
There are situations when there is lighting, but one of the channels gives too dim light. At the same time, the controller circuit functions without problems, and when the buttons are pressed, normal mode switching occurs.
Ringing diodes using a multitester also does not work. There is only one possible reason - low-quality wires. If some part of the stranded conductor is torn, the total cross section decreases, which is expressed in the dimness of the light. This is due to the fact that the required amount of voltage is not supplied to the LEDs.
To find the gap, you will need to manually check the entire wire line. You will have to be patient, because the defect in the line is quite possibly located on the last thread to be checked.
When the problem area is found, we disassemble the conductors on the LED, clean them (preferably with a lighter) and re-solder. Next, we apply an insulating layer using heat shrink.
broken lamps
If one or more lamps turned out to be broken and it was decided to fix the garland, it is recommended to simply change one LED for another. Repairing such bulbs is technically impractical.
Note! Diode replacement is carried out only when the power supply is off.

If there is no spare light bulb, we remove the broken light source and connect the wires without his participation.
LED ringing
Finding a burnt wire and other defects is easy with the help of a dial. LEDs are characterized by indicators that determine their working environment. These include voltage and operating current. These parameters vary depending on the type of light diode. The most important parameter is the current strength. These indicators should be taken into account when the LED is ringing independently. If the current and voltage are unknown, it is recommended to use one of two reliable ringing methods:
- using a multimeter;
- using a standard battery.
Note! Before checking the LED bulb, it must be unfastened or unsoldered from the contacts.
The diode is a semiconductor product (that is, it passes electricity in one direction) and is equipped with two contact parts (anode and cathode). Contacts are made in the form of copper legs.
We put the tester in ringing mode. In this position, the current through the LED will be approximately 1 mA. We touch the probes of the multitester to the legs and look at the readings shown on the monitor of the device.
Advice! It will be easier to notice the glow of the LED if the room is darkened.
We make a ringing in two positions - this will allow you to set the position of the cathode and anode of the working light diode. If the device is faulty or does not give enough light, the multimeter will show one.

In the absence of a tester, ringing is performed using a standard 9-volt battery. Since a direct connection of the diode to the battery leads to its breakdown, you will need a step-down device - a resistance resistor. However, since the operation assumes the absence of any auxiliary means, except for a battery, we use a finger moistened with water as a resistor. With the anode we touch the plus of the battery, and put our finger on the minus and bring the cathode to it.
Garlands produced in Soviet times are distinguished by their reliability. Another feature of them is that they can be repaired, while not all Chinese-made products can be repaired. Modern devices and tools allow you to identify a malfunction and carry out repair work.
Necessary set of tools and materials:
- soldering iron;
- screwdriver-indicator;
- insulating material;
- pliers.
The garland uses a serial connection scheme. In other words, if one bulb burns out, the entire system stops functioning.
We check the lamps for integrity. If the light sources are not damaged, check how they are screwed into the cartridges. If necessary, screw the lamp into the cartridge to the end.
Advice! If you need to replace a colored light bulb, but a replacement is not available, it is recommended to paint the light source with zaponlak.

If the actions described above did not give a positive result, we take an indicator screwdriver and look for a contact interruption site in the conductor. A broken contact is not necessarily in the wire, so we also check the cartridge. If the problem is in a broken contact, we restore its functionality using a soldering iron. If necessary, connect the conductors directly.
Alteration of the Chinese garland
Most consumers have a not very good opinion about Chinese products. Garlands also do not stand out against the general background of goods from China: poor-quality connections, too thin conductors, cheap construction materials. As a result, such garlands (including their control units) often fail.
Failure of any of the elements of the circuit can affect the functioning of the garland. For example, a non-working capacitor causes the bulbs to flicker. Breakdown of the thyristor entails the shutdown of one of the channels. A blown diode, a failed diode bridge lead to the complete inoperability of the system.
Advice! If you need to change the flicker frequency, it is recommended to add a 0.5-2 uF capacitor to the circuit.
Damaged parts must be replaced with new ones. In the absence of sufficient knowledge in the field of electrical engineering or unwillingness to mess with repairs, an extremely simple but effective scheme is recommended. We connect the garland directly with a plug, and we build a starter from a fluorescent lamp into one of the cable conductors. However, this scheme is effective only for conventional light bulbs. As for the LED garland, its performance in this case will be restored, but the light will become dimmer.
New Year holidays come as always unexpectedly and bring with them a lot of pleasant troubles. It's time to think about gifts, first of all for children, for adults, set the table, pick up good music and be sure to put up a Christmas tree to dress up so that the guests have fun and feel comfortable. And the first thing to be hung on the Christmas tree is, of course, Christmas tree garlands. All other toys, as a rule, are hung after the garlands. Next, we will talk about the device of a variety of very different New Year's garlands - old and modern.
In ancient times, when there was no electricity, and the New Year was already celebrated, special New Year's candles were lit on the Christmas tree. This decoration was very flammable. But these times have already passed, everyone began to use electric garlands.
These were ordinary small bulbs from a pocket torch or from the illumination of a scale in a radio receiver, connected in series. From such light bulbs, garlands were made by enthusiasts mainly with their own hands. They just picked up a soldering iron, who, of course, knew how to use it, took the wire and light bulbs, and after a while the New Year's garland was already hanging on the Christmas tree.
A little later, New Year's garlands began to be produced industrially. Small-sized lamp sockets and colored lampshades of various shapes were used in various designs. Sometimes the plafonds were made transparent, and the lamps themselves were painted.

Flashers and blinkers
But calmly looking at the luminous New Year's garland is somehow sad, I want the soul to turn around. Apparently, this is facilitated by some flashing of the garland. In general, a flashing garland attracts with its beauty, and even with the expectation of some kind of miracle or surprise. If there are several garlands, then it is possible to get various lighting effects, for example, a running fire, a running shadow, running twos and threes, as well as many other interesting effects.
Once such designs were developed by radio amateurs, these schemes were published in amateur radio magazines, as a rule, in the November issues. But these magazines, under the conditions of socialist mismanagement, arrived late by almost a whole month, so by the New Year it was possible to make only last year's flashing light.
Microcircuits with a low degree of integration, primarily K155 and K561 and their varieties, were used as the element base. As an example, we can cite a diagram from the Radio magazine No. 11, 2002.
The basis of the circuit is a DD2 counter of the K561IE16 type, which controls four LED garlands through the keys on the DD3 chip and transistors VT4 ... VT7. The most interesting thing is that the UMS8-01 musical synthesizer chip is used as a master oscillator. Such microcircuits were once used for voicing children's toys and musical calls: they simply played the melodies recorded in them.
So in this circuit, the output sound signal is also used to clock the counter. One can only guess how the pictures generated by the LEDs will look against the background of this sound. Naturally, the music also sounds through the speaker.
In the magazine "Radio" No. 11 of 1995, a scheme was published under the name "Automatic device for smooth control of a garland" by A. Chumakov. The circuit provides alternately smooth ignition and extinguishing of the garland at a speed set by the control unit. The device diagram is shown in Figure 1.

Figure 1. Scheme of the automaton for smooth control of the garland
If you look closely, the circuit is a triac power controller, made on a two-base transistor KT117A. Only the charge rate of the capacitor does not change manually using a variable resistor, but by switching individual resistors using a counter - decoder K561IE8. For comparison, Figure 2 shows a diagram of a phase power controller using a two-base transistor KT117.
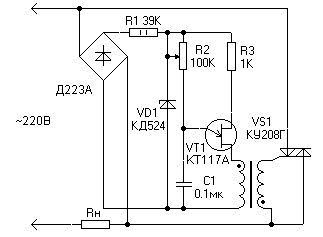
Figure 2.
Microcontroller control of the Christmas garland
As designs on microcontrollers appeared in amateur radio creativity, Christmas lights, or as they are respectfully called “automatic lighting effects”, also began to be developed. The most exotic design was published in Radio magazine No. 11, 2012, p. Christmas tree garland”, author A. Pakhomov.
The design was based on a board from a faulty Chinese garland. The author writes that he was attracted by the originality of the output stage, controlled directly from the MK. He recalls those flashers that were built on the K155 series microcircuits, powerful KU202 thyristors (there were simply no others), and in general, a Christmas tree could be put on such a flasher.
And here it was enough to change the controller on the faulty board, write a program with lighting effects and supplement it with some kind of control panel. This remote control was an old Siemens C60 phone that was lying around idle. The microcontroller AT89C51 was used as a manager. What came out of this is shown in Figure 3.

Figure 3. Scheme of microcontroller control of the New Year's garland (click on picture to enlarge)
Although this controller is already outdated and out of production, it is one of the best developments of Intel, later manufactured by Atmel. The constructs on this MK never freeze, they do not require a watchdog timer. The command system is so good that it still remains unchanged, despite the appearance of new models of the MSC-51 family.
Simple LED flasher
A little higher than the article by A. Pakhomov in the same magazine “Radio” No. 11, 2012, an article by I. Nechaev “From the details of CFL. LED flasher for a New Year's toy. The circuit is made on a three-color LED and three DB-3 symmetrical dinistors "extracted" from faulty boards.

Figure 4. Scheme of a simple LED Christmas garland
Each channel of the three-color LED is controlled by its own relaxation oscillator, assembled on the DB-3. Consider the operation of the circuit using the example of one channel, for example red.
The capacitor C1 through the resistor R3 is charged from the rectifier R1, VD1 to the breakdown voltage of the dinistor VS1 (32V). As soon as the dinistor opens, the capacitor C1 is discharged through the red element of the three-color LED, the resistor R4, and the dinistor VS1. Then the cycle repeats.
The red, green and blue elements of a three-color LED have their own generators and work independently of each other. At the same time, the frequency of each generator is different from the other, so flashes occur with a different period. The design is placed in a transparent case and can be used, for example, as a Christmas tree top. If you add a white LED HL2 to the circuit, then colored flashes will occur on a white background.
Many more descriptions of the designs of domestic radio amateurs, old or new, good or bad, could be given, but all of them were made almost in single copies. Modern stores are completely littered with electronics made in China. Even New Year's garlands and those Chinese ones, besides, they are now worth nothing. Let's see what's hidden inside.
Chinese New Year Garland Controller
Outwardly, everything looks very simple. A small plastic box with one button, which includes a power cord with a plug, and four garlands come out. When plugged into the socket, the garlands immediately begin to alternately show all the lighting effects. There are 8 of these effects in total, as indicated by the inscriptions under the button. By pressing a button, you can simply immediately switch to the desired light pattern.
If you open the box, then everything inside is also quite simple, as shown in Figure 5.

Figure 5
Here you can see all the details. The microcontroller, as always, is made in the form of a drop of black compound, next to it is a control button, a single diode and three output thyristors.
There is a place on the board for the fourth thyristor, and if you solder it, you get one more additional channel. In the controller, this channel, as a rule, is also flashed. It's just that our Chinese friends saved on one thyristor. Those who have ever opened such control units assure that in some boxes only two thyristors are soldered. The economy must be economical! Our, still Soviet slogan.
Despite such a small size, PCR406 thyristors have a reverse voltage of 400V, and a forward current of 0.8A. If we assume that the load consumes only 25% of the maximum current, then at a voltage of 220V it is possible to switch the power 220 * 0.2 = 44 (W).
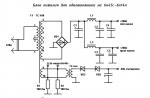
Figure 6 shows a printed wiring, according to which you can draw a circuit diagram, which has been done repeatedly. Here you can see the holes for the fourth thyristor, just the one that was saved.

Figure 6
The savings also affected the diode bridge: instead of four diodes, only one is used on this board. And everything else corresponds to the scheme shown in Figure 7.

Figure 7
The mains voltage is rectified by the diode bridge VD1 ... VD4 and is fed through the quenching resistor R1 to the 10th output of the microcontroller. To smooth out the ripple of the rectified voltage, an electrolytic capacitor C1 is also connected here. The current consumption of the microcontroller is quite insignificant, so in the future, instead of a bridge of four diodes, the Chinese decided to get by with one.
A small note about increasing the reliability of the entire circuit as a whole. If you solder a zener diode with a stabilization voltage of 9 ... 12V in parallel with capacitor C1, then the probability of failure of the microcontroller or simply explosions of thyristors will decrease much.
Deserves special attention resistor R7 connected to pin 1 of the microcontroller directly from the mains wire. This is done to synchronize with the network in order to carry out phase power control. This is exactly what works at the time when the garland lamps smoothly light up or go out.
On the right side of the microcontroller there are thyristor control outputs and a control button, which was described above. The thyristors turn on at the moment when a high level appears at the corresponding output of the MK, then the corresponding garland lights up.
Sometimes New Year's Eve garlands of high power are required, from several hundred watts and above. In this case, the considered circuit can be used as "brains", it is enough just to supplement it with powerful triac switches. How to do this is shown in Figure 8.

Figure 8. Scheme of a New Year's garland of high power (click on the picture to enlarge)
Here you should pay attention to the fact that the MK is powered from a separate source galvanically isolated from the network.
LED garlands
They use the same controller with one button, the same thyristors, but instead of bulbs, garlands are made up of LEDs of three or four colors. Each garland contains at least 20 LEDs with current limiting resistors.
Moreover, the design of such a garland is just a Chinese riddle: in the first half of the garland, a resistor is soldered to each LED, and the remaining ten pieces are simply connected in series. Again, saving ten resistors at once.
Such a design can, apparently, be explained by production technology. For example, the first half is assembled on one line, which is with resistors, and on the other line without resistors. Then it remains only to connect the two halves into one whole. But this is just a guess.
It remains to be hoped that everything is in order with you, at least with New Year's garlands. Therefore, decorate the Christmas tree, set the festive table, invite guests, celebrate the New Year. Happy New Year, comrades, friends, gentlemen! This is how you like it.
I admit, I did not plan to write a full review.
Well, I once bought these LEDs, "in reserve". Well .., LEDs ... why write about them? Only a year ago, in one of the comments, he mentioned them, and considered the topic closed.
But literally today at work, an employee, looking at the soldering iron in my hands and the code for the arduino on the screen, complained that there are fathers in the world (they are the majority) who “does not cut” further than a designer with a battery and a light bulb at a labor lesson in electronics . But, for example, "cuts" in something else. But to do something with your own hands, and even on the weekend with your son, would be quite nice. And in fact: this raises the prestige of the father in the eyes of the whole family, it certainly contributes to education, and, most importantly, this is how the foundations of creativity are laid in the emerging personality.
This conversation was the impetus for writing the review. And the theme is obvious: since ancient times in Soviet magazines, starting with "Young Technician" and ending with "Radio", it was in November that homemade products dedicated to the New Year were printed. There is time to think, do and have time for the holiday.
Why is our resource worse?
In today's review, we will build a beautiful iridescent New Year's garland. With my own hands. Without any "arduino", "scripts", "controllers", "datasheets" and other incomprehensibility. I will even try to avoid the words "anode" and "cathode".
Everything will be amateurish, simple and “on the fingers”. Experienced specialists, for sure, will be bored, primitive, "kindergarten" and not interested. Somewhere even funny.
Here he is, the hero of the review: 
The LED is unusual. It doesn't have a single glow color.
It shines like this: it smoothly (chameleon) changes seven colors in a circle: red, through orange and yellow to green, through blue to blue and purple, etc. Each color lasts a second and a half and is smoothly replaced by the next.
The colors are very rich and bright. Even adults are pleased, what can we say about children.
To understand the size, next to the ruble coin: 
The LED itself has the shape of a ribbed "rocket", which, in the presence of children's imagination, is also important.
Since the experts still went under the cut, then here
a few technical details, the rest you can not read
LEDs come sealed in a metallized antistatic bag: 
Label attached by the seller. I suspect that the handwriting is also his. 
Dimensions: L = 13mm, Ø 5mm. 

I measured the current consumption at a voltage of 3.3V.
It fluctuates (depending on the included crystals) within 9-14 mA.
The seller writes 20mA, but I think this is the limit.
I consider the nominal voltage to be 3.2 - 3.4 volts, 5v - the maximum maximum indicated by the seller.
What do we need to know about this LED.
It will operate on any 3 volt source (lithium coin cell battery or a pair of AA/Mini batteries). 
No diagrams or additional details. Only the battery and these diodes. Everything.
In any watch repair shop, you can say: “Give me a 2032 or 2025 battery,” or even like this: “A coin cell battery for the motherboard.”
Connecting is very easy.
The LED has two outputs. And one is longer than the other. The long output is connected to the "plus" of the source, the short one - to the "minus". For a tablet battery, everything is the same - a larger shirt is a plus, a patch-contact is a minus.
If you take several such diodes at once and connect them to a battery, then they, out of sync, will gradually diverge in time; you get a kind of multi-colored rainbow-plasma-placer. You can make lamps, nightlights, well, or something like that with a child; embed where appropriate. This is where creativity and imagination come into play. You can, say, glue figures from thin paper and highlight them (from the inside or outside). Insert into some toys, etc.
In principle, this could be an intermediate point. I told about LEDs how to power them - explained.
But we are building a New Year's garland.
So, let's move on to the second part of the review.
It's time to get out the soldering iron and stock up on other auxiliary materials. I really hope that the word "soldering iron" will not scare away novice designers too much. Perhaps someone in the comments will offer some elegant solution on how to do without soldering. Apart from the Vago terminal blocks, nothing comes to my mind, but it is cumbersome, ugly for a garland and unreliable for a device that will constantly be unwound / pulled out / removed. Therefore, I do not see alternatives to soldering for this case.
But soldering is not so scary. Plus extra experience.
In addition to the soldering iron itself, we will need
- Heat shrink tubing of two diameters (I assume that Ø 2mm and Ø 3mm). You can do without heat shrinkage, replacing it with electrical tape, but it will not be so artistic and convenient.
- Non-cleaning vaseline flux (which will be much more convenient for a beginner). Or rosin, it's more affordable.
- Solder.
- The wires themselves, from which we will make a garland.
I propose to extract the wires from a piece of a “twisted pair” computer cable, preferably with stranded conductors (such cables are softer, as a rule, they are industrially made). I think you can ask a sysadmin friend at work for a couple of meters of "twisted pair" or buy it at the nearest construction market.
The beauty of this solution is that there are guaranteed green and brown conductors, which is very good for a Christmas tree garland - it will be less noticeable. We will not need the remaining six conductors from the gutted pair in this design. It can only be made from a green conductor, but a beginner will have a chance to get confused in the "pluses" and "minuses" of the LEDs in the garland; In my opinion, green and brown - just right. 
It makes sense to pre-cut the wires into segments of the desired length. For myself, I chose an interval of 10-12 cm between adjacent LEDs, although everything is individual.
Each piece of wire is stripped by 3 millimeters from both ends, and, with the help of flux and solder, it is tinned to a brilliant state. I think it is advisable to immediately do this routine work, so that in the process of assembling the garland, this is not distracted. It also makes sense to cut pieces of heat shrink in advance (I will talk about their length a little later). At this preparatory stage can be considered completed. 
The number of LEDs in our garland is determined by the planned length of the garland, patience and desire. Already one and a half to two dozen - it will be beautiful on a small desktop Christmas tree. And fifty diodes will decorate even a one and a half meter forest beauty.
All LEDs are connected in parallel to each other. This means that all long leads of all LEDs must be connected together and connected to a common plus; all short leads are also connected and connected to a common minus.
If you depict it in a diagram, then it is like this: 
With such a connection, damage and burnout of one LED will not lead to a breakdown of the entire garland, everything will work the same way, only without the “dropped out” diode.
Structurally, I propose to assemble the garland like this. We solder one conductor to the LED, isolate it with a heat shrink tube of small diameter. We seat with a lighter or a building hair dryer. Then we solder another conductor, and we isolate everything together with a tube of a larger diameter. We seat the finished connection.
This method will save small diameter tubes (since we isolate only one leg), and make the design neat, since the entire soldering place will be covered by a large tube.
Like this: 
And so, link by link, we collect the whole garland.
Just a few remarks.
Firstly, when soldering the next contact of the LED, obviously, two conductors of the same name will have to be passed into the tube at once - from the previous link and for the current one. So that both wires are crimped at once.
Secondly, the legs of the LEDs will need to be bitten to a length of 6-7 mm and tinned, and it is reasonable to do this not in advance, but immediately before soldering the next diode. In order to see the difference in the length of the legs until the last. Well, or in advance, using a felt-tip pen, set points near the plus legs of the LEDs, then immediately cut and irradiate everything.
Now the length of the tubes has become obvious. Thin ones should be slightly longer than the bitten leg, i.e. about a centimeter. Thick - a little more authentic to cover the entire structure, a centimeter and a half.
Assembly, despite such an abundance of text in the review, is not at all difficult, just routine. But, as you "stuff your hands", the process will accelerate.
An optional, but justified action will be a slight interlacing of the conductors. Twisted conductors do not bulge so much, they look neater and are easier to unwind.
The finished node, upon close and enlarged examination, will look like this: 
During the process of assembling the links, it would be wise to control the process with a three-volt battery to make sure that the polarity of the next soldered LED is not reversed.
It makes sense to make the conductors from the power source to the nearest LED longer.
But how to power our garland - everyone decides for himself.
I offer several options.
Option 1. The best thing I see is a 3.3 volt power adapter. This means that "DC 3.3V" should be written on it. The maximum that can be allowed is 5 volts, but the LEDs will work at their limit. Nine-volt, twelve-volt, etc. power supplies are guaranteed to kill the garland.
You can also try to adapt an old charger from an unnecessary phone if DC 5V is written on it. 
The current values indicated on the power adapter (this is what is in amperes or milliamps, mA) are not important for this case, do not bother yourself.
For specialists who are outraged by the last phrase. Others can't read
Even a 100-milliamp PSU will power a dozen diodes. It is unlikely that a charge with a current of less than 200mA will come across, which, taking into account the desynchronization of the glow of the diodes, will allow a garland of any reasonable number of diodes to work comfortably.
When connecting the power adapter, you will have to figure out where it has a “plus” and where it has a “minus”.
We find out the polarity of the power adapter
If you know how to use a tester, voltmeter or multimeter, then you can turn off this spoiler, the issue is resolved.
For those who don't know what I'm talking about here, let's get started.
Most likely, we will have to analyze the power adapter without a connector. Either it was cut off and bitten off before us, or we still need to cut it off, since we still don’t have reciprocal connectors from old Siemens, Nokia, Samsung and Ericsson. We look at the cores of the wire.
If they are colored, then the plus is usually a “warmer” color. For example, in a red-black pair, the minus is likely to be on the black wire; in a red-blue pair, the minus will be more likely blue.
If the wire looks like “thin wire with a braided jacket around it” (this is called “shielded” or even “coaxial”), then the outer layer is a minus, the inner core is a plus.
In any case - take a separate LED and try to instantly connect it at random to the power adapter - there are two options at most, in one position it will light up, in the other it will not.
Option 2. Batteries. A good option for when there is no outlet nearby. Let's say we decorate a Christmas tree in the yard or in the country. It is best to use batteries or accumulators of the AA format ("finger-type"). They need two pieces, connected by a “train” (this is called “in series”) - in the middle, the “plus” of one touches the “minus” of the other. At the edges, remove the "plus" and "minus" to power the garland. There are special boxes for batteries, immediately with contacts. Well, or in a simple way, assemble them with electrical tape, irradiate the contact pads with flux (it is difficult to tin with rosin) and solder the wires.
An important factor is that the power supply of the garland is reduced and decoupled from the mains voltage (whether it be batteries or a good serviceable power adapter) absolutely fire and electrical safety. The voltage on any part of our decorated Christmas tree will not exceed 3-5 volts, which is absolutely safe.
At the end of the review, of course, I will show a one-minute video with the work of the finished garland.
Anyone who has ever filmed LEDs knows that it is almost impossible to correctly convey the color and brightness of an LED using household video recording tools. Believe me, in reality everything looks much more colorful and beautiful. The colors are vibrant. There is no light near the LEDs themselves, this is a lack of shooting. The flickering in the video during the change of colors of each LED is a stroboscopic effect from shooting PWM, in reality it is not there either.
I suspect that a lot of 250 pieces will seem redundant for most. I just provided a link from which I bought it myself. This does not mean that you need to buy this particular lot from this particular seller. Surely there will be offers of this product in smaller batches.
Everything in this review I bought myself at different times; no one provided anything for the review and did not set any conditions.
I plan to buy +80 Add to favorites Liked the review +100 +180