Hello dear friends! Today we will talk about disabling Skype updates. Why disable it, you may ask me. The fact is that sometimes Skype releases new versions, and they are a little buggy, but sometimes they are serious. For example, after the next update.
Usually, to get rid of glitches, you have to download more old version and disable automatic Skype updates. How it turns off, we'll figure it out now.
Before getting down to business, nevertheless, make sure that the version of Skype you have installed is normal, and you will not update it in the near future.
Disabling updates in the program settings
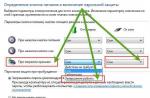
Run the program and click on the "Tools" button in the top menu. From the drop-down list, select the item "Settings ...".
In the opened settings in the left menu, select the "Advanced" item, then "Automatic update":

We look to the right side of the window and click on the "Turn off automatic update»

In principle, everything could have been left that way, but a window will constantly pop up with a proposal to update to latest version... If that's okay, then finish with practice. If annoying, let's try further to make sure that the window does not bother.
Finishing the Skype process
Right-click on the toolbar and select the "Start Task Manager" item from the drop-down menu.

We finish the process Skype.exe. To do this, in the processes tab, right-click on it:

Delete the SkypeSetup.exe file and create a new one
First, turn on the display hidden files and folders. Open any explorer folder. In the top menu, click on "Service" and select "Folder Options" from the drop-down menu:


Now we go along the path C: \ Users \ Username \ AppData \ Local \ Temp. Find SkypeSetup.exe there and delete it. Then we just create a new one. You can just create a regular Text Document in Notepad and call it SkypeSetup.exe.
Add a couple of lines to the hosts file
We find hosts along the path: C: \ Windows \ System32 \ drivers \ etc. We open it with a notepad.
Many Skype users have already noticed that in the latest versions of the program, the option has disappeared to disable automatic Skype updates. However, some do not like this situation for several reasons, including: dissatisfaction with the interface of the latest releases, the lack of necessary functions or the presence of unnecessary ones, errors in the work of new Skype versions requiring large resources and the most latest updates in system.
The easiest way to avoid updating Skype is to use portable version programs. In this case, even if the version of Skype installed on the system is updated, the contents of the Portable Skype folder will remain unaffected.
Another easy way to avoid automatic updates is to use Skype version 4.2.0.187 - the latest version with the ability to configure program update management. If you are using Skype 4.2.0.187, just go to the program settings:
Tools - Options - Advanced
Uncheck the boxes "When a new version of Skype is released ..." - "notify me" and "download automatically", save the settings.
How to disable Skype 5 update
If you want to use one of the earlier versions of Skype 5 or the previous recipes do not suit you or did not help you, you will have to follow more complex instructions:
1. Install the required version of the program. You can download it here.
2. Completely unload the program: right click on the tray icon (about hours) - Exit.
3. We clean the system Temp folder, which contains all the temporary files and, possibly, the latest Skype distribution already downloaded.
The easiest way is to find the temp folder by running the command "% USERPROFILE% \ AppData \ Local \ Temp": press simultaneously Windows key(Start) and R, in the window that opens, enter the command without quotes. Now in the window that opens, safely delete all files.
4. Find the profile folder Skype user... Again, we do this through the command: Win + R, enter% APPDATA% \ Skype in the window, and go to the folder with the name of your Skype login.
5. Open the config.xml file in notepad
6. Now we need to add the value 0 (zero) to the UpdatesMajor directive. We are looking for a line containing "UpdatesMajor" and replace it with
If there is no such line in the file, add the line
A little about UpdatesMajor values
0 - notifications when updates are released and automatic Skype updates are disabled;
1 - you will receive notifications when new versions are released, but the program will ask you to update;
2 - automatic Skype updates enabled.
7. Save the file, launch Skype and live peacefully without updates.
Many Skype users have already noticed that in the latest versions of the program, the option has disappeared to disable automatic Skype updates. However, some do not like this situation for several reasons, including: dissatisfaction with the interface of the latest releases, the lack of necessary functions or the presence of unnecessary ones, errors in the work of new versions of Skype, which require large resources and the latest updates in the system.
The easiest way to avoid Skype updates- use the portable version of the program. In this case, even if the version of Skype installed on the system is updated, the contents of the Portable Skype folder will remain unaffected.
Another easy way to avoid automatic updates is to use Skype version 4.2.0.187 - the latest version with the ability to configure program update management. If you are using Skype 4.2.0.187, just go to the program settings:
Tools - Options - Advanced
uncheck the boxes " When a new version of Skype is released ... " - "notify me" and "download automatically", save the settings.
If you want to use one of the earlier versions of Skype 5 or the previous recipes do not suit you or did not help you, you will have to follow more complex instructions:
1. Install the required version of the program. You can download.
2. Completely unload the program: right click on the tray icon (about hours) - Exit.
3. We clean the system Temp folder, which contains all temporary files and, possibly, the latest Skype distribution already downloaded.
The easiest way to find the tempo folder is to run the command “ % USERPROFILE% \ AppData \ Local \ Temp«: Press the Windows (Start) key and R at the same time, in the window that opens, enter the command without quotes. Now in the window that opens, safely delete all files.
4. Find the profile folder of the Skype user. Again, we do this through the command: Win + R, in the window we enter % APPDATA% \ Skype, and go to the folder with the name of your Skype username.
5. Open the file in notepad config.xml
6. Now it remains for us to enter the value 0 (zero) into the directive UpdatesMajor... We are looking for a line containing "UpdatesMajor" and replace it with
If there is no such line in the file, add the line
A little about UpdatesMajor values
0 - notifications when updates are released and automatic Skype updates are disabled;
1 - you will receive notifications when new versions are released, but the program will ask you to update;
2 - automatic Skype updates enabled.
Skype's automatic update keeps you always up to date with the latest version of the program. It is believed that only the latest version has the widest functionality, and is maximally protected from external threats due to the absence of identified vulnerabilities. But, sometimes it happens that the updated program, for some reason, is poorly compatible with your system configuration, and therefore it constantly lags. In addition, for some users it is critically important to have certain features that were used in older versions, but which then the developers decided to abandon. In this case, it is important not only to install an earlier version of Skype, but also to disable the update in it, so that the program does not automatically update itself. Let's find out how to do it.
Disable automatic updates
Turning off automatic updates in Skype isn't too much of a problem. To do this, go to the menu items "Tools" and "Settings".


Click on the name of the "Automatic update" subsection.

This subsection has only one button. When Automatic Updates is enabled, it is called Turn Off Automatic Updates. Click on it to refuse to download updates in automatic mode.

After that, Skype auto-update will be disabled.
Disable update notifications
But, if you turn off automatic updating, then every time you start an un-updated program, an annoying pop-up window will pop up informing you about the availability of a newer version and prompting you to install it. Moreover, the installation file of the new version, as before, continues to be downloaded to the computer in the Temp folder, but is simply not installed.
If there was a need to upgrade to newest version, we would just turn on auto-update. But the annoying message, and downloading the installation files from the Internet, which we are not going to install, in this case, are definitely not needed. Is it possible to get rid of this? It turns out that you can, but it will be somewhat more difficult than disabling auto-update.
First of all, log out of Skype completely. You can do this using the Task Manager, "killing" the corresponding process.

Then you need to disable the "Skype Updater" service. To do this, through the Start menu, go to the Windows Control Panel.


Then, we move to the "Administration" subsection.

We open the item "Services".

A window opens listing the various services running on the system. We find among them the Skype Updater service, right-click on it, and in the menu that appears, we stop the selection on the "Stop" item.


Are looking for hosts file, open it, and leave the following entry in it:
127.0.0.1 download.skype.com 127.0.0.1 apps.skype.com

After making an entry, be sure to save the file by typing Ctrl + S on the keyboard.
Thus, we blocked the connection to the download.skype.com and apps.skype.com addresses, from where the uncontrolled downloading of new versions of Skype occurs. But, you need to remember that if you decide to download the updated Skype manually from the official website through a browser, you cannot do this until you delete the entries in the hosts file.
Now we just need to delete the Skype installation file that has already been loaded into the system. To do this, open the Run window by typing the Win + R key combination on the keyboard. Enter the value "% temp%" into the window that appears, and click on the "OK" button.

A folder of temporary files called Temp opens in front of us. We look for the SkypeSetup.exe file in it, and delete it.

Thus, we have disabled Skype update notifications and hidden download of the updated version of the program.
As you can see, despite the fact that it is quite easy to disable automatic updates in Skype, after that you will be bored with constant reminders to update the application. Also, the update will still download in background, although it won't install. But, with the help of a few manipulations, you can still get rid of these unpleasant moments.