Greetings, reader of my blog. I haven't written articles for a long time. Many life changes ... Today's article will be devoted to syslog, or rather rsyslog, which is actively implemented instead of the old syslogd (aka sysklogd) in the latest distributions (for example, etc.). I gave a basic description of the functionality in the corresponding article. Therefore, before reading the following, I highly advise you to read. At the moment, the task for me is collect syslog system logs from network equipment in the amount of ~ 100 hosts with a subsequent increase in their number. I will try to implement this functionality in this article, having previously described and. The whole thing will be described on the basis of Debian 6, in other distributions, with experience, with a minimum of file movements, I think that it will also not be difficult to set up. So, let's begin...
Introduction to rsyslog
As I already said, rsyslog became the default package on most Linux distributions (probably all). Rsyslog totally coincides syslog protocol, described in, and also contains some additional features. Such as TCP transport, filtering and sorting messages, storing messages in a DBMS, encryption, and many others. In the article I will try to consider the description, description rsyslogd daemon control and .
Installing rsyslogd
Installing rsyslog (if it isn't installed by default for some reason) boils down to one command:
Aptitude install rsyslog # red hat possible yum install rsyslog
Configuration Directives
Configuration directives are sometimes called global directives, they specify general parameters of the rsyslogd daemon... The directive has the format $ Directive parameter
############################ #### GLOBAL DIRECTIVES #### ############# ############## # Specifies the use of the classic timestamp format (Mes DD HH: MM: SS). # To enable unix-format timestamps, you need to comment out the line. $ ActionFileDefaultTemplate RSYSLOG_TraditionalFileFormat # # Sets the default for log files. $ FileOwner root $ FileGroup adm $ FileCreateMode 0640 $ DirCreateMode 0755 $ Umask 0022 # # Sets the location of spool and static files (for storing files such as message queues) $ WorkDirectory / var / spool / rsyslog # # Includes all configs in *. conf from the /etc/rsyslog.d/ $ IncludeConfig /etc/rsyslog.d/*.conf directoryThe most complete list of global directives is available.
Rsyslog Templates
Very important and key a feature of rsyslogd is the ability to use templates. Template allows you to: 1. set the format of the output information, 2. use dynamic names of log files based on some rule. Actually, all output messages to rsyslogd are pattern-based. Here the corresponding question may arise - how is the output formed if you do not specify any templates in rsyslog.conf(after all, no templates are specified by default)? It's simple. There are some templates (taken from the compatible ones and statically written into the rsyslog sources). Confirmation of this case can be found in the syslogd.c source file by searching for "template_" (stumble upon / * hardcoded standard templates (used for defaults) * /). Templates must be specified before use in the rules.
Template syntax
In general, the structure of a template can be represented in the following syntax:
$ template template_name, template_description[, options (optional)]Let's take a look at each point. $ template- indicates that the description of the template will follow. template_name- an arbitrary value that clearly describes what kind of template is and what for (the name will be used to refer to the template). options- can take on the value sql and sqlstd, this forces you to format the final result of the template execution in a form suitable for MySQL or standard SQL, respectively (in fact, it replaces some special characters in the syslog message in a format supported by the SQL server). Options apply only to templates for sql output.
template_description is enclosed in quotation marks. In templates in quotes, any text is taken literally (as is), except for the text that is enclosed in percent signs ( %text%). Such text is a variable and allows you to "access" the internal content of the incoming message and thereby achieve all sorts of fun modification features). Also, in quotes can be used so-called. escape sequences in the form of a backslash and some character after the line (for example, \ n - newline, \ 7 - ...).
Using Variables in rsyslog Templates
Let's rake through the structure of the values specified in% percent%.
% proper_name [: line start: line end: options [: fieldname]]%proper_name(it is property_name, it is variable_name) - sets the name of the property (a property in this context can be considered as some property \ field of a syslog message passing through the daemon), here are some of the most used with rsyslog properties:
- msg- message body
- hostname- hostname \ ip from message
- fromhost- the name of the host from which the message came
- fromhost-ip- address of the host from which the messages came (127.0.0.1 for local messages)
- syslogtag- the name and number of the process ("rsyslogd:") that issued the message (extracted from the message)
- programname- the name of the process that issued the message (extracted from the message)
- pri- source and priority, as a number
- pri-text- decoded source and priority ( facility.priority e.g. syslog.emer)
- syslogfacility- only source as a number
- syslogfacility-text- decoded source only ("local0")
- syslogseverity- only priority as a number
- syslogseverity-text- only decoded level ("debug")
- timegenerated- acquisition time (high resolution)
- timereported- time extracted from the message
- inputname- the name of the input module
- $ hour, $ minute- current time
- $ myhostname- processing host name
As you can see, some properties start with a dollar sign - they are considered local / system.
Further - options... Options allow you to modify a variable in the range from a percent sign to a percent sign. You can use several options at the same time, separated by commas. If you specify several contradictory ones (for example, uppercase, lowercase), then the last specified (lowercase) will be applied. Here are some options:
- uppercase- converting to uppercase
- lowercase- convert to lower case
- date-mysql- convert to MySQL date format
- space-cc- replace control characters with spaces
- drop-cc- remove control characters
fieldname- this field is available since version 6.3.9+ and has a very specific character. You can forget her ...
As you can see from the above variable template, values from curly braces are optional, that is, you can simply specify, for example% hostname%. However, if options are to be used, the preceding empty fields must also be specified, for example% hostname ::: lowercase%. Fields are missing between colons start_line and end_line... At the same time, for some reason, fieldname is not specified as empty.
Templates that are hardcoded into rsyslog (but which can be changed with the directive $ ActionFileDefaultTemplate):
RSYSLOG_SyslogProtocol23Format- the format defined in the IETF draft standard ietf-syslog-protocol-23 matches the pattern:
"<%PRI%>1% TIMESTAMP ::: date-rfc3339%% HOSTNAME%% APP-NAME%% PROCID%% MSGID%% STRUCTURED-DATA%% msg% \ n \ "
RSYSLOG_FileFormat- the traditional log format, with the addition of fractions of a second and a zone, follows the pattern:
"% TIMESTAMP ::: date-rfc3339%% HOSTNAME%% syslogtag %% msg ::: sp-if-no-1st-sp %% msg ::: drop-last-lf% \ n \"
RSYSLOG_TraditionalFileFormat- the traditional log format for writing to a file follows the following pattern:
"% TIMESTAMP%% HOSTNAME%% syslogtag %% msg ::: sp-if-no-1st-sp %% msg ::: drop-last-lf% \ n \"
RSYSLOG_ForwardFormat- the traditional log format for transmission with the addition of fractions of a second and a zone, follows the pattern:
"<%PRI%>% TIMESTAMP ::: date-rfc3339%% HOSTNAME%% syslogtag: 1: 32 %% msg ::: sp-if-no-1st-sp %% msg% \ "
RSYSLOG_TraditionalForwardFormat- traditional log format for transferring to a remote server
"<%PRI%>% TIMESTAMP%% HOSTNAME%% syslogtag: 1: 32 %% msg ::: sp-if-no-1st-sp %% msg% \ "
Rsyslog sorting rules (rule line)
Each line of sorting rules has a classic format, as in a regular syslog. To understand what and how, you need to read the article. In short: the rule consists of selector and actions separated by space or tab. Selector in turn consists of source and priority... Each message is checked against the selector from each rule sequentially, if the message selector and the rule match, then the specified action is performed. At the same time, after the first match, processing does not stop. Front action, the message is converted in accordance with the template (the default template specified in the corresponding directive (replacing the default template), the template specified in this action is one of three).
To standard features syslog selectors some additional features have been added (let me remind you that the classic selector is source.priority he is facility.priority). In rsyslog, values can be used as selectors. In rsyslog, applying variables in a selector is called Filters... Above in the article, as well as in the description of the classic approach to filtering based on source.priority(so-called "traditional" severity and facility based selectors). In addition to traditional filtering, there are the following types of filtration: RainerScript-based filters(filtering based on the RainerScript language - actually a regular if - then - else), property-based filters(filtering based on message properties (as in)). Let's take a look at both:
RainerScript-based filters
As I said, RainerScript is a classic if then else based language. In rsyslog, RainerScript supports condition nesting, arithmetic, boolean, and string operations. In general, the syntax is as follows:
if condition then action_block else action blockRespectively, if, then are required operators that define the construction of a condition, else- of necessity. action_block - can contain one action (), or a nested block of conditions. If a block of conditions contains several actions, then it is enclosed in parentheses. condition- contains a condition for selecting messages for an action_block. In a condition, you can use:
- logical expressions(and, or, not), as well as grouping these expressions in the form: not condition0 and (condition1 and condition2).
- variables (properties)- variables are specified as $ variable_name (for example, $ hostname or $ msg)
- comparison operations(== - equal,! = - not equal,> - more,< - меньше, <= - меньше или равно, >= - greater than or equal, (!) contains - (not) contains, (!) startswith - (not) starts with)
- comments / * comments * /(questionable point ... should it be escaped like in bash ???)
Cisco
as53xx231 # conf t Enter configuration commands, one per line. End with CNTL / Z. as53xx231 (config) #logging 10.0.0.1 as53xx231 (config) #exitVMware ESXi
For an old hypervisor:
Add the following to /etc/syslog.conf:
*. * @ 10.0.0.1 # syslog must be enabled in the firewall and saved: esxcfg-firewall -o 514, udp, out, syslog esxcfg-firewall -l # restart syslog service syslog restart
In the latest versions of the hypervisor, everything is done through the guish client. In the hypervisor settings Advansed -> Syslog -> remote specify the address of the rsyslog server.
Storing rsyslog in MySQL DBMS
In Debian, setting up storage in a database is mega simple (almost like in a vendor)). In general, it is sufficient to install the rsyslog-mysql package. At the same time, the installer puts the ommysql.so module in the / usr / lib / rsysloul / spang / directory and starts the setup wizard, which asks for the MySQL administrator password, creates a separate user and asks for a password for it. Creates the corresponding database from the script / usr / share / dbconfig-common / data / rsyslog-mysql / install / mysql. Put the resulting settings in /etc/rsyslog.d/mysql.conf. The config is obtained from 2 lines:
# module connection: $ ModLoad ommysql # send all messages to MySQL (remember above Actions) *. *: ommysql: server_address, database_name, username, password
Rsyslog web interface
As a web interface, we will configure the Loganalizer from adiscon. Installing the web interface is pretty straightforward. It consists in downloading the archive, unpacking it into the web server directory and launching the graphical setup wizard. So, from here (http://loganalyzer.adiscon.com/downloads) download the archive with files (For example: http://download.adiscon.com/loganalyzer/loganalyzer-3.5.6.tar.gz). Before configuration, of course, the Web server and the php5 module must be installed (aptitude install apache2 libapache2-mod-php5). And yes, also php5-gd for displaying reports.
~ # # Download the archive: ~ # wget http://download.adiscon.com/loganalyzer/loganalyzer-3.5.6.tar.gz ~ # # unpack the archive: ~ # tar xf loganalyzer-3.5.6.tar.gz
The directory loganalyzer-3.5.6 appears in the current directory and contains some information worth reading:
~ # ls -l total 12 drwxr-xr-x 3 root root 4096 Sep 20 22:51. drwx ------ 13 root root 4096 Sep 20 23:01 .. drwxrwxr-x 5 root root 4096 Sep 10 17:26 loganalyzer-3.5.6 ~ # ls -l loganalyzer-3.5.6 / total 112 -rw -rw-r-- 1 root root 41186 Sep 10 17:26 ChangeLog drwxrwxr-x 2 root root 4096 Sep 20 23:01 contrib -rw-rw-r-- 1 root root 35497 Sep 10 17:26 COPYING drwxrwxr-x 2 root root 4096 Sep 10 17:34 doc -rw-rw-r-- 1 root root 8449 Sep 10 17:26 INSTALL drwxrwxr-x 14 root root 4096 Sep 10 17:34 src ~ # # from the src directory we need to copy content in / var / www / loganalyzer: ~ # mkdir / var / www / loganalyzer ~ # cp -r loganalyzer-3.5.6 / src / * / var / www / loganalyzer ~ # # next, you need to create an empty config file ~ # # which will be filled in automatically - by the installer ~ # touch /var/www/loganalyzer/config.php ~ # # set write permissions (after installation, these permissions can be removed) ~ # chmod 666 /var/www/loganalyzer/config.php
click here
We see why we gave the rights 666, click Next
Here we select the desired settings. The Enable User Database parameter requires special attention. If you select it, a separate database will be created for storing the settings of the Web interface. Also, the ability to create users and groups will be available. Click next.
There is a small addition - the web server does not have access to regular files in the / var / log / directory. Therefore, the log may not be displayed. To solve this problem, you need to add the www-data user to the adm group:
~ # usermod -G adm www-data
In addition to Loganalyzer, there is also Logzilla, which has the same functionality. It is also worth trying to install it, if you wish.
Some tips and tricks for rsyslog
Sometimes, when rsyslog is a network service for collecting remote logs, storing messages by hostname is inconvenient or unproductive, or something else. To disable resolving of ip addresses in hostnames, you need to add the -x parameter:
~ # cat / etc / default / rsyslog RSYSLOGD_OPTIONS = "- c5 -x"
In order to allow udp packets to pass through, you must use the command:
~ # iptables -A INPUT -p udp -s src_subnet --dport 514 -i interface -j ACCEPT
Some examples of rules with comments:
# if you create a selector like this: if $ fromhost-ip startswith "10.0.1." then / something # you should pay attention to the last dot in the address, # otherwise the rule will include addresses from the subnet 10.0.111.0, 10.0.12.0 and others
For a centralized server for collecting logs from network devices, you can set the facility on the network devices to any value from local0-local7. This will allow you to conveniently sort messages, for example:
# cisco: net-device-cisco # conf t Enter configuration commands, one per line. End with CNTL / Z.<...>net-device-cisco (config) #logging facility local2<...># rsyslog-server local2. * /var/log/remote-cisco.log & ~
Thus, it is possible to conveniently filter local messages from remote ones.
Here is some config that allows you to send mail event notifications (!!! mail server must accept messages without authentication):
$ ModLoad ommail $ ActionMailSMTPServer smtp_address $ ActionMailSMTPPort 25 $ ActionMailFrom sender @ address $ ActionMailTo recipient @ address $ template mail_subject, "On host% hostname%, Error-level by serverity" $ template mail_body, "Facility.Serverity:% syslogfacility%.% syslogpriority% at% timegenerated% on host:% HOSTNAME% \ r \ n% msg% "$ ActionMailSubject mail_subject # time interval (pause between letters) $ ActionExecOnlyOnceEveryInterval 10 # filter and action if not ($ msg contains" something "\ or $ msg contains "something else" \ or $ msg contains "maybe something else") \ and ($ syslogseverity-text == "err" \ or $ syslogseverity-text == "crit" \ or $ syslogseverity-text == "alert" \ or $ syslogseverity-text == "emerg") \ then: ommail:; mail_body
Trableshuting
To diagnose the operation of syslog, it helps a lot, an example of a command for monitoring:
~ # tcpdump -vvv -nn -i interface udp port 514
And, of course, / var / log / syslog itself.
This section provides recommendations for working with programs for collecting logs. This information is required by the technical support service to accurately diagnose the problem at the user's workplace. Instructions for applications are available below.
Collecting https logs using FiddlerCap
Installing FiddlerCap
You need to download and run the application.
In the window that opens, click on the "Install" button. The Destination Folder line will indicate the path to the folder where FiddlerCap will be installed. By default, the Desktop is specified there.
Wait until the end of the installation and click the "Close" button.

Collecting logs with FiddlerCap
Find the FiddlerCap folder in the directory that was selected during the installation step. By default, FiddlerCap is installed on the Desktop. Run the "FiddlerCap.exe" file in the FiddlerCap folder.

In the "Capture Settings" item, set three checkboxes:
- save binary data,
- decrypt HTTPS traffic,
- store cookies and POST forms.

If a warning about installing the certificate appears, click the "Yes" button in it. If necessary, you will be prompted to delete the certificate when saving the logs.

Close all browsers open on the computer. Click on the "Start Capture" button. Open the program, when working with which an error appears (for example, Contour.Extern), and reproduce the error.

After the error is reproduced, you must click on the Stop Capture button in the FiddlerCap window. Logging will end.


Select a folder to save.

The log file will be saved in the selected folder.

When saving the logs, a window will appear asking about removing the certificate from the root store. At the discretion of the user, you can choose any option.

Recording network traffic in Internet Explorer
To record network traffic in Internet Explorer, you need to open the required page in Internet Explorer. In Internet Explorer go to Tools> Developer Tools F12 F12.
If the "Service" menu is not displayed, then press the "Alt" key on the keyboard.


Go to Network tab> Ctrl + 4. Enable collection of network traffic: in Internet Explorer 9, click "Start collection". In Internet Explorer 11, click on the button with a green triangle.

Reproduce the error (for example, refresh the page, or follow the required link). Save the collected log by clicking on the floppy disk image.

V Select the folder to save, enter the file name by pressingbe "Save". The file will be created in xml format. The creation of the log is completed.

Recording network traffic in Mozilla Firefox
To record network traffic in Mozilla Firefox, you need to open the required page in Mozilla Firefox. In IMozilla Firefox go to Tools> Development> Developer Tools (Ctrl + Shift + I)or press the key on the keyboard F12.
Go to the "Network" tab and refresh the page by clicking key on the keyboard F5... Reproduce the bug.

Select any entry from the log - right-click on it and click on "Save all as HAR".

Network traffic recording in Google Chrome
To record network traffic in Google Chrome, you need to open the required page in Google Chrome. In Google Chrome go to Tools> More Tools> Developer Tools (Ctrl + Shift + I)or press the key on the keyboard F12.
Transfer to the Network section and refresh the page by pressing the F5 key on your keyboard... Reproduce the bug.

If logging does not start automatically, click on the “Record Network Log” button.

Select any entry from the log, right-click on it and click on "Save as HAR with content".
Select a folder to save, enter a file name, click on save. The file will be saved in har format.
Installation
It is necessary to jump start and run the application . You should answer affirmatively to the offer to start the installation by clicking on the "Yes" button.

In the window that opens, click on the "Next" button.

In the next window, you must select the switch "I accept the terms in the License Agreement" and click on the "Next" button.

Select the installation type "Typical".

Check the box “Create shortcut for Microsoft Network Monitor on the desktop” and click on the “Install” button.

Click on the "Finish" button to complete the installation.

After the installation is complete, you need to wait until the end of the automatic configuration of the Microsoft Network Monitior 3.4 Parsers component.

Start logging
Close unused software (this is necessary to exclude the saving of the activity of third-party products to the log). Launch the program using a shortcut on the desktop.

In the main window of the program, select the menu "File"> "New"> "Capture".

Click on the "Start" button, then close the program and reproduce the error.

To reproduce the error, click on the "Stop" button.

V Select the "File" menu>
"Save As", specify the directory for saving and the file name and click on the "Save" button.The creation of the log is completed.

Process Monitor
To start logging using the Process Monitor program, you must complete the following steps:
Close unused software (this is necessary to exclude the saving of the activity of third-party products to the log), jump start and run the application .
After starting the program, choose File> Capture Events. Logging will be stopped. Select the "Edit"> "Clear Display" menu. The automatically recorded log will be deleted. The program is ready to go.
Choose File> Capture Events. Logging will start. Minimize the application and reproduce the error.
Restore the application and choose File> Capture Events. Logging will be stopped. Select the "File"> "Save" menu. Set the radio button "All Events".

Click on the button with three dots to the right of the "Path" field, specify the folder for saving and the file name (it is recommended to leave it by default) and click on the "Save" button.

In the file saving parameters window, click the "Save" button. The creation of the log is completed.
I have one weakness - I like different monitoring systems. That is, an ideal situation for me is when you can see the state of each component of the system at any time. With realtime, everything is more or less clear: you can aggregate data and display it on a beautiful dashboard. The situation is more complicated with what happened in the past, when you need to find out different events at a certain moment and connect them with each other.
The problem is actually not that trivial. First, you need to aggregate logs from completely different systems, which often have nothing in common with each other. Secondly, you need to tie them to the same timeline so that events can be correlated with each other. And thirdly, you need to efficiently arrange storage and retrieval of this huge amount of data. However, as is usually the case, the difficult part has already been taken care of before us. I'm trying a few different options, and so I'll give you a mini-review of what I've already worked with.
Online services
The easiest option, which worked great for me at first, is to use a cloud service. Such tools are actively developing, providing support for an increasing number of technology stacks and adjusting to the specifics of individual IaaS / PaaSs like AWS and Heroku.
Splunk
Both I and recently Alexey Sintsov wrote about this service in a column. Generally speaking, this is not just a log aggregator, but a powerful analytics system with a long history. Therefore, the task of collecting logs and aggregating them for further processing and search is a trifling matter for him. There are over 400 different applications, including over a hundred in the field of IT Operations Management, that allow you to collect information from your servers and applications.
loggly
This service is already specially tuned for log analysis and allows you to aggregate any kind of text logs. Ruby, Java, Python, C / C ++, JavaScript, PHP, Apache, Tomcat, MySQL, syslog-ng, rsyslog, nxlog, Snare, routers and switches - it doesn't matter. You can collect up to 200 MB per day for free (which is a lot), and the nearest paid plan starts at $ 49. It works very well.
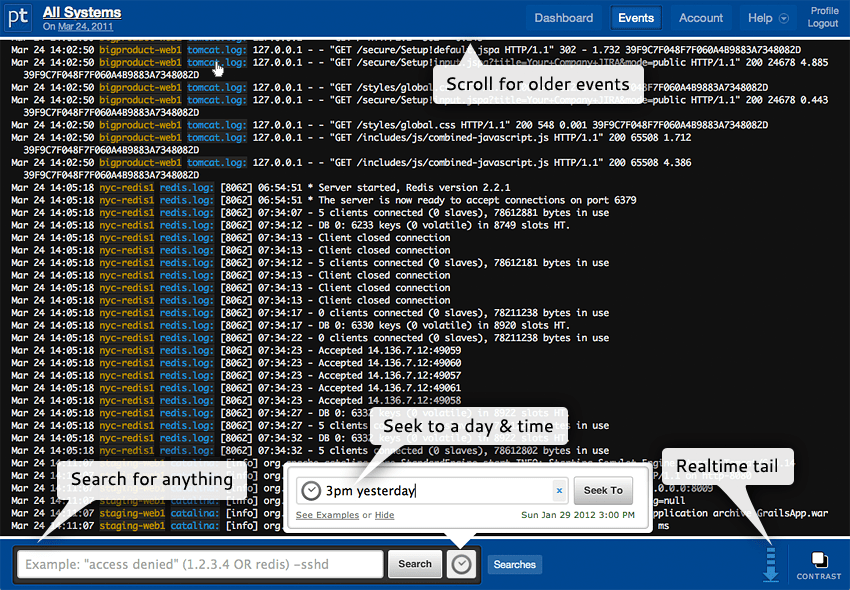
An excellent service that aggregates application logs, any text logs, syslog, and more. What's interesting: you can work with aggregated data through a browser, command line, or API. The search is done with simple queries like "3pm yesterday" (get data from all systems at three in the morning for yesterday). All related events will be grouped. For any condition, you can make an alert in order to receive warnings in time (the settings in the configs have changed). You can use S3 to store logs. In the first month, they give 5 GB as a bonus, then only 100 MB per month are provided free of charge.
Another good data collection service that allows you to collect up to a gigabyte of logs per month for free. And the possibilities are the same: powerful search, tail in real time (everything that "arrives" from the logs at the moment is displayed), data storage in AWS, monitoring of PaaS, IaaS and popular frameworks and languages. On the free plan, you can store data for seven days.

NewRelic
Yes, this service is not really for collecting logs. But if the question is about monitoring the performance of servers and applications, then this is one of the best options. Moreover, in most cases you can work with it for free, which we used for a long time in the editorial office to monitor applications and the status of servers.
Expand everything at home
My experiments with online services ended when there was so much data that I would have to pay three-digit amounts to aggregate it. However, it turned out that you can deploy such a solution yourself. There are two main options.
logstash
It is an open system for collecting events and logs that has worked well in the community. Deploying it, of course, is not difficult - but this is no longer a ready-made service out of the box. Therefore, be prepared for bugs in poor documentation, module glitches and the like. But logstash copes with its task: the logs are collected, and the search is carried out through the web interface.
Fluentd
If I choose a standalone solution, then I liked Fluentd more. Unlike logstash, which is written in JRuby and therefore requires a JVM (which I don't like), it is implemented in CRuby and performance critical sections are written in C. The system is again open source and allows you to collect large streams of logs using more than 1500 different plugins. It is well documented and very easy to understand. I have deployed the current version of the log collector on Fluentd.
Show this article to your friends.
I saw nothing unusual.
Feb 15 17:47:23 log-n1 yum: Installed: syslog-ng-3.5.6-3.el7.x86_64
Feb 15 17:47:36 log-n1 systemd: Reloading.
Feb 15 17:47:40 log-n1 syslog-ng: syslog-ng starting up; version = ’3.5.6 ′
Feb 15 17:47:40 log-n1 systemd: Listening on Syslog Socket.
Feb 15 17:47:40 log-n1 systemd: Starting Syslog Socket.
Feb 15 17:47:40 log-n1 systemd: Starting System Logger Daemon ...
Feb 15 17:47:40 log-n1 systemd: Started System Logger Daemon.
Feb 15 17:52:41 log-n1 syslog-ng: syslog-ng shutting down; version = ’3.5.6 ′
Feb 15 17:52:41 log-n1 systemd: Stopping System Logger Daemon ...
Feb 15 17:52:41 log-n1 systemd: syslog-ng.service holdoff time over, scheduling restart.
Feb 15 17:52:41 log-n1 systemd: Starting System Logger Daemon ...
Feb 15 17:52:41 log-n1 systemd: syslog-ng.service: main process exited, code = exited, status = 2 / INVALIDARGUMENT
Feb 15 17:52:41 log-n1 systemd: Failed to start System Logger Daemon.
Feb 15 17:52:41 log-n1 systemd: Unit syslog-ng.service entered failed state.
Feb 15 17:52:41 log-n1 systemd: syslog-ng.service failed.
Feb 15 17:52:42 log-n1 systemd: syslog-ng.service holdoff time over, scheduling restart.
Feb 15 17:52:42 log-n1 systemd: Starting System Logger Daemon ...
Feb 15 17:52:42 log-n1 systemd: syslog-ng.service: main process exited, code = exited, status = 2 / INVALIDARGUMENT
Feb 15 17:52:42 log-n1 systemd: Failed to start System Logger Daemon.
Feb 15 17:52:42 log-n1 systemd: Unit syslog-ng.service entered failed state.
Feb 15 17:52:42 log-n1 systemd: syslog-ng.service failed.
Feb 15 17:52:42 log-n1 systemd: syslog-ng.service holdoff time over, scheduling restart.
Feb 15 17:52:42 log-n1 systemd: Failed to start System Logger Daemon.
Feb 15 17:52:42 log-n1 systemd: Unit syslog-ng.service entered failed state.
Feb 15 17:52:42 log-n1 systemd: syslog-ng.service failed.
Feb 15 17:52:42 log-n1 systemd: start request repeated too quickly for syslog-ng.service
Feb 15 17:52:42 log-n1 systemd: Failed to start System Logger Daemon.
Feb 15 17:52:42 log-n1 systemd: Unit syslog.socket entered failed state.
Feb 15 17:52:42 log-n1 systemd: syslog-ng.service failed.
Feb 15 17:53:11 log-n1 systemd: Listening on Syslog Socket.