Many users do not know the answers to the question. They don't know how to update BIOS. Do not think that updating this program is supernaturally difficult. Believe me, everyone can figure it out.
The abbreviation of this system in translation into Russian sounds like a basic input-output system.
What is the BIOS for?
- During computer startup, the BIOS checks the standard hardware and its viability. If any of this equipment burns out, a special sound signal will sound.
- The program launches a boot program that directly loads the Operating System.
- Provides OS interaction with various peripheral equipment.
- Allows the user to configure PC hardware components.
Do I need to update the BIOS and why?
Updating this program is a deeper process than ordinary computer programs. This implies a short algorithm of changes. Basically, this is a fix for the incorrect operation of any rare components of the system or the addition of support for the latest processor models.
In the event that the computer works without problems, it is better not to deal with this program. And you don't need to update it. You will not see the differences between the previous and the new version, and on the contrary, the update can generate unexpected problems for your PC. Most often, they occur when more thoughtful testing was carried out in the previous version than in the new one.
The update should only be run for your motherboard model. If you try to update a BIOS designed for a different model, this can bring you a number of unpleasant difficulties and problems.
But there are times when updates are needed, and sometimes urgent:
- The motherboard requires the installation of a new processor, which can be provided by an updated version. It is necessary to update the program in this case.
- You need to connect a hard disk of a size that is not supported by the old version of the program.
- It is required to activate additional chipset features (a set of chips that are designed to work together in order to provide a set of different functions) that were not used in the original version.
- It is necessary to replace the outdated OS on the computer.
- In the event that you plan to overclock your computer.
- The system functions slowly or incorrectly due to errors in the BIOS code.
- The version you have installed is broken, causing the system to not function partially or completely.
What does a BIOS update do?

Updating the BIOS of the motherboard, as you already understood, is done mainly so that new processors and new memory that come out very often are supported by the motherboard installed on your computer. Because of this, updating the program is sometimes simply necessary.
Is it worth it to update the program unnecessarily? Is it possible to update it constantly without thinking about the consequences? Programming professionals advise not to do this.
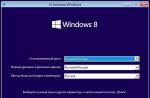
How to see the current current version of your system program?
- The fastest way to find out the current version is to use command line on your computer.

- Enter: wmic bios get smbiosbiosversion. A window will open showing you the current version.


After you have found out the information you need, you should go to the website of the manufacturer of the motherboard that is on your computer.
There are five most popular manufacturers:
How to update BIOS on a laptop?
Special programs for updating BIOS
Top 3 programs:
- Asus - Asus Update,
- MSI Live Update
- @BIOS.
General instructions for the programs:

Let's look at the option of how to update BIOS from a USB flash drive:

How to make a bootable BIOS update floppy?
The method of updating from a floppy disk is considered one of the most reliable in terms of security.

After all these manipulations, you need to restart the computer and boot from a floppy disk. Make sure the floppy drive is set as the first boot device in the BIOS. During the reboot, open the BIOS setup menu by pressing the special opening keys. We select - Advanced BIOS Features, Boot Sequence, which are sometimes called Advanced, Advanced BIOS Features.
How to update BIOS without battery?
In order to update, it is often necessary to charge the computer at least within 10%. If this condition is not met, then a message will pop up in front of you "Power Check Error", which does not allow you to update the program.
In order to still update it, you need to know one key. What is required to do this?

Windows won't boot after BIOS update
It happens that after the update, Windows stops loading. In this case, you need to start the BIOS of the computer. Find the parameters of SATA devices and try changing the mode of operation. If IDE is in the settings, you need to activate AHCI (or vice versa). After that, save the new settings and restart the computer. 
And remember that you do not need to enter this system unnecessarily, as this can harm your computer! If you still don’t understand some subtleties or can’t figure it out, contact the experts!
Have a great day!
The BIOS is the Basic Input/Output System, the heart of the computer, without which other components and software cannot function normally. When you turn on the computer, the BIOS starts first, and only after turning it on does the operating system start loading.
Theoretically, since Windows boots after the BIOS, reinstalling the operating system or adding another OS should not affect the normal operation of the BIOS. However, it is not uncommon for an attempt to install a second operating system to result in the BIOS not loading.
In this case, it can be assumed that the BIOS settings have gone astray and restoring the default settings can solve the problem. To reset the settings, you need to carry out the following operations.
- Disconnect the PC and monitor from the mains.
- Open the system unit and remove the battery from the motherboard.
- Wait a few minutes.
- Replace the system battery.
- Connect power to the computer and monitor.
After restarting, the BIOS will start to boot “like the first time”. If after that the problem disappears, it is recommended to format the bootable hard drive and reinstall the operating system. Preferably one that previously worked without problems. It is possible that the added operating system was damaged in the distribution.
Connection violations
There is a high probability that the BIOS does not boot due to breaks in the power supply or data loops. To check this option, you first need to listen to see if the cooler rotates on the motherboard. The BIOS is part of the processor and therefore poor cooling of the motherboard leads to malfunctions.
It is possible that the contact groups of the fan have moved away, which is why it does not work. After that, carefully inspect all cable and daisy chain connections. Check if dust has accumulated on the motherboard or in the contacts. Dust is an excellent conductor of electric current, and it also creates electrostatic fields, to which electronics are very sensitive.
- Remove dust from the device with a vacuum cleaner and a brush.
- Disconnect the contactors in sequence and clean the terminals from dirt and oxidation. You can use a school gum to strip the contacts.
- Check the security of all connectors. It is likely that the vibration caused the contacts to separate, and therefore the equipment stopped working correctly.
After prevention, you can try to restart the computer. Again the screen is black and the BIOS does not load? Then it can be assumed that one of the internal modules is faulty. Including the motherboard itself could fail or it needs to be reflashed.

You can download a new firmware for the motherboard on the official website of the manufacturer. Updating the firmware is a complex and rather risky task. Therefore, if you don’t know exactly what and how to do it, it’s better not to risk it, otherwise you can ruin the entire computer, in a place with hard drives. Please contact the service center.
Bad blocks in the computer
None of the above helped? Then the probability of iron malfunction increases and you can start checking the blocks.
Unplug and remove anything from the device that is not necessary to start the computer. Leave only the motherboard, power supply and one of the RAM sticks. The computer will not work in this state, but it is possible to check the health of the motherboard itself.
A common reason for the impossibility of starting the computer is the insufficient power of the power supply. For example - you replaced the motherboard with a better one, which requires more electricity. At the same time, the power supply remained old. Or so - additional hard drives or some other functional components were installed in the system unit. Energy consumption can rise quite a lot. Installing a more powerful power supply will solve the problem. If the question, of course, is the lack of energy.
Often, BIOS loading is prevented by a malfunction in the video card. If possible, you need to check the video card by replacing it with another similar one. Or install the video card in another computer. Here you need to look at the compatibility of the equipment. Otherwise, you will not find the problem, but you can create new malfunctions.

If in the minimum configuration - a motherboard, a power supply, a RAM socket - the system unit is working and the BIOS is loading, then the problem is in one of the removed modules. After installing and connecting the next block, try turning on the computer again and see what happens. As soon as the BIOS stops starting again, it can be assumed that you have found a faulty block. Now it remains only to find a similar one and replace it.
In reality, things are often much more complicated. For example, a computer sometimes boots up and works quite normally, and then, for no apparent reason, starts to fail. The problem can be both in violations in the software, and in malfunctions of components.
These periods of normal operation, alternating with the inability to boot the BIOS, are characteristic of three types of problems.
- The presence of microcracks on the motherboard. Because of this, contact periodically disappears.
- Dry electrolytic capacitors on the motherboard or in the power supply. This malfunction mainly refers to old system units that have been in operation for a long time. Sometimes faulty capacitors can be identified by a characteristic swelling of the case.
Bad contact in connected wires. As already mentioned - the presence of dust, oxidation of contacts, not enough strong pressure. If the contactors have fixing screws, they must be tightened to the end. The reverse situation also happens - too tightly clamped fixing screws lead to deformation of the connectors and disruption of contact in the connection.
BIOS is the firmware responsible for booting Windows. It checks the performance of components and add-ons. The correct loading of the computer and its normal operation (hardware components) depend on it.
It is written on the motherboard, not on the hard drive like the OS. In new devices, the BIOS has been replaced by UEFI, which performs the same functions, but has been improved. Both programs sometimes need to be updated.

BIOS can be updated in several ways
DO YOU NEED TO UPDATE BIOS?
Manufacturers release updates for laptops on a regular basis. It is downloaded on the official website of the company that produced the laptop. It is more difficult for owners of a PC of their own assembly. To find the files to update, they will have to start from the data of the motherboard chip. Any update is also written to the chip, replacing the old version.
It is not difficult to update bios correctly, but only materials designed for a specific PC model or board should be used. Each motherboard has a strictly defined type of firmware, and installing the wrong version of it can lead to computer malfunctions or its complete inoperability.
BIOS is a thin program, and therefore it is better to update it only in extreme cases. On a normally functioning PC, it does not need to be updated. This is due to several factors:
- Flashing bios on an asus motherboard or any other is difficult, the process requires some skills, the process goes through DOS;
- Improvements will not be noticeable, since the differences between the versions are minimal and highly specialized;
- Malfunctions and malfunctions may occur, as the old version was tested more thoroughly than the new one;
- During work, the power must not be turned off, otherwise the device will stop loading.
But sometimes the BIOS needs to be updated. If you regularly encounter this or that error in your work, go to the website of the device manufacturer and check if such an error has been fixed in the new firmware version. More often on the websites of manufacturers there is such a list. If such a problem is really solved in the new version, it makes sense to update the bios on the laptop.

Another good reason to flash BIOS is the installation of new hardware. If you purchased a new processor that appeared after the release of your motherboard, then it will not be supported by your BIOS. In new firmware versions, manufacturers add support for new types of processors, and therefore you will have to download such a file and flash the firmware.
You need to update the BIOS as a last resort. But even then, before updating, study the characteristics of the new version and find out if the problems are solved in it. Based on this, and conclude whether it is necessary to update the bios.
Find out the current version by holding Win + R on the keyboard. In the window that opens, you see msinfo32 for a 32-bit OS. Click the Run button. A window will open listing the hardware and OS characteristics of the device. Among them, find the one you need.
Sometimes a notification appears that the bios mode is outdated. This means that the BIOS mode is outdated, it still works in real mode, not protected mode. The firmware may not help solve the problem, but it is not serious and it is not necessary to fix it.

UPGRADE METHODS
The update method depends on the computer manufacturer, motherboard model, etc. Most often, each manufacturer has its own instructions for flashing. You can get acquainted with it on the official website of the company.

On all modern motherboards, or you can update the bios on your computer in any of the following ways. But it is better to choose the latter, as it guarantees a minimum number of errors.
UPDATE ALGORITHM
You can update the bios of an asus or any other modern laptop using any of the three methods described. They have their own nuances, but when carrying out the process using utilities, they are still not complicated.
FROM DOS
Difficult option with big risks. To update the bios on a windows 7 computer, do the following:
- Find out the model of your motherboard;
- On the official website of the manufacturer, download the required firmware version;
- There are sometimes several of them. In this case, choose the one that is designed for installation in DOS mode;
- Create a bootable flash drive with BIOS, DOS and an additional utility (it is downloaded from the manufacturer's website or included in the archive along with the firmware);
- Install the flash drive and restart the computer;
- Specify the media on which the BIOS firmware of the motherboard;
- After flashing is finished, restart your PC.
There is no exact instruction, as it varies for different PCs and boards. Find detailed instructions on the manufacturer's website. But this method is not recommended.

FROM WINDOWS
Flashing the bios on a laptop in this way is easy. Errors rarely occur. popular method.
- Download the firmware utility. It has its own for each manufacturer. Program for updating bios asus - Asus Update, MSI - Live Update, etc .;
- Install the program;
- Run;
- Find the online function - search for new firmware. In different programs, she is in different groups of commands;
- From the list of firmware, select the required one;
- Activate the download;
- After downloading, run the flashing and follow the instructions of the program.
Flashing bios asus, MSI and others in this way is also safe because the program itself selects the appropriate firmware version. In addition, an intuitive interface will help even a non-advanced user to flash the firmware.
FROM BIOS
It is possible to reflash the bios on a laptop from the firmware using pre-installed utilities. This is a complicated method, as it differs depending on the motherboard chip model, manufacturer, etc. To update the bios on a gigabyte motherboard, run the preinstalled @BIOS utility, other manufacturers have other programs. Such programs are similar to the utilities involved in the previous method, but are not as convenient. They also work with them - they find the necessary file on the network and run it.
More often, the method is used in case of computer breakdowns, when it is impossible to enter the OS, because. PC won't boot.
O guess the riddle: it stands like a beehive buzzes. But there is no smoke coming from the chimney, because this is not a native factory, but a computer on which the BIOS is damaged. And he buzzes because that's the only thing he is now capable of. Without a bios, it's just a bunch of lifeless iron. Is this worth worrying about? Of course not. After all, now you have a great bedside table!
The system unit as a bedside table? Well, I do not! We know how to make it work. Today we'll talk about how to restore the BIOS if it crashed.
What causes BIOS flashing
B IOS and its “descendant” UEFI, which modern motherboards are flashed with, are special computer programs that are necessary for the initial setup and management of PC devices until the operating system starts. They are stored in special flash memory chips on the motherboard, one of which is shown in the picture above. It seems to be a good storage place, reliable, but sometimes the BIOS gets uncomfortable there and runs away. More precisely, it is damaged and ceases to perform its tasks.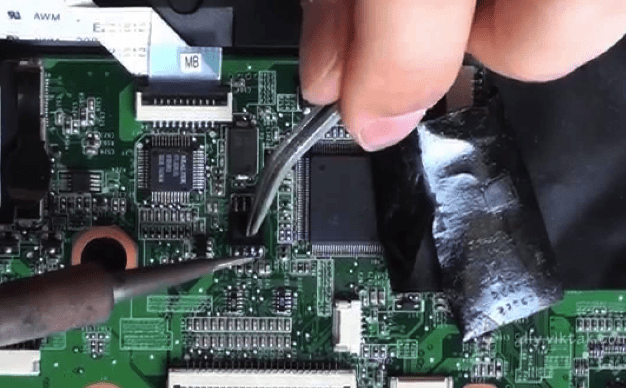
There are not too many reasons for BIOS damage, in some cases they are obvious, in others they are not. Here is a list of the most common:
- During a power outage to the computer.
- The flasher program (flasher) incorrectly interacts with the firmware or flash memory chip.
- Flashed a BIOS version that does not match this motherboard. Yes, .
- If the update is carried out from under a running operating system - a system failure or software interference, for example, blocking by an antivirus.
- Incorrect user actions, for example, restarting the computer before the update is installed.
- Failure of the flash memory chip.
- Hidden BIOS microprogram errors. Sometimes this explains spontaneous "gatherings" that occur for no apparent reason.
- Electrical failure of the motherboard.
How BIOS corruption manifests itself
In most cases, the BIOS firmware is partially damaged, so the symptoms of a failure can be different:- When you press the PC power button, only the cooler turns on, which immediately starts to rotate at maximum speed. Sometimes the LED indicators on the case and keyboard light up.
- One or more seconds after power on, a cyclic reboot begins. Outwardly, this is manifested by a cycle of spin-ups and stops of the cooler, which are repeated as long as power is supplied.
- When turned on, the power indicator lights up, the cooler does not spin.
- The computer shows no signs of life. This happens when the boot block, the BIOS bootloader, is damaged. This is the hardest case.
There is no image on the screen. Even the splash screen of the manufacturer does not appear.

There are other forms of damage to the BIOS, more precisely, its area, which stores the configuration of the ME controller (a component of the chipset) on boards that work with Intel processors - the so-called ME region. If there is a problem in this area, a computer or laptop may:
- Incorrect loading or not turning on at all.
- Turn off or restart at regular intervals.
- It is incorrect to regulate the cooler rotation speed, for example, to turn it at high speed regardless of the load.
The elimination of such failures consists in reading the BIOS dump, replacing the ME region with a clean one and re-flashing it using the programmer. Since this is usually done by repairmen, and not by computer owners, we will not dwell on this. Let's better do what can be done at home without special equipment and the risk of finally sending your "iron pet" to the realm of eternity.
BIOS recovery without a programmer is possible only if the bootloader is saved. It is sometimes possible to determine whether it has been preserved or not by indirect signs: flashing of the screen backlight, sound signals from the system speaker, the reaction of the motherboard to turning on without RAM (sound or flashing indicators), etc. If the BIOS bootloader is preserved, the first moments of work computer run normally, the failure appears a little later.
How to restore the performance of a motherboard with a failed BIOS
Asus
Many Asus brand desktop motherboards support USB flashback, which is designed to quickly update and restore the BIOS in the event of a failure. This does not require anything other than a USB flash drive with a capacity of up to 4-16 GB and the BIOS file itself, which must be downloaded from the manufacturer's website from the section on your "mother" model.After downloading the firmware, you need to rename it. For example, the file "Sabertooth X79" (model name) is renamed to "SABERX79.ROM", the file "Sabertooth Z77" to "Z77ST.CAP". Information on how the firmware file should be named for your model is most likely on the Asus website, but if you do not find it, check the forums or support.
Next, save the renamed BIOS to a FAT32-formatted flash drive and plug it into the USB port marked " flashback" or " ROG Connect". It is advisable to turn off the computer before this, this will increase the chance of a successful recovery.

After connecting the flash drive, turn on the PC and press the " BIOS". Hold it down for about 3 seconds until the indicator light on the board starts flashing. Blinking indicates that the file was successfully read and flashed into memory. When the flashing process is completed, the indicator will turn off.
If your board is from a budget segment or not too new, that is, it does not support USB Flashback, most likely you can restore it in another way. If the computer is equipped with a floppy drive or optical drive, write the renamed BIOS file to the root directory of a blank floppy disk or CD, place it in the drive, turn off and then turn on the PC. The firmware will be completed when the drive indicator turns off. If there is no drive, use a USB flash drive.
gigabyte
On Gigabyte boards with Dual (dual) BIOS, failures rarely occur, since in case of damage to the firmware in the main chip ( M ain_ BIOS) the dump from the backup is copied into it ( B backup_ BIOS). As long as the main flash memory is healthy and contains firmware, even damaged, the board remains operational.
Problems with starting a board with Dual_BIOS are possible in the following cases:
- The main chip is missing or has failed.
- The microcode in the main chip is completely erased.
- The contents of both chips are damaged.
Some Gigabyte "mothers" can boot from backup flash memory and use it as the main one. Another group of boards from this manufacturer uses a dedicated area on the hard disk as a BIOS backup medium. This is a less reliable option, but still better than nothing.
Restoring the Gigabyte BIOS from a backup is usually done automatically, but if this does not happen, try unplugging the computer, wait a bit and turn it on again.
MSI and others
Most Micro-Star motherboards use a firmware recovery technology very similar to ASUS's - using a flash drive, floppy disk or CD. Copy the BIOS to blank media, connect it to the PC, press the shutdown button for 4 seconds, hold down the combination on the keyboard leftctrl +Home(or Alt +ctrl +Home) and, without releasing the keys, turn on the computer. The beginning of the firmware process can be judged by the blinking of the flash drive or drive indicator. BIOS on MSI board. On the right is the JSPI1 port for firmware on the programmer
 On MSI motherboards and some other brands that are more than 8-10 years old, the BIOS is flashed from a floppy disk. The instructions for AWARD and AMI BIOS are slightly different.
To restore the AMI BIOS, do the following:
- Rename the BIOS file downloaded from the motherboard manufacturer's website to AMIBOOT.ROM.
- Move it to the root of a clean floppy disk. Insert the floppy disk into the drive of the switched off PC.
- Press left Ctrl + Home on your keyboard and turn on your computer.
To restore the AWARD BIOS:
- Place the flash driver and BIOS files on a floppy disk (usually downloaded in one archive).
- Create a text document on a floppy disk containing the name of the BIOS file with the extension bin. Rename the document to autoexec.bat.
- The next steps are the same as above.
By the way, some motherboard manufacturers post BIOSes on their websites only in exe format - in one bottle with the flash driver for updating from under Windows. Sometimes such a file can be unpacked as an archive, but users often do not understand what exactly of its contents is the firmware. There is no universal solution for such problems. In order not to aggravate the problem, it is better to consult on the specialized forums or in the technical support of the manufacturer.

On some boards, before restoring the BIOS, you also need to remove the real-time clock (RTC) battery from the socket or rearrange (remove) the clear CMOS jumper. It is important to find out these points before starting the procedure.
Features of BIOS recovery on laptops
On laptops, as well as on Gigabyte boards, the BIOS is also often stored in two flash memory chips. But it's not Dual and it has no backups. Both chips contain different parts of the firmware, or one contains the main BIOS, and the other contains the multicontroller program. To prevent the device from turning on, it is enough to damage the microcode in at least one of them.
The procedure for recovering a crashed BIOS on laptops is about the same as on desktops. The firmware file downloaded from the manufacturer’s website and the flasher program (the latter is not always needed) are placed on a clean USB flash drive formatted in FAT32 / 16, connected to a de-energized device (just turning off the laptop is sometimes not enough, you need to disconnect the power supply and remove the battery), insert a charged the battery in place, turn on the device and hold down the key combination. On different laptops, different keyboard shortcuts are used for this, for example:
- Ctrl (left only or both) + Home
- Windows + B (this and other letters are given in the Latin layout)
- Windows+F
- Windows+M
- Windows + Esc
- Fn+B
- Fn+F
- Fn+M
- Fn + Esc.
The main work is to unpack and rename the BIOS files. Again, there is no single rule here. In most cases, you have to get the firmware from exe files, but! Many manufacturers include BIOSes for different revisions of one platform or a whole series of platforms in the program, and it can be very difficult to choose the only file you need from them. In order not to be mistaken, read the instructions for the firmware of your particular model and platform revision on the specialized forums. And feel free to ask questions.
I deliberately do not provide instructions in the article for restoring BIOSes by flashing on a programmer with and without soldering, closing various contacts, hot-swapping removable flash memory, etc., since all these methods are unsafe and require certain knowledge. However, among the readers, there are probably those who have done something similar on their PC and got good results. It will be great if you describe in detail your actions in the comments to the article. Also, stories about negative experiences are welcome so that other readers can avoid mistakes thanks to you. In the comments, be sure to include the model name and revision of your motherboard, as well as the BIOS version you were working with.The basic input/output system is the beginning of the computer's electronic life. In the event of a hardware or software malfunction of the BIOS microchip, the successful launch of the computing device simply becomes impossible. Despite the extreme degree of reliability of the specified element of the computer system, software failures in the basic microsystem (in view of many factors!) Still take place. In most cases, the problem "BIOS does not start: what to do?" is allowed by elementary replacement of the CMOS battery, otherwise it is required to apply a comprehensive diagnostic plan, and only after identifying the cause of the problem, perform a repair (correct!) algorithm of actions, -. details in the article!
Not a short introduction: small BIOS and big consequences...
Indeed, everything depends on a small microcircuit, which contains a set of microprograms in its memory, and in the aggregate is the basic microsystem of a computer! A very rare electronic ailment that occurs in our time is damage to the main BIOS entry of the system (not to be confused with temporary data stored in CMOS memory!), This is a “dead” motherboard. That is, the motherboard becomes completely useless, since it is devoid of a startup control element.

A partial malfunction of the BIOS of a microchip can be accompanied by an incredible variety of surprises, both hardware and software. In general, the beginning of all computing beginnings is a small microcircuit with a certain set of programs. The degree of efficiency of the computer used depends on how correctly you configure the BIOS, directly affecting the overall operational life of the computing device as a whole. If for you, dear reader, all of the above has become news, then it makes sense to think: “Do I follow the manufacturer’s critical instructions regarding operating rules?”.
Why BIOS suddenly stopped starting: a little about all the reasons
Let's move on to the specifics, because the situation "does not start" can look different:
- When you press the "on" button, nothing happens - a black screen and silence.
- The computer turns on, the screen flickers with a black void (not active) - the noise of the fans is heard and the system speaker beeps (BIOS speaker).
- The computing device starts, some message is displayed on the screen - the buttons do not respond, except that ... the restart works.
- The system boots too quickly (and, safely!), But you can’t get into the BIOS.
There is another interpretation of the voiced problem, when a novice user does not correctly understand what exactly is happening and at the same time wonders how to enter the BIOS at all? Let's start with the last one...
How to enter the basic settings of the computer
Depending on the BIOS version (s), as well as the design features of the computer, access to the basic settings can be radically different from the methods that are considered standard.
For example, in most PC modifications, the BIOS is entered by pressing the F2 or Delete function button. Moreover, the activation of one of these buttons is carried out directly at the time of launching the computer system at its initial stage. By the way, there is a special technique for calling the BIOS main menu - pressing the corresponding button multiple times with an interval of two clicks per second of time.
There are other "tactile schemes" for entering the BIOS - some manufacturers supply the devices they produce with special mechanisms, push-button or lever type, when activated, the user enters the service menu of the base microsystem. However, there are more exotic buttons - touch. However, the essence of the listed keys and service gadgets is the same - calling the BIOS Setup menu.
As for the “high-speed resistance” to the moment you enter the basic computer settings menu, there are several solutions here:
- Enter the BIOS menu through Windows OS - use this link to read how it's done.
- Try calling the BIOS using other service keys, for example, "F8".
- Finally, you can get into the basic settings using the System Restore emergency disk or a Windows distribution kit.
Black Screen and Silence: Causes and Solutions

This "electronic incident" has a rather long list of "causes and effects", nevertheless, it is possible to single out the main symptoms of a malfunction, namely, to identify the real culprit of the "silent celebration" as soon as possible.
- With a probability of 99.9%, the power supply failed. Naturally, replacing the component with a known-good power supply unit will correct the situation in the direction of “Problem solved!”.
- The power button is out of order - replacing the switching element or checking the wire for mechanical damage (obvious breakage, wire deformation, oxidation of contacts, etc.), of course, with its subsequent restoration (soldering, cleaning).
- Dust contamination of the inside of the computer case (especially important for portable computer equipment - a laptop) - it is necessary to clean all components of the motherboard, as well as the attached modules and strapping equipment, from dust. Do not forget to clean the protective meshes of the air intakes and other structural elements of the case.
The computer turns on, but the monitor screen is "full of black secrets"
As a rule, problems with starting a computer system are always accompanied by a specific sound signal, the tone and sound sequence of which has its own decryption code.

To solve the problem described, you can also try to change the computer's power supply, but more likely this "PC behavior" indicates that the BIOS has detected a faulty component in the system: one of the memory sticks (RAM) has failed, the hard drive has broken, or the processor temperature has reached a critical value. In the latter case, it is necessary to replace the thermal paste and check the cooler of the cooling system for serviceability.
The rest of the user's actions should be as follows:
- Disconnect all peripheral devices (printer, fax machine, webcam, external storage devices, etc.).
- Remove all RAM modules.
- Turn off hard drives.
- Switch to a different graphics mode - change the video scheme from integrated to discrete, or switch to an integrated video chip if you have used an external video card.
If an empty mainland starts up, throw in one of the previously disabled components and carefully monitor the reaction of the microsystem as a whole. In any case, if the BIOS starts up, then you have already achieved a positive result!
By the way, do not forget that a black screen can be the result of a failed monitor. In laptops, the integrity of the connecting cable is often violated, which is constantly subjected to dynamic load when opening / closing the display lid. In the latter case, it is better to contact a laptop repair service center. In both the first and second cases, to check the validity of the assumption, you can always try to connect an external monitor to the VGA connector.
At the end
Here, in brief, is the entire list of instructions on the problem "BIOS does not start: what to do." We hope everything worked out for you and access to the basic settings is restored. Of course, you should not lose sight of another undescribed way to fix the problem that has arisen - switch the CMOS jumper to the RESET position (then return the contact element to its original position).
And you know, this article has a great continuation, because the BIOS may not start due to swollen capacitors, as well as “dead” transistors ... Don't miss it!