Every user has problems with a laptop. This may be due to a wide variety of reasons that are difficult for a simple user to identify. If you are sure that the fan is the problem with your laptop, you do not need to contact the service center, you can clean it yourself.
What is required for cleaning?
Dust fills all surfaces in the house, entering the laptop through numerous holes that are used to release hot air. Most of the dust is in the fan or cooler, which blows hot air during the heaviest load of your device. To get to this dust and clean it, you will need the following tools:
- Compressed air in a can with a small nozzle in the form of a tube;
- A dry and clean surface on which to clean and disassemble the laptop. You can use the table;
- Several screwdrivers with different calibers, all Phillips;
- Anti-static gloves (preferred but not required).
Carefully review all the documents for your device - whether the warranty is still valid. If the warranty is still valid, just take the computer to a service center and explain the problem.
Disassembling a laptop for cleaning
Before you start disassembling your device, make sure it is not in sleep or hibernation mode. Disconnect the charging cable, remove the battery from the socket, if this is possible in your laptop model. After that, close the laptop and turn it over so that the bottom surface where the laptop usually rests is on top.
Now take a screwdriver and gradually begin to unscrew the screws, of which there are a lot in the lid. If you know the exact laptop model, you can find videos on the Internet and see how to properly disassemble your particular device. If this is not possible, unscrew the screws gradually, in no case in a hurry.
If something doesn’t work out for you at the stage of disassembling the laptop, do not use too much force, it should be easy to understand. In case of problems, it is better to contact the service center, as you can accidentally break the device and pay much more for repairs.
After you have unscrewed all the screws, remove the cover - it should be removed either by lifting up or shifting to one side. Be very careful: collect all the screws and parts separately, you can even sign at which stage which part you removed. This will help when you are assembling the laptop. Having done everything right, you definitely will not be dumbfounded by the presence of unnecessary details.
Laptop Fan Cleaning Instructions
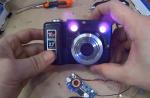
Most laptops that are used by users today have a cooling system similar to the one shown in the photo:

The system consists of a cooler, copper pipes and wires that are connected to the processor, heatsink and video card chip. Since these elements of the computer process the largest amount of data, that is, they heat up the most.
If there is a lot of dust, you can first blow off its top layer, for this use a can of compressed air. In most cases, at this stage of disassembling the laptop, there is not much dust, as it accumulates a little deeper.
Don't forget to clean your laptop keyboard too. We wrote about how to do this in a previous article, although you can also use the article " How to clean a computer keyboard".
Very important: in no case do not wipe any surfaces of a disassembled laptop with a wet rag - this can lead to a short circuit and burning of your device.
Remember that when further working with a laptop, you need to be very careful. Any careless movement can damage or bend any parts, so apply just as much force as needed: if the part does not give in, you are doing something wrong or you forgot about some kind of fastening.
As you can see in the photo, using a can of air will give a low effect, as you will not be able to properly clean the dust. Therefore, if possible, it is necessary to free the cooler from all upper parts as much as possible (in the photo we see a metal surface with several screws).

After removing this surface, in most laptops you will come across another one, a plastic one, which can also be removed. Only then start cleaning with compressed air. Clean slowly and efficiently, and most importantly, achieve the most effective result.
A cooler and a fan for a laptop are practically the same part of the device. The only difference is that the cooler is a part that includes wires, mounts, and the fan itself.
Keep in mind that some laptops may have multiple fans, in which case you need to clean each one. Some of the existing fans can only be partially dismantled. In this case, you should clean them as much as you can.

In order for the cooler cleaning to be as effective as possible, you should also clean the adjacent surfaces. Boards, wires and other elements of the device must be cleaned with compressed air. If there is a lot of dust, the upper layers can be removed with a dry cloth. You can buy it at computer hardware and parts stores. Do not use ordinary cloth rags, as the threads may get into any part, after which it may stop working or degrade its performance to a critical level.
After you have carried out all the procedures for cleaning the cooler from dust, you must carefully assemble all the parts back. Assembly must be carried out in exactly the reverse order. Be very careful, use the notes that you left as you disassembled.
Video cleaning a laptop from dust
In the following video, you will clearly see how to clean the laptop fan from dust:
After a good cleaning of the fans from dust, your computer device should start working efficiently, get warmer and buzz less. If it doesn't, it might not be due to dust or you made a mistake while cleaning. In this case, you should contact a professional who will provide qualified assistance and quickly sort out the problem.
In contact with
It happens when there is not enough. The radiator grill becomes clogged with dust over time, less and less air is needed to cool the laptop. One fine day from overheating may die completely. To prevent this from happening, you just need to clean the cooler. The easiest way to do this is if you have a powerful blowing vacuum cleaner. In this case, you do not have to disassemble anything. It is enough just to blow the air in the direction opposite to the usual air flow. If blowing did not help, then you need to disassemble the laptop case.
Each laptop has its own disassembly system, try to find the disassembly instructions for your particular model. If there are no instructions, then you will have to understand and disassemble yourself. Unplug your laptop from the mains and remove the battery from it. Loosen the screws on the bottom of the laptop. Depending on the model, you may need to remove different laptop covers, the main thing is that you understand what you should be looking for. And you are looking for a cooler, which you can recognize by the large fan attached to it. As soon as you find it, the first thing you will be horrified by is the amount of dust that has settled on it. Take a vacuum cleaner and carry out the primary processing of the cooler to remove large rags of dust. Be careful, in this case, the vacuum cleaner should work for suction, not for blowing. Carefully remove any remaining dust with cotton swabs. If dust has covered the motherboard, run your chopsticks over it as well, but be extremely careful not to damage anything.
Some experts advise cleaning the cooler in the bathroom with a hot shower on. The damp steam will tamp up flying dust and prevent it from getting back into the laptop, but never try to wash the laptop or parts of it with water. After you have cleaned the cooler, assemble the laptop in the opposite direction to how you took it apart. If you did everything right, then immediately after turning it on you will be able to notice how much faster and easier the laptop has become. Laptops get clogged with dust very quickly, so you may have to repeat the cleaning after a year.
note
Often this happens due to the fact that the fan of the laptop cooling system is corny clogged with dust or something else (there have been cases when laptops were brought to the SC, where the fan was clogged with cat hair). If there is dust on the fan and radiator of the cooling system, then the cooling efficiency decreases, and the fan starts to make a lot of noise. To fix this, you need to clean the laptop from dust.
The laptop has firmly entered our lives. It allows you to browse the Internet while lying on the couch, watch a movie on the train, other transport and provides a person with a lot of various advantages. Many people get very used to this gadget, so they get upset when there are any problems with it. One of these troubles is a fan in a laptop “clogged” with dust and dirt.
With the need to clean the fan or, as it is also called the cooler, sooner or later every owner faces. In this case, the gadget simply ceases to cope with its duties. The processor gets very hot, and the laptop itself “slows down” a lot. If the cooler is properly cleaned, then the temperature of the processor and other devices decreases by about 20 degrees. This has a very positive effect on the functioning of equipment and its durability.
Frequency of cleaning the device
Experts recommend cleaning your gadget regularly, even in the absence of heat and other signs indicating a clogged fan. The rate of clogging of the cooling system in a laptop depends on the model, namely on the location of the system itself. Leading brands pay a lot of attention to this issue, so high-quality and expensive gadgets can do without such a procedure for a long time. So, the products of Samsung, Acer, Asus, Lenovo companies need to be cleaned every year. Notebooks SONY Vaio, and more expensive models HP, Asus can be cleaned every two years. Apple appliances can go without cleaning for more than 4 years.
In addition to the location of the cooling system, the operating conditions of the device are of great importance. If the laptop is in a dusty room, then the cooler will clog much faster, if in a clean room - much longer.
There is a certain list of factors that lead to the fact that the fan clogs faster:
- smoking while working on a laptop,
- repairs in the apartment, accompanied by "dusty" work;
- the location of the room, office near a busy road;
- the presence of pets in the room.
Easy laptop cleaning
There are several signs when a fan in a laptop needs to be cleaned. This includes overheating of the gadget after a short operation, the noise that the cooler creates, or software failures of the laptop.
Very often, to eliminate these phenomena, it is quite enough to clean the dust in the most elementary way. To perform the simplest cleaning of the gadget, you need to find a hole through which warm air is removed during the operation of the device. It is very simple to do this: often it is made in the form of a lattice, which is located in the side of the case (usually on the left). Also, there are models where this hole is located at the back.
Further, a hair dryer or a blown vacuum cleaner is brought to this hole. Sometimes you can effectively clean the fan without technique: you can bring the hole to your mouth and blow air sharply into it. The effectiveness of the result can be estimated by the volume of the cloud that is knocked out of the hole. This method can keep the fan running for several months. However, this method is unlikely to help if the cooler has not been cleaned for a long time.
An important advantage of this method is the absence of the need to remove the back cover, which is very important if the laptop is still under warranty.


General cleaning of the laptop
If the method described above did not give a result - it was not possible to effectively clean the cooler, you need to resort to a more radical solution. General cleaning of the gadget is a rather complicated process that must be carried out in a certain sequence. First you need to carefully study the instructions that will help determine the location of the devices.
For general cleaning, the following list of tools and materials will be required:
- a special blowing vacuum cleaner (a model used to clean car interiors is suitable);
- screwdriver "cross";
- rag;
- engine oil to lubricate the fan.
If you have these items, you can proceed to disassemble the laptop. This process includes the following steps:
- Removing the laptop battery:
- removal of the back panel;
- removing the hard drive;
- removing the drive;
- detaching and then removing the keyboard;
- complete disconnection of the display cables;
- removing the display.
Video: laptop maintenance - how to disassemble and clean
Thus, the cooler and the entire cooling system remains in sight. To clean the fan and other elements of the system, including copper connecting tubes, you can use cotton swabs, after which you need to “walk” through the elements with a can of compressed air or a special vacuum cleaner. In this case, you need to be as careful as possible. Radiator tubes and fins are fairly easy to damage. To make the cooler work better in the future, you can additionally lubricate it with special thermal paste.
Laptop overheating is a common reason for contacting a service center. At best, the laptop noticeably “slows down”. At worst, high temperatures lead to breakage. The reasons are different: improper operation, air vents clogged with dust, wear of the thermal interface, and even initially unsuccessful design. Let's try to figure out what causes the causes of overheating, and how to deal with them.
What does it consist of
The laptop cooling system consists of a fan (or fans), heatsinks, and vents on the case. Typical design - a copper heatsink snakes through the processor and video card chips, leads to a fan that blows hot air through a hole in the laptop case. At the points of contact between the heatsink and the chip, there is a layer of thermal interface between them: thermal rubber or thermal paste.
How to determine the temperature
Modern laptops are able to diagnose themselves. Feeling that the temperature "passes" for normal, the laptop reduces performance. They say about this that "the computer began to slow down." In more complex situations, the laptop crashes and displays a warning about the problem on the next boot. But you should not rely only on the intelligence of a laptop. You can independently determine the high temperature "by eye". If you feel that the laptop heats up much more than when you bought it, then you need to take action. To whom a scientific approach is closer, we recommend installing a thermometer program. For example, HWMonitor. Please note that measurements must be taken in a "loaded" state - while watching a movie, while working with 3D graphics or while playing.

HWMonitor shows the temperature of the chipset (THRM), processor cores (Core #0 and Core #1), graphics card chip (GPU Core) and hard disk drive (HDD). The maximum temperatures of the equipment depend on the model, but there are indicative figures:
- processor - 75-85 °;
- video card - 70-90°;
- hard drive - 50-60 °;
- chipset - up to 90°.
If the temperature exceeds the upper limit, it makes sense to seek the help of a specialist.
Causes of overheating and necessary measures
Poor cooling system design
Alas, it happens that overheating is associated with the design features of the laptop. Typically, such a laptop gets very hot from the first day of operation, or after a short operation, because. more susceptible to the causes discussed below.
There is no need to despair. Build a simple structure on your table, as in the photo. Just lift the back end a little. This will improve air circulation and the temperature can drop by 5-10 degrees. The method can be applied anywhere - an ordinary book will do.

Greater effect can be achieved with a special cooling pad. The stand is a design with fans. With them, you can achieve a decrease in temperature by 5-15 degrees. Among the disadvantages are large dimensions and the need for external power from a wall outlet or USB.

"Craftsmen" offer more original solutions.

Misuse
The laptop can only be used on hard surfaces - on a table or on a stand. In extreme cases - on your knees (although it is difficult to sit in this position for a long time). It's all about the ventilation holes. When the laptop is on the table on small "legs", air enters under its case. When the laptop is placed on a soft surface (in a bed, on a sofa, on a thick tablecloth), the ventilation holes are closed. Hot air is not removed, cold air is not drawn in, and the temperature inside the case rises.
The recommendation is very simple: stop using the laptop incorrectly. Work at the table. And if you can't imagine life without a laptop in bed, use bedside tables and coasters. The latter, for example, can be bought at Ikea.

Holes and fan clogged with dust
This happens with almost all laptops. Dust accumulates inside the case, clogs the vents and impairs the performance of the fans. It is recommended to carry out scheduled cleaning after the end of the warranty period and every following year. Cleaning can only be done from the inside. No vacuum cleaner, special "computer" or powerful home, can pull out all the dust through clogged holes.


And disassembly-assembly requires certain knowledge. At least theoretical. It will be sad to see how the motherboard cracked due to the fact that the screws were screwed in the wrong order.
Replacing the thermal interface
As we said at the very beginning, at the points of contact between the heatsink and the chips, there is a layer of thermal rubber or thermal paste between them. When replacing a thermal interface, not only knowledge is important, but also skill. A layer that is too thick, thin, or uneven can cause the laptop to run hotter than before. As a rule, the replacement of the thermal interface is combined with cleaning from dust.
Failure of the ventilation system
The laptop ventilation system consists of two parts:

- The heat removal system is a combination of thermotubes and radiator grilles. Designed to transfer heat from processor chips to heatsinks, where this heat is dissipated by air flow.
- The fan itself. May not be available on some laptop models.
Most often, the fan itself fails, usually due to overheating, the bearing jams or becomes loose over time and begins to “crack”. In "smart" laptops, with a faulty fan, at startup, the BIOS displays an error message about the cooling system. To diagnose such a malfunction in more budget laptops, it is enough to bring your hand to the radiator outlet grille under a significant load, the lack of air flow and fan noise indicates a fan malfunction.
The second common malfunction of the cooling system is a malfunction of the thermotubes. Thermal tubes stop conducting heat from the processor to the radiator grille. In this case, the fan will run at full speed, a cold air stream will be output from the laptop, but the processor will overheat. This malfunction is dangerous for a laptop due to the failure of the processor or motherboard.

But the photo shows that the thermotube is torn off from the copper plate, there is no heat sink from the processor
There is only one way to deal with such malfunctions - replacement.
So, if your laptop gets too hot, make sure you use it properly. If problems appear when working on hard surfaces, bring it to the service. So far, it's just a rise in temperature. But if nothing is done, it can lead to serious physical damage to the equipment. Better prevention.
The laptop hp pavilion, asus, acer, dell, lenovo, samsung, packard bell, lenovo, toshiba and others, becomes dirty and dusty during everyday use, which leads to overheating and poor performance.
Luckily, you can clean it yourself and if you do it regularly, you can keep your laptop in good condition for a long time.
When to clean a laptop fan
When a laptop overheats from dust, dirt, spontaneous restarts, crashes and performance degradation may occur.
In addition, it works louder, and the body heats up. Even simple applications are slow (load increases significantly).
The high temperature of the laptop should let you know that the components are dusty and need to be cleaned before they fail.
The easiest way is to observe dust symptoms after about half an hour of work, when the laptop literally begins to take on a life of its own, and any operation becomes difficult.
When it comes to these situations, chances are your laptop is already very dirty and the thermal paste is worn out. So you need to clean it up and apply a new paste.
How to clean a laptop fan
You can go to the service and request a thorough cleaning, but you can also do it yourself with compressed air.
Air is sold in the form of a can and is not expensive (you can use a vacuum cleaner, but a can is more effective).
Before cleaning, disconnect the laptop from the power supply, remove the cover (many have a specially handed over for a fan, then there is no need to completely remove it) and blow it with compressed air.
If there is little dust, then it may be enough to blow through the holes in the case. The air flow is directed to the fan inlet.
If the dust balls are firmly held in the fan shell, then you need to disassemble it and clean it with a soft brush.
Cleaning the laptop from dust will significantly speed it up and lower the temperature, as a result, it will start working faster.
How to disassemble a laptop to clean the fan
If your laptop makes a loud roar while working and its body gets uncomfortably hot, it's likely that you need to clean it.
Components in operation generate heat, which is released from specially designed channels from the outside.
After a while, the heatsinks and laptop coolers accumulate a lot of dust, which prevents heat dissipation from the cooling system and causes equipment overheating and serious accidents.
In practice, there are cases when the cooling channels are clogged, which caused irreversible damage to the processor or graphics card of the laptop. It is better to prevent such an accident and clean the equipment.
The tips in this section are for advanced users. If you feel that you cannot afford them, do not risk it, but contact the experts
I am not responsible for damage caused by misuse of the guidelines provided here.
I will show how to do this using the HP Pavilion DV7 model as an example. This will be cleaning the inside of the laptop, the ventilation ducts and replacing the thermal paste on the GPU.
I use a trusted brand of thermal paste, so Arctic Silver 5 will be used in this case.
I will use compressed air to clean the components. Unfortunately, the cooling ducts in this laptop model are poorly designed, which leads to periodic clogging of the radiator and fan, so that heat does not escape.
In order to get to the root of the "windmill" you have to dismantle the entire laptop - to the motherboard. The first step is to unscrew the small cover hiding the components of the device.
Then remove the battery and unscrew the two screws that secure the keyboard. Also, inside the battery, remove the latch. The keyboard should come off easily, but handle it with care. Don't forget to remove the tape.

Now you need to disassemble the DVD drive to unscrew the three fixing screws.

Then unscrew all fixing bolts and remove the upper part of the case. This is in addition to the latches.


The next step is to disassemble the entire cooling system - just unscrew the connectors from the GPU system.

Before replacing the thermal paste, you should remove the remnants of the old one, which has dried up and has already lost its properties.
It is important to pay attention not to damage the CPU system. Do not touch the processor with your hands - it may contain static electricity.

In the heat sink and other parts of the cooling system, remove any remaining dust to unblock the free flow of air.

Before assembling the cooling system, apply a new layer of thermal paste.

We put all the elements in the reverse order.

At the last stage, check the correct installation and loading of the laptop. If everything is folded correctly, you should now rejoice.
Of course, "for beginners" it is better to see how everything happens on the video. In the coming days I will post it on my Youtube channel.
NOTE: in addition to cleaning from dust, the laptop also needs to clean up the debris of the Windows operating system - this also greatly affects performance.