Many users may have noticed that any programmer who comes to fix problems related to the system has a . This trick is very useful, because for any problem with the system or hard drive, the user can always restore access to the computer and understand what the problem with the computer is. In this case, not everyone wants to have a system in a computer, where it is easier to carry a small system disk with additional files with them. Therefore, anyone should know how to make a hard drive out of a flash drive.
But how to turn a flash drive into a hard drive? It would seem that such a process should be difficult and resource-intensive, but in fact everything is carried out quite simply, while the volume and “age” of the flash drive does not matter. The main condition for a flash drive is that it works properly. Also, not only a USB flash drive, but also an SD card is suitable for this role, the process of changing properties is identical.
At the same time, it is worth knowing that multi-partitioning should not be applied to such external media, since many operating systems support only the first partition on non-HDD-type disks. HDD is non-removable media that is installed in a computer. You can remove them, but it takes a lot of time and effort, so people use cards and external drives to facilitate the whole process of transferring information or an operating system right with them.
First you need to make sure that Windows detects the USB flash drive as a non-removable device. In this case, any flash-card has a standard reverse parameter, then you need to start changing. Some do not think at all about the safety of their equipment, so they simply modify the flash drive. But this method is dangerous because many flash drives simply cannot change to the selected parameter, because of which they will break and they will have to be carried to a service center. It is much easier and safer to replace the response from the device with the desired result. For this, a special driver is installed. A flash drive instead of a hard drive on Windows 7 will work just like with any other operating system.
Before making a flash drive a hard drive, the device must be connected to a computer, and then determine the type of flash drive.
First option
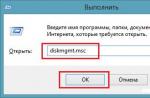
Open the Media Manager. You can find it using the "Run" button, enter "diskmgmt.msc" here and press "Enter". Now it will be possible to see what type the drive has, removable or non-removable.

Second option
You can also see the type of device by opening the Volumes tab in the properties of the flash drive.
Third option
You can also enter the diskpart command.

So, now the user knows whether the flash drive is a removable or non-removable device in this case.
Second step
If the device is defined as "non-removable", then it can already be used as a hard drive. Otherwise, before using a flash drive instead of a hard drive, its type must be changed to "non-removable". For this, a special filter driver is used, which can easily change the incoming information, changing it to the necessary one. One of the most common and simple filters is the Hitachi Microdrive driver. Thus, the user does not invade the microclimate of the flash drive, while simply deceiving his system, giving it a false answer.
After the media becomes non-removable, the computer will consider it a full-fledged hard drive that can be partitioned, each of them will function simultaneously. The main thing at this point is to download a program that is suitable in terms of bit depth for your operating system.
Third stage
Once the user has been able to trick the computer, the device code can be identified. You can find the code in the "Details" tab, "Device Instance Path".

As a result, it is necessary to copy the information, it will be further manipulated in the Hitachi Microdrive program. When copying, you must remove all information after the second "\".
On a 64 bit system
Now you need to find the cfadisk file in the Hitachi Microdrive folder, where we find the cfadisk_device and cfadisk_device.NTamd64 sections.
In sections, instead of information after "\", we insert the code of our device.
On a 32 bit system
The process is similar, only in the file for the 32-bit version you need to find the "cfadisk_device" section.
Here you need to replace "DISK&VEN_&PROD_USB_DISK_2.0&REV_P" with the device code.
If you want to set your own name for the device, then you need to replace "Microdrive_devdesc" with the desired name, say "USB_hard".
Fourth stage
The last step is to replace the drivers. On 64-bit operating systems, before this action, you must disable the verification of the digital signature of the driver so that it does not update itself due to third-party interference.
You need to open the "Drivers" => "Update Drivers" tab. Next, the folder with the Hitachi Microdrive driver is indicated. This driver is selected, it remains to skip the message about the absence of a digital signature, then restart the computer and see the result of the work. The drive has become non-removable.
The driver is removed using the "Update drivers" button.
Here's how easy it is to make a hard drive from a flash drive. This procedure can be carried out by anyone, if you follow the instructions, while the computer cannot be damaged at all, as well as the drive system. If you use a high-quality volumetric external drive with good performance, then there are no questions whether a flash drive can be used instead of a hard drive. In this case, it will cope with the task no worse than hard drives.
A bootable USB Flash or HDD drive is convenient because you can refuse to use a CD / DVD to install the OS and use diagnostic programs such as Memtest, MHDD, Acronis TI.
A “multi-boot” flash drive or HDD is good because you don’t have to format the entire disk for each program, but install all the necessary programs there once and, when booting from it, select the one you need through a beautiful menu. In the case of an HDD, it is convenient to create a separate small partition for this.
There are many solutions for flash drives (for example, http://eee-pc.ru/wiki/soft:usb_multiboot), but, as a rule, they do not work with USB HDD. On Habré, I only found about installing Win7 from a USB HDD, but a year ago, attempts to reproduce this were unsuccessful. To install Windows 7 from a flash drive, there is MS Win7 DVD Tool, but again it does not work with the HDD. So let's create our own multiboot USB HDD using GRUB4DOS.
We will need:
- USB HDD (everything described should work for flash drives).
- Windows OS (of course, you can do it in the same way from a Linux-based OS, but now I don’t have the opportunity to check the performance and the presence of “pitfalls”).
- Motherboard (BIOS) with support for booting from USB drives. If booting from USB is not supported, you can use Plop, more on that below.
UPD: automation of this method: rghost.ru/20467691 or greenflash.su/_fr/7/7487664.7z. Files from the archive (except for menu.lst and seven.iso) must be copied to the root of the partition (or change the paths in Menu.lst accordingly).
Possible problems and errors
Error 60: File for drive emulation must be in one contiguous disk area
Solution: The image needs to be defragmented. For example, using the Contig program from Mark Russinovich. Usage: contig.exe g:\ubuntu1.iso in console.
BIOS does not support booting from USB, freezes, takes a long time to boot, and other problems associated with booting from USB HDD
I hope this article helped you figure out how to create a multiboot hard drive or flash drive.
A more detailed manual on GRUB4DOS is available (translated into Russian, sometimes crooked) or in README_GRUB4DOS from the archive with GRUB4DOS.
UPD1: re-uploaded the script from the 2nd method win7: made a mistake and uploaded the old version, it had problems with x64.
UPD1.1: added automated 3 way win7.
You can right-click on "Start" and select "Device Manager".

In "Disk devices" you need to select the connected USB flash drive and double-click on it with the left mouse button to launch "Properties".


Open the downloaded file from the archive using notepad. Right-click on it and select "Open With...".

Choose Notepad.

Go to the section:. Delete the first four lines from it before %attach_drv% = f2d_install,USBSTORGenDisk.

Then paste the copied value from the "Device Manager" in place of the remote one. Before each line to be inserted, add %attach_drv% = f2d_install.

Save the modified text document. Next, switch to "Device Manager" and right-click on the USB flash drive, and then select "Update Driver Software ...".

The best way is to use the "Search for drivers on this computer" method.

Click on "Browse" and specify the location of the file that has been edited.

Confirm your actions and click "Continue installation". When the installation is complete, open Explorer, where the flash drive will be displayed as "Local Disk".
For Windows x86 (32-bit)
Download and unpack the Hitachi_Microdrive.rar archive. Do everything as described above. Then select the "Details" tab, and in the "Property" line, insert "Path to the device instance". In the line "Value" copy the string that is displayed.

From the downloaded archive, open the cfadisk.inf file using Notepad. How to do this is also written above. Find the partition and reach the line %Microdrive_devdesc% = cfadisk_install,USBSTORDISK&VEN_&PROD_USB_DISK_2.0&REV_P.
In this article, we will show you how to make USBflash drive or SDthe map was defined in the Windows system like a regular local hard drive. You might be asking, why is this necessary? The fact is that by default Windows defines USB flash drives and memory cards as removable drives that cannot be divided into several sections using Windows standards. And even if you split the flash drive into two or more partitions using third-party utilities (in the same Linux), then only the first of them will be available in the Windows family OS (by the way, a built-in one appeared in Windows 10 1703). Those. Windows supports normal work with multi-partitions only for HDD drives that are defined in the system as local (i.e., non-removable).
RMB bit and USB media
Windows family operating systems recognize USB flash drives as removable / removable (removable) devices due to the presence of a special bit descriptor on each device RMB(removablemediabit) . If, when polling a connected device via the StorageDeviceProperty function, the system determines that RMB=1, it concludes that the connected device is a removable drive. Thus, in order to convert a USB flash drive to a hard drive from the system's point of view, it is enough to modify this descriptor. This can be done directly (which is quite risky due to differences in hardware implementations of specific devices, and not always possible), or indirectly, by replacing the USB device response with a special driver that allows you to filter information in the device response.
Advice. Some manufacturers release special utilities for flashing the controller of their flash drives. First of all, try to find such a utility and / or firmware on the manufacturer's website. This is the most correct way. If there is no such utility, follow the recommendations from this article.
Connect a USB flash drive to any free port on your computer, then open the Disk Management Manager ( diskmgmt.msc) and make sure that its type is defined in the system as Removable(Removable device) .
Also, the device type can be viewed on the Volumes tab in the disk properties (as we see here Type: Removable). 
Or using the diskpart command:
List volume

In this article, we will look at two ways to change the RMB bit on a USB flash drive - using the Hitachi filter driver (changes are made only at the driver level on a specific computer) and changing the bit in the controller firmware using the Lexar BootIt utility (a more universal way, but there is a number of restrictions and does not apply to all models of flash drives and SD cards). Although both of these methods are quite old and I originally tested them on Windows 7, they continue to be relevant and work equally well on modern Windows 10.
Lexar BootIt Utility
Recently, I came across a rather interesting utility - LexarBootIt. This is a free portable program that can change the RMB of a removable drive by making a removable USB device fixed (or vice versa). Despite the fact that the Lexar BootIt utility was developed for Lexar devices (Micron, Crucial), it can also work with flash drives from other manufacturers. BootIt supports all versions of Windows from Windows XP to Windows 10.
Important. The utility is guaranteed to work for Lexar drives. Judging by the reviews, the "Flip removable bit" function does not work on fast USB 3.0 flash drives. In addition, when flashing the controller, you lose the warranty on the flash drive and can make it inoperable.
You can download BootIt on the Lexar website (lexar_usb_tool) or from our website ().
- Run BootIt.exe with administrator rights
- Select your flash drive from the list of devices
- Click on the button Flip Removable Bit
- Save changes by clicking OK.

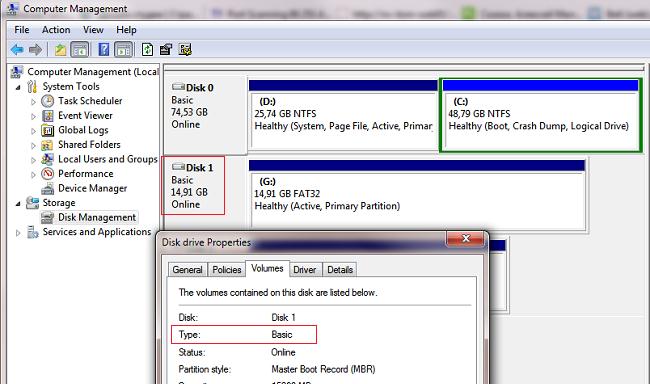
Reconnect the device and use the device manager to verify that its type has changed from Removable to Basic.

In the event that the BootIt utility did not help change the RMB bit on the removable drive, try using the following method based on the Hitachi Microdrive filter driver
Filter driver for Hitachi Microdrive flash drives
In order for a USB flash drive or SD card to be recognized in the system as a hard drive, we need a special filter driver that allows us to modify the data transmitted through the system stack of the current device driver. We will use the Hitachi USB flash drive filter driver ( Hitachi microdrive driver), which at the OS driver level allows you to change the type of flash drive device from removable to fixed (USB-ZIP -> USB-HDD). By using this driver, you can hide from the system that the connected device is removable. As a result, the system will consider that it is working with a regular hard disk, which can be divided into sections that will be simultaneously available in the system.
Hitachi Microdrive Driver Archives:
- 32 bit systems - (3.0 Kb)
- Hitachi Microdrive version for 64 bit systems - (3.8 Kb)
You need to download the driver version for your system in accordance with its bitness. Both archives have the same structure and consist of two files:
- cfadisk.inf- installation file, with driver settings
- cfadisk.sys- Hitachi driver file
The next step is to identify the device code of our flash drive. To do this, in the properties of the disk on the tab Details in parameter Device Instance Path select and copy ( ctrl+c) device instance ID. 
In our example, this would be:
USBSTOR\Disk&Ven_Linux&Prod_File-CD_Gadget&Rev_0000\0123456789ABCDEF&0
Suppose we are planning to install a driver on 64 bit system. Using any test editor, open the file for editing cfadisk.inf. We are interested in the cfadisk_device and cfadisk_device.NTamd64 sections.
%Microdrive_devdesc% = cfadisk_install,IDE\DiskTS64GCF400______________________________20101008
We change the value of DiskTS64GCF400________________________________20101008 to the code of our device.
Important! In the device instance code, it is necessary to discard the part after the second "\" (in our example, we discard 0123456789ABCDEF&0).
We get:
%Microdrive_devdesc% = cfadisk_install,IDE\USBSTOR\Disk&Ven_Linux&Prod_File-CD_Gadget&Rev_0000
We save the file.
If the driver is installed on 32 bit system, you need to download the advising archive, unpack it and open the cfadisk.inf file for editing. Let's find a section :
%Microdrive_devdesc% = cfadisk_install,USBSTOR\Disk&Ven_JetFlash&Prod_TS1GJF110&Rev_0.00
Then we will change the data in the last line, indicating the code of the instance of our flash drive, i.e. in our example we get:
%Microdrive_devdesc% = cfadisk_install,USBSTOR\Disk&Ven_LEXAR&Prod_JD_LIGHTNING_II&Rev_1100 %Microdrive_devdesc% = cfadisk_install,USBSTOR\Disk&Ven_JetFlash&Prod_TS1GJF110&Rev_0.00 %Microdrive_devdesc% = cfadisk_install,USBSTOR\Disk&Ven_Linux&Prod_File-CD_Gadget&Rev_0000

Advice. If you want the USB flash drive to be displayed with a specific name in Device Manager, you need to edit the value of the Microdrive_devdesc variable, for example:
Microdrive_devdesc = "Transcend 64GB DIY SSD"
Installing the Hitachi Microdrive driver instead of the native USB drive driver
It remains to replace the driver used by the USB flash drive.
Important! If the Hitachi Microdrive USB driver is installed on a 64-bit system, then this driver is not digitally signed, you will either have to .
Open the Drivers tab and click the button Update Drivers. 
Specify the folder to the directory where the downloaded archive with the Hitachi driver is unpacked: 
Let's choose a new driver. 
We ignore the warning about the missing digital signature of the driver. 
Advice. In Windows 10 and Windows 8, when installing the driver, the following error appears:
Windows found drivers for this device, but an error occurred while trying to install these drivers.
Hitachi Microdrive
3rd party inf does not contain signature information

To disable driver digital signature verification, run the following commands:
bcdedit.exe /set nointegritychecks ON
bcdedit.exe /set TESTSIGNING ON
Restart your computer and try installing the driver again.
It remains to restart the computer and, having opened the disk manager, make sure that your flash drive has become detected as a regular hard drive ( Type:Basic), and the Hitachi driver is used as the driver.
By opening the explorer, you can also make sure that the icon of the flash drive has changed, it began to appear as a hard drive as a regular disk. 
Now you can work with this flash drive like with a regular HDD: create partitions, specify an active partition, create dynamic disks, install software that does not work from flash drives, etc.
Important. On other Windows computers without this driver, the second device partition will not be available.
To uninstall the Hitachi Microdrive driver, open the disk properties and on the driver tab, click the Update Driver button - the system will install the native driver itself.

Advice. If, after installing the Hitachi driver, the system stops booting with a BSOD, you need to boot the computer from the Windows installation disk / Live CD and manually delete the following files:
- cfadisk.sys in %windir%\System32\drivers directory
- Directory "cfadisk.inf_amd64_…" from %windir%\System32\DriverStore\FileRepositoty
Restart your computer
You need to understand that this solution will only work on the system on which the appropriate driver is installed.
Any flash drive can be easily turned from the point of view of Windows into a natural hard drive. That is, for the operating system, a USB flash drive will be perceived as a regular, fixed disk, and not as an external portable device. Why might this be needed?
This technique is described primarily for those who want to prepare a flash drive. The whole problem is that in Windows XP the DISKPART utility does not see the USB flash drive point-blank at all. At least a hundred times enter the command for DISKPART list disk, is useless: as a result, we will be shown only available hard drives and nothing more.
Therefore, you cannot make a bootable USB flash drive with Windows 7 from Windows XP using DISKPART at all.
However, what happiness - this problem can be solved in a tricky way. Namely: we will turn the flash drive into a regular fixed disk. In other words, for Windows XP, the flash drive will become another hard drive. And then DISKPART will show the disk we need as a pretty one. Cool? Still would!
Such a transformation of a flash drive will also come in handy for other purposes, wherever you plan to use a flash drive instead of a removable hard drive.
By the way, are you wondering why the hell DISKPART does not display a USB flash drive at all? It's all about the RMB (removable media bit) descriptor written on each flash drive. It is because of him that Windows XP (and other versions of Windows) perceive the USB flash drive as a plug-in device (i.e. removable device). It is enough to remove this descriptor and the flash drive will mutate into a hard disk, it will be displayed as a disk in the window My computer, all file managers and generally everywhere.
A wonderful driver from Hitachi will allow us to make such a feint with our ears. Therefore, first of all, we need to download it, and then modify it.
Download Hitachi driver for USB flash drive
Unpack the driver archive and find the file cfadisk.inf. Let's open it. There is a lot of stuff in the file, but we need one section, it's called
.
And it has the main line with which we do street magic. In the file, it looks like this:
Now all we need to do is to replace the selected part of the record with the identification data of the flash drive, which we will turn into a hard drive. And then we will change its name.
How to do it? First of all, plug the flash drive into the USB port. Now open Device Manager(for example, select Start > Run, enter devmgmt.msc and press the key).
Expand Section Disk devices, right-click on the name of the flash drive and select the command Properties.
Go to the tab Intelligence. The menu will open immediately. Device Instance ID, this is the code we need. Highlight the code with one click with the left mouse button and press the key combination to save it to the clipboard.
Well, then everything is simple. Open the cfadisk.inf file, find the section
, in it the line that starts with %Microdrive_devdesc% and change the specified value after %Microdrive_devdesc% = cfadisk_install to the previously copied one.
In other words, you need to change the line in bold below to the one you copied. Then save the cfadisk.inf file.
%Microdrive_devdesc% = cfadisk_install, USBSTOR\DISK&VEN_JETFLASH&PROD_TS1GJF168&REV_0.00\A7B03577C3F1B5&0 Now change the name of the flash drive. At the very end of the cfadisk.inf file we find the line Microdrive_devdesc = In chapter
and change the value in brackets to whatever you want. Initially, the value “UsbToFix” is indicated there, you can leave it.
The most important thing remains: install the updated cfadisk.inf driver for our USB flash drive. To do this, click again on the name of the flash drive in the window. Device Manager and select command Update Driver.
A window will open Hardware Update Wizard. Now step by step.
- In the first window, select the radio button No not this time and click on the button Further.
- Select radio button Installation from a specified location, click the button Further.
- Select radio button Do not search. I will choose the right driver myself and click on the button Further.
- Click the button Install from disk.
- In the window Install from disk click on the button Review and select the driver folder where the file is located cfadisk.inf.
- Windows will ask you if you really want to install the driver, click on the button Continue installation and then on the button Ready.
Well, that's all, the flash drive has successfully turned into a hard drive, and now it will become available for the DISKPART utility, or maybe you will find another use for it.