Creation of a website on a virtual server. Server on the local computer.
Before starting to create their own website, novice web developers are advised to try their hand at a local machine (personal computer), for this you need the DENWER distribution kit, which can be found on the developers website www.denwer.ru
Gentleman's set of web developers (DeNVeR)The software is emulation of a virtual server on a local computer, at home as a replacement for web hosting, without the need for an internet connection. You can create a website on any CMS platform (or without CMS) in a matter of minutes, fill it with content and debug the configuration. With the subsequent transfer to hosting, or to the server, respectively. The virtual server contains all the most necessary components: Apache, MySQL, phpmyAdmin, SMTP server + the ability to connect additional extensions. Distributed free of charge - in Russian.
Why do I need a local server?- Firstly, for the development of the site, the possibility of initial filling with content and optimization of the site structure.
- Secondly - a way to check the site for errors and debug the configuration.
- Thirdly, as a backup of the site and subsequently saving the site data and SQL databases to the local server.
- Installer (installation on a flash drive is also supported).
- Apache, SSL, SSI, mod_rewrite, mod_php.
- PHP5 with support for GD, MySQL, sqLite.
- MySQL5 with transaction support.
- A template-based management system for virtual hosts. To create a new host, you only need to add a directory to the / home directory
- Start-up and shutdown control system for all Denver components.
- phpMyAdmin is a web-based MySQL management system.
- Emulator of sendmail and SMTP server (incoming messages are placed in / tmp in .eml format); work in conjunction with PHP, Perl, Parser, etc. is supported.
Local server - is one of the basic tools of any webmaster.
To create the html page, you can use a simple editor such as Windows Standard Notepad. To test and debug html sites, you can use any browser, for example Windows browser, Internet Explorer. That's all.
But! We will face a completely different situation if we create a site that runs under the control of a dynamic script in the php language. Or, if we are with you, we are planning to create a website that operates under the control of a content management system (site) - CMS.
How to get out of this situation? The answer is obvious, you need to install a local web server on your computer.
Local server installed on a computer works in exactly the same way as a web server that works on the hosting side.
Using local server, you can install and test any php scripts, create MySQL users and create databases, as well as manage users and databases through the admin panel
phpMyAdmin.
Installing a local server based on the kit denwer, is very simple and usually does not cause problems.
Local server download- it is for this request that you will most likely find a link leading to the site of a developer of high-quality software - denwer.ru.
In addition, on this site, you can get acquainted with the contents of the local server distribution kit and learn about the local server from the first person, that is, from the developer.
Local server download from the developer's site - "free local server Denver".
Installing Denver Local Server- to your computer. A local server on a computer plays the same role as a remote web server on a hosting.
For the computer, you need to run the executable file of the downloaded installer. Installation is normal and does not cause any problems. Options requested during installation, select the ones recommended by the installer.
After Denver local server installations, on your computer, the following changes should occur:
1. The C: \ WebServers folder will be created.
2. After restarting the Windows operating system, you will have a virtual disk Z necessary for the operation of the local server.
3. On the desktop, you will have three shortcuts:
StartDenwer - to start the local server in operation
RestartDenwer - to restart the local server
StopDenwer - to stop the local server.
 Recently installed Denver on Windows 7, all local server services in Denver started, Denver page opened, MySQL databases were created. Next, I installed WordPress CMS on my local server.
Despite the fact that the installation of WordPress went fine, the created site in the browser did not open for me. What I just didn’t do - Denver works, but the site does not open!
Due to this, I decided to find an alternative to the local Denver server. After looking for information about local server packages, my choice fell on local XAMPP server.
XAMPP is local server, which can be installed on any operating system, the first letter of the name just indicates this:
X - cross-platform local server

After installing the Windows 7 operating system on my computer, I wondered - which one to install the local server?
I decided to try to install something new on my computer, some other local server. After a short search on the Internet, I settled on a local server - Open Server.
The first thing I liked was that Open Server did not need to be installed. That is, you just download the self-unpacking archive of the local server package. Then, unpack the contents of the archive into any folder on your computer. And further, in order to start the local server program, you just have to click the start file.
Another positive point is that the local Open Server can be run from external media. That is, from a flash card, or from CDs and DVDs.
I note right away that the local Open Server has two assemblies, full and minimal. The minimal assembly allows only the local server to run on the computer.
 In, we have downloaded the archive of the OpenServer software package, on the basis of which you can run a local server on your computer. In addition to the local server, the package contains many programs that are necessary for and can be useful to any webmaster.
We have noted with you one of the most important advantages of the OpenServer software package, which is that the OpenServer package works without installation on a computer. That is, to start the local server and all the programs of the complex, it is enough to click one file.
By the way, I want to note here a rather important point concerning the launch of the OpenServer software package.
If your computer is running Windows 7, start the local server as administrator, otherwise, the local server may give an error when it starts.
Well, let's continue working with the local server, and in this article, let's look at how to add a new domain to the local server, or in other words, how to add a new site to the local server.
First of all, I draw your attention to the directories that the OpenServer package contains.
Among these directories is the domains folder. It is in this folder that the subfolders of the local server domains are located.
There are two methods for creating new domains (sites) on the local OpenServer: automatic and manual.
After that, a red flag will appear in the system tray of the computer's taskbar, clicking on which, we will get access to the complex control menu.
First, let's open the documentation for the Open Server software package. In order to do this, you need to click on the flag, then sequentially go through the menu items - Additional - Documentation - Open Server.
As a result, a window with help information will open. In the left part of the help we find the menu, here we select the item of interest to us - Domains and Alice.
Due to the fact that my blog is completely devoid of any chronology, I decided to fix it. The next series of articles will be devoted to creating your own website.
In this article, we will consider: what is local server, where to download it, how to install, how to setup, how to make a local server available on the internet.
What is a local server?
Local server- software that allows you to debug a site on a local (home) computer, without Internet access. The local server completely imitates the operation of hosting and has similar functionality.
Those who have been building site using only html and css know that there is no need for a local server, since the browser perfectly processes and understands the hypertext markup language and cascading style sheets. But, it is worth adding some PHP script and you will immediately get embarrassed - the browser will not display the result of PHP work. This is because browsers don't understand PHP. And in order for the user to see the page of the site in the form in which this page should be, it is necessary for the server to process and convert the PHP code to html.
All CMS a la WordPress and Joomla contain PHP scripts. Accordingly, for sites created using content management systems to be able to run on a home computer, a local server is required.
My site was created using WordPress, I constantly have to test some plugins, extensions, delve into PHP code. It is quite logical that sooner or later, such actions may lead to the loss of the site's performance due to a mistake. Of course, most of the hosting supports the restoration (backup) of the site and the database. And competent webmasters keep, just in case, a spare on their computer. I'm generally paranoid, except for the hosting and my computer, I also wrote it down to a USB flash drive. It will be necessary to throw somewhere else on the cloud service =).
And do not forget that not all plugin developers care about the correct removal of their products, and often, even after removing a product, you can observe traces of an incompletely erased plugin in the database. And the longer the site lives, the more such rubbish will hang in the database.
As a matter of fact, the local server will help to cope with the listed tasks and problems (and not only).
How do I create a local server?
In fact, you do not need to create a server, everything has already been created, you just need to download and install a ready-made set of necessary components. We will consider the installation and configuration of one of the popular local servers below.
How do I set up a local server?
One of the most popular and stable local servers - Denver... The name stands for: a gentleman's set of a web developer - D.N. v. R. We will then consider its installation.
The basic package contains:
- Installer.
- Apache server.
- PHP 5.
- MySQL5 supporting transaction.
- phpMyAdmin is a MySQL management system that allows you to work with databases through a browser.
- Sendmail and SMTP server emulator - simulates the function of sending mail. All sent emails will be located in the Z: \ tmp \! Sendmail directory in .eml format, and not sent to the specified mail.
One of the advantages is that the server can be installed on a flash drive. And wherever you are, you can work on your projects.
And, of course, the most important plus is that Denwer is absolutely free.
Installing Denwer
- 1. Run the downloaded file and agree to the installation of the base package.

- 2. Then, a browser window will open, which must be closed to continue or cancel the installation.
- 3. Press Enter to proceed with the installation.

- 4. Then, you need to specify the directory in which the files will be located. Default: C: \ WebServers. Feel free to press Enter and continue.

- 5. Following the instructions, press Enter.
- 6. Next, the installer will offer to select a letter for the virtual disk. By default, the letter Z is offered. If there is no disk with this name on the computer, then you can safely continue the installation by pressing Enter, if there is, then select another.

- 7. After all the distribution files are copied, you will be offered a choice of 2 options for creating a virtual disk:
- Create a virtual disk when you turn on your computer.
- Create a virtual disk only when explicitly called, that is, when you click the start shortcut on the desktop (I chose this option).
That's all, this is the end of the Denver installation.
Now you can test the work of the local server. If everything is done correctly, then 3 shortcuts will appear on the desktop: Start Denwer, Stop Denwer, Restart Denwer.

Click Start Denwer to start. If you go to my computer, you can see that the selected local drive has appeared. And in the tray (near the clock) 2 icons will appear in the form of a hat and a feather.
Open a browser window and enter the following into the address bar: http: // localhost /
A window with the message “Hurray, it’s working!” Will open, symbolizing that everything was done correctly and you can safely start a robot with a local server.
The page that opens contains a lot of useful things:
- You can find the necessary documentation for PHP, MySQL, Apache, Perl, PostgreSQL using the appropriate search.
- Since Denver is free software, the creators accept donations from grateful users to support the project. Well, and I noticed an affiliate link for Gino hosting.
- You can check the work of the components by clicking on the following links:
subdomain.localhost / ssl.php - check if SSL is active.
subdomain.localhost / - check "non-Internet" second-level domains, as well as SSI
test1.ru/ - checking second-level domains.
subdomain.test1.ru/ - checking subdomains (subdomains)
localhost / Tests / phpnotice / index.php - PHP Notice interception can be checked.
localhost / Tests / PHP5 / index.php5 - information on PHP 5.
localhost / Tools / phpMyAdmin - access to phpMyAdmin and MySQL.
custom-host: 8648 - check a host with a different IP address and port (127.0.0.2:8648)
localhost / Tests / sendmail / index.php - check if sendmail is working (sending mail).
The Denver site is displayed in hieroglyphs
The problem with hieroglyphs sometimes happens if the utf-8 encoding is used. In Opera and Chrome, instead of my text, creepy rock inscriptions were displayed. And Internet Explorer, oddly enough, showed everything as it should. But be that as it may, the problem must be solved. And you can do it in the following way:
Create an .htaccess file in the root directory of the site (in the www folder) and add the following there: AddDefaultCharset UTF-8
If the file already exists, then just add this line there.
How to remove Denver?
Uninstall via Control Panel - Uninstalling Denver programs will not work, since it does not write files to the Windows directory and does not leave entries in the registry, so an uninstaller is not needed. Therefore, we simply delete the folder with the files of the local server (after stopping the work of Denver using the shortcut on the desktop): C: \ WebServers, delete the shortcuts from the desktop and from Startup.
How to make a local Denwer server available on the Internet.
The first thing to learn is that Denver is for local use. And the developers warn that by making the local site visible on the Internet, you can expose the local machine to the danger of being hacked, since Denwer is not a reliable and full-fledged server.
Denver runs with administrator rights, so unfinished scripts can pose a potential danger, namely, open a "hole" through which a hacker can harm your computer.
If you are a competent administrator and fully understand what you are doing, then in order to open access to the local site, you should:
- First of all, you need to have a static ip address. Dynamic IPs will change when the machine (router) is rebooted.
- Windows has a built-in antivirus - a firewall that blocks access from external computers. In order to make the local site available, this block must be disabled in Start - Windows Firewall. It should be understood that this will also reduce the protection of your computer.
- Well, and the last thing to do is to create such a hierarchical structure of folders on the Denver virtual disk: /home/192.168.0.1/www
Instead of the ip address specified in the previous paragraph, you must specify your own, issued by your Internet provider.
If the provider provides, in addition to the IP address, a domain linked to it, then the site will be accessible through it.
In the next article, we'll look at installing WordPress on a local server.
ALL HAPPY NEW YEAR 2014 !!!
I once wrote articles about installing local servers ... but those are already outdated by their technical power. And today we will install and configure the local Bitnami server on the computer - Bitnami. Nowadays, in my opinion, this is a more useful gadget, unlike any Xamps and Denvers, etc.
Firstly, it is quite simple to install and configure, and, moreover, without any edits to the Windows system files. For example, today I copied my work site to LAN in 25 minutes!
The curtain opens:
Let's agree this way: I will try to describe the installation in as much detail as possible for beginners, but still not excessively ... some intermediate and insignificant pictures of the type, I will not publish "further". It will be long!
However, I will try to make it clearer, and those who already know the details will simply be able to follow the "anchors" and read what is needed:
Sections of the article:
if you treat the article carefully, your local server will work soon!
As I said, starting your own server for a WordPress site, for example, is very easy. And this is great! As you know, a local server is a must in certain cases and at various stages of site building. Although now for the final tweaking of the site, before releasing, hearty, in the light, there are suitable hosting sites. I will talk about this throughout the article.
In short, I will say: this local server can be used with many cms sites. One has only to select the server configured by default for the required CMS ... And in a couple of minutes (conditionally) you will already have a configured test site, which you can already forward to the desired one.
By the way, in the server-side Bitnam engine "by default" the line will already be installed, so ... let's install.
The binding of a certain CMS, among other things, is the ease of installation.
Download the "underlined" on your computer.
Well, I, for example, put the installer on disk "D" - there I also set up its work so as not to repeat itself after the next installation of Windows. I don't use the C drive.
More details below ...
advice:
Create a folder on drive "D", say, with the name localca and place the Bitnami installer in it - this is more convenient.
Now that you have everything downloaded and placed in a folder, click the installer ...
Select the Russian language of the server (f 2) - this is the Database, etc. (not to be confused with the site engine itself ... the English version is installed by default. Don't be shocked by the English dialect when you first open the local site) Change everything in further settings ...
... press the button "Yes" (f 3).
Well, now you need to select the server components. Let all the "check marks" remain as they are.
And here is attention !!
As mentioned above, at this stage you need to select the directory for installing the server. That is, indicate the path to the installer program (by default, the path to the "C" drive is specified).
We will change to "D"! But what is more convenient for you ..
Yes, and your server works only for you and there is no one to delay the password, in general.
Creating a Bitnami WordPress Admin Account
Here's another plus for Bitnami
These real addresses will come in handy when you start testing a site interacting with the Internet: that is, you can configure the link between your future site and the real world right on the LAN - for example, set up forms and shortcodes for subscriptions in articles, or the main one) Yes, and many other important adjustments which cannot be configured on XAMPP ...
In the next pop-up window, indicate the port of the Apache server - there, in my opinion, port 80 will be indicated. I advise you to replace it, because there may be conflicts with other installed programs on your computer. Skype usually runs on port 80.
So write down some other 87, for example.
Well, and SSL (if the window drops out - the certificate protocol), let it remain the same: just accept the terms and everything.
Enter your blog name on your local server
The next step and the window that opens will be:
setting up Gmail email on local Bitnami server
... I advise you to set it up seriously ... This is exactly what was mentioned above - all this will come in handy when you begin to configure those site modules that need a connection to the Internet.
Just to avoid confusion, enter your real address and password.
... a dialog box and a window of the installation process will open ...
... The process of unpacking, installation and preliminary automatic configuration of the server will begin ...
1 - brown arrow: go to the main page http: // localhost / in your browser window (and in the window that opens, press the GREEN underline ... the photo below) - the main page of your new local site on Bitnami will open (but do not rush - while you need to finalize local web server). But remember this step: you will come back to it when you get access to the database. More on this ...
2 - red: path for phpMyAdmin login to MyQL Database
3 - green: opens the root directory of the server (see also below).
There is, in fact, nothing to set up here, but there is little, little to understand.
Click in the direction of the green arrow and find yourself here:
This is a normal computer explorer, but with the folder of the created local server open and the folder we need.
1 - send the shortcut to the desktop (highlighted) and pay attention to the apps folder, I did not emphasize it on purpose, complications for)
We go along the following path: apps / wordpress / htdocs - this is where the root directory of the site is located, in which we will begin to conjure over the performance of the shadow theater.
... and - we continue the performance:
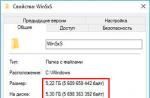
First of all, we need access to the database - the password, for information, can be seen in the wp-config.php file ... as well as all the related data of the TESTO site.
Enter data and au revoir ... you are in the MySQL database
Well and, completing the server settings, take a look at the photo: in the second tab of the top menu, the server control is hidden. Start All “Start” and Stop All “Stop” the server are the necessary control levers.
Find out the rest for yourself.
For your information:
If you suddenly need to move the site here, to Bitnami for testing, then - all settings are regulated in the wp-config.php file and CAREFULLY to the site theme FILES! To the file header.php You will need to edit the paths to the CSS files (in the site header) and pictures of all kinds of LOGOS.
Well, about what you missed and did not tell, ask in the commas ...
Your site will open at the initial http: // localhost / wordpress / ...
In general, on LAN, I advise you to perform only the initial settings of the future site. Well, of course, as long as you are not a real webmaster ... and you know little about the nuances.
And already on the hosting to deal with fine-tuning.
There is such a hosting Gino. I myself use it to overclock the site, and only then, if necessary, I transfer it somewhere to a stronger hoster, but this is true, if required.
I declare with full responsibility, it is simpler and clearer, MORE CONVENIENT for adjustments and settings of the site (without any ftp clients), I have not yet met in Runet.
! .. subscribing to site updates -
... parting with ignorance ..!
And here is a video and a post for those who.
Every Minecraft player wants to play with his friends on servers, but finding a decent server is very difficult, and you want to be the admin yourself, so you can create your own Minecraft server. We wrote this article and filmed a video in which we laid out on the shelves everything that relates to the server and after it, you hardly ask a question how to create a Minecraft server on Windows.
Video instruction:
There are many cores of Minecraft servers, we will tell you about the four most popular ones.

Vanilla- the official core from the developers. Pros: Comes out immediately after the release of the new version; Cons: Not many plugins; Low optimization of resource use; You will have to install Forge separately if mods are needed.

Bukkit- Kernel based on Vanilla. Pros: Highly optimized compared to the standard kernel; Lots of third party plugins written. Cons: You will have to install Forge separately if mods are needed; The project was completely closed on version 1.6.4, there is no support on the official website. It now exists with Spigot.
![]()
Spigot- More optimized kernel based on Bukkit. Pros: Many improvements over Bakkit; All plugins written in Bakkit work quietly on this core. Cons: For a beginner, installation may seem daunting; You will have to install Forge separately if mods are needed.
![]()
Cauldron(previously MCPC +) - Spigot-based kernel that includes pre-installed Forge. Pros: Since Forge is already preinstalled, if you want to install mods, you do not need to install it yourself; All plugins written in Bakkit work quietly on this core. Cons: For new versions of Minecraft, you have to wait for the assembly for a long time, since at first the developers are waiting for the release of the updated Spigot.
Now you need to decide for what purposes you need a server and based on this, choose a kernel on which you will develop the server. We will show how to create a server using each core as an example.
1) First, download the server of the version you need:
(Downloads: 16598)
(Downloads: 9222)
(Downloads: 42582)
(Downloads: 348)
(Downloads: 20489)
(Downloads: 14566)
(Downloads: 932)
(Downloads: 16865)
(Downloads: 231)
(Downloads: 731)
(Downloads: 380)
(Downloads: 109)
(Downloads: 209)
(Downloads: 116)
(Downloads: 9600)
(Downloads: 7912)
(Downloads: 12130)
(Downloads: 334)
(Downloads: 184)
(Downloads: 173)
(Downloads: 182)
(Downloads: 546)
(Downloads: 220)
(Downloads: 499)
(Downloads: 4284)
(Downloads: 5243)
(Downloads: 246)
(Downloads: 284)
(Downloads: 246)
(Downloads: 1404)
(Downloads: 1054)
(Downloads: 243)
(Downloads: 173)
(Downloads: 1694)
2) Create a separate folder for the server and copy the downloaded file.

3) Run the server file (for a file with the * .jar extension, you need to right-click on the file -> Open with -> Java) and immediately the console window will be closed (* for version higher than 1.6), eula.txt false on true... We save the modified file.

4) Start the server again, wait a few seconds and see that a lot of files have appeared in the folder, including the folder with the world, which means the server has started normally. But you cannot enter until you can (Of course, if you do not have a license), to enter the pirate, open the file " server.properties"and find the parameter" online-mode ="and change the value from true on false.

5) You can enter the game, the network game, add a new server, you can use the IP "127.0.0.1" (Without quotes) or "localhost".

1) Download the server version you need:
(Downloads: 54617)
(Downloads: 324)
(Downloads: 18569)
(Downloads: 14028)
(Downloads: 786)
(Downloads: 1433)
(Downloads: 14965)
(Downloads: 608)
(Downloads: 230)
(Downloads: 8502)
(Downloads: 7103)
(Downloads: 399)
(Downloads: 180)
(Downloads: 403)
(Downloads: 184)
(Downloads: 260)
(Downloads: 6915)
(Downloads: 6963)
(Downloads: 242)
(Downloads: 371)
(Downloads: 1830)
(Downloads: 1643)
(Downloads: 156)
(Downloads: 1754)
(Downloads: 324)
(Downloads: 278)
2) Create a separate folder for the server and copy the downloaded file there. Create a file start.bat(A simple .txt file needs to be renamed with the extension to start.bat) with the following content:
@echo off
java -jar spigot.jar
pause
Download this file if you don't understand how to create it:
(Downloads: 107427)
2.1) Next, copy this file to the server folder.
Note: Be sure to replace the line in the file spigot.jar to your server name, for example spigot-1.8.8-R0.1-SNAPSHOT-latest.jar !
To edit a file start.bat, you must: right-click -> "Change".

3) Run our " start.bat", you should see the following (* for a server higher than 1.6 version):

A couple of new files have appeared in the folder with the server, we are interested in " eula.txt"to open and change the value false on true... We save the modified file.
What is this file? This is a user agreement between Mojang and you, by setting this to true you agree to all of the terms of this agreement.

But you cannot enter until you can (Of course, if you do not have a license), to enter the pirate, open the file " server.properties"and find the parameter" online-mode ="and change the value from true to false.
What is this online-mode parameter? He is responsible for checking the license of the player trying to connect to the server, if the player logs in from a pirate client, the server will not let him through.
5) We go into the game, into the network, add a new server, entering as IP - " localhost"(Not using quotes).
1) Download the server version you want to play on:
(Downloads: 231759)
2) Unpack the downloaded archive into a separate folder.
3) Run the file start.bat and you will see the following (* for version higher than 1.6):

A couple of new files have appeared in the folder with the server, we are interested in " eula.txt"to open and change the value false on true... We save the modified file.
What is this file? This is a user agreement between Mojang and you, by setting this to true you agree to all of the terms of this agreement.
4) Start the server again. We are waiting for the launch to complete and we see the word "Done" at the end, which means everything is ok.