How to create interactive images in WordPress. An unusual photo is a great way to promote you: how to make an interactive photo ThingLink makes your photo interactive
How to create interactive images in WordPress. An unusual photo is a great way to promote you: how to make an interactive photo ThingLink makes your photo interactive
Greetings to the readers of the Webtun site. For several days now I have been going to tell you about an interesting service, but unfortunately, due to lack of time, I put it off for later. And finally, I had free minutes. Today we will talk about a service called that allows you to create interactive pictures, namely, you can add signatures, links, sounds, videos, flick pictures to any point on any picture of your site.
It works like this: A small script is added to the site. Dots appear on the side in the upper left corner of the picture, indicating the presence of tags (for users) and / or the ability to add them (for the owner of the picture). If you hover the mouse over the picture, a toolbar and tags already added to the picture, indicated by dots, appear. If the mouse is removed from the picture, then only the dots in the upper left corner remain, the rest of the excesses disappear. Each tag can include a caption and (optionally) a link. By default, just anyone can not add tags, only you yourself. To do this, open the Thinglink service in the next tab and log in. If you wish, you can open the possibility of tagging this or that picture for everyone.
Now I will tell you and clearly show you how to create an interactive picture or a photo and publish it on the site in the future. In order to start using this service, you need to register, at least you will be reminded of this after uploading the image. You can register manually by following the typical registration process. Well, I preferred authorization for myself through my facebook account, it's easier and faster.
After authorization, you will see that you can upload an image in three ways:
1. Of course, you can upload a picture from your computer. But keep in mind that the storage space for pictures is organic. You can initially upload a maximum of 10 images to Thinglink. It is possible to increase your limit on uploaded images. There is a so-called referral program. If someone registers in the service by going from your picture, you will be able to upload additional 10 images and so on.
2. Add image from Flicker. You can import the latest public images of any Flickr user. To do this, simply enter your username and you will see a list of the last 20 images. You will be able to select one or more images to import into Thinglink.
Using this method of uploading images, you have no limit on the number of images.
3. Download from a third party server or website. All you have to do is paste the URL of the image into the field and click the button "Tag this image".
The most common image types are supported - PNG, JPEG, GIF and BMP. The maximum image size is 5 MB. Images larger than 1280x1280 are scaled.
Let's try to create an interactive photo together. As an example, I will use a photo of this wonderful kitty.
I will use the third method described above, or rather, the picture will be stored on the site. Insert Url pictures into the field and click on the button "Tag this image"
We will get such a window for editing in front of us:
Click anywhere on the image to create tags. For example, I've added five labels. At the end, click on the green "Done" button
When labeling, note that there is support for a large number of integration services.
If you take advantage of the integration and service capabilities, you can also attach a music file to the picture! This way, you can create a musical greeting card or leave verbal comments.
In the settings of your picture, you can give the right to visitors to leave their marks on it.
After you have marked the marks on the pictures. (If you are a webmaster) You should insert something like this into your website template:
In order for interactive images to work on all pages of your site, it is recommended to insert this code before the tag
If you have a blog on Wordpress, Blogger or Tumblr you can use the plugin already available.
Using the "embed image" option, people have the ability to add your interactive image to their website. Who wants to be able to share it with friends using the "share image" option.
That's not all. Logging into your account, you will find that there is also a statistics section in which you can see the number of views of your image or clicks on tags. I think that you can figure out the statistics without my help.
Attracting attention is part of the sales formula.
A-Attention - Attention
I - Interest - Interest
D - Desire - Desire
A - Act - Action
First, we must grab attention, then arouse interest and desire, and finally, induce action. Since everything in this world, one way or another, is tied to sales, every day we have to draw the attention of other people to ourselves, to our creativity, to our product, to our business. In order to find out how to do it better, we use the advice of friends and colleagues, look on the Internet, learn from the Masters, and apply our practical experience.
As you know, life is changing rapidly and every day, and we can hardly manage to track all the most modern ways and methods for attracting attention on our own. Today in the "Piggy bank of tips" great news for readers - with the help of interactive photography, you can use all the channels of your promotion.
Why and who needs interactive images
The fact that the photographs retain attention, and that they are original, interesting and unusual photos hold attention even more, a familiar fact. Try adding active links to a photo, image or picture, and by doing so, you will turn them into information items. Don't know how? I'll give you a hint.
There is a great service for this. Thinglink.com It is with the help of this service that you can place any of your active links on the image.
Let's answer the question first, who needs it? Naturally, not everyone. Artists, musicians, famous and popular personalities, online stores, and corporate websites use this service with great success. By and large, all those who want to declare themselves publicly. In general, the list turns out to be decent.
If you have something to show, and there is a need to tell about it, then this is for you. As you can see, all ingenious is simple: you can take any image, embed links, videos, audio, your social connections, and make it interactive.
ThingLink makes your photo interactive
To do this, go to the ThingLink service, load the desired image and insert links and tags (description). By the way, it is the tags that can make your image more attractive, and therefore more active on the part of users. Therefore, the more interesting you come up with a description for each link, the more people will want to click on it. I plan to edit my tags, I hope that interesting ideas will appear.
From this service, you can take a minimum or maximum of opportunities, as much as you need. Of course, you can embed the resulting unusual photo on your site with any platform. There is an application with which you can make tabs on Facebook, or even better - you can read about it in service blog and see the required methods in action.
I don't think that learning the service will take much time, the creators have tried to make the tool for creating an unusual photo and image convenient and accessible. It is quite possible that I will also discover for myself some moments that I have missed. But today I can publicly declare myself with the help of an unusual photo, located, and your views are instantly reflected in the statistics. The number of clicks and clicks on links is growing very quickly. That I, as the author of the site, undoubtedly pleases.
What do you get from interactive photography?
Colleagues, you can take this great way of promoting with the help of an unusual photo for yourself. Your visitors and readers will be impressed!
V In the gallery of works you can find examples for your own embodiment.
D In order to change, add and edit links and tags on your site, you need to install ThingLink on your site.
V the free version can upload 50 images. For some it may not be enough, but for many of us, I think it’s enough to start with.
M You can embed any other person's image or photo on your site.
N in a group photo, different people can be tagged this way.
Agree, friends, that this interactive technology is amazing! It allows even greater dissemination of information about us, our interests, abilities, talents, preferences. An unusual photo will be a great tool for us to promote the brand and not only. It is important, as always, to know when to stop. In one example, I saw a laconic one link to a large photo, but led exactly where I needed to attract more attention.
P.S. Prompt. You can quickly find the information you need in my blog
In conclusion - an example of how you can tell interestingly about what, as a result, will surely attract the attention of many.
An interactive image allows you to select, link, and animate specific areas of an image. In this article, we will show you how to create interactive images in WordPress.
What is Interactive Image
An interactive image has hotspot areas, links, colors, and more. This is how it differs from a simple image that you upload to WordPress. Interactive images attract users with their details. You can add descriptions to different parts of the image, add links to pages, highlight sections.
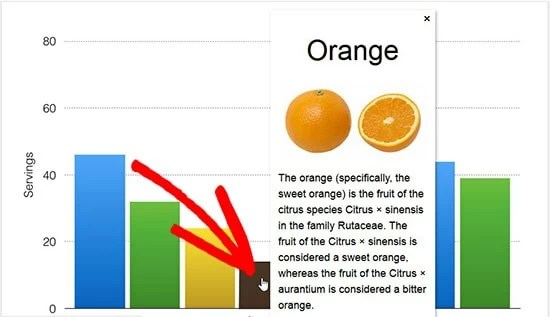
In this image, you can see the description of the fruit when you hover the mouse cursor over a specific column. You can use these interactive images to increase user engagement and increase the time spent on the site.
Let's take a look at how you can grab the attention of your visitors with interactive images.
Creating interactive images in WordPress
The first thing to do is install and activate the plugin Draw attention.
Upon activation, you will see a new custom post type in your WordPress admin area. To create an interactive image, you need to go to the page Draw Attention »Add New page.
Start by adding a title for this new interactive image so you can easily save it. On this page, you can create an interactive design for new or previously uploaded images. You can add a new image by clicking on the uploaded images icon, or you can select an image from the WordPress media library.
Then you need to press the button " Publish»(Publish).
Once published, the plugin allows you to edit the image and highlight specific areas, add colors, links, draw hotspot areas, and more. You can scroll down to the " Hotspot Areas»(Hotspots) and expand the preview area for preview.
Just move your mouse and draw clicks on the image. You can easily select areas of hotspots and expand them to create a selection.
After you outline the hotspot area, you need to scroll down to the “ Action»(Action) and select an action for the selected area in the image. If you select Show More Info, you can add a description to explain the hotspot area in the image. You can add a link to the selected area using the " Go to URL».
You can also control general settings and style for links, actions, text, info background, and more. These settings can help make an image more interactive.
Then you need to click the " Update»(Update) and copy the shortcode and add it to your WordPress post or page.
The plugin allows you to create as many interactive images as needed using previously uploaded or new images.
Import and export of interactive images
If you work on multiple sites and want to import / export interactive images, this requires the same Draw Attention plugin on both sites.
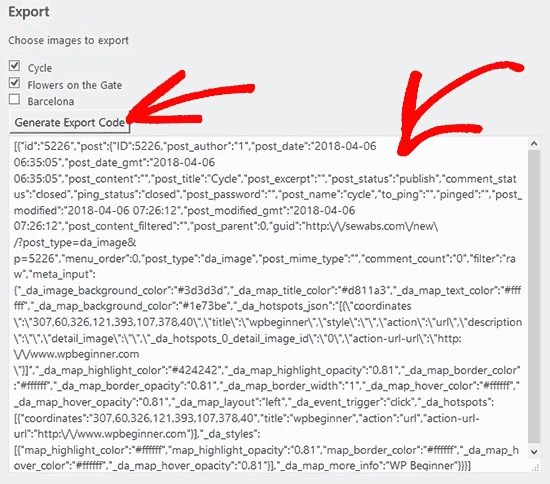
On the first site, you need to visit the "" page and mark the images that you want to export. Then press the button " Generate Export Code»(Generate Export Code) and copy the code.
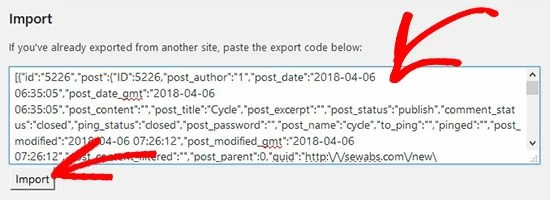
After that go to the following website and make sure you have Draw Attention plugin enabled. Then go to the page " Draw Attention »Import / Export»From WordPress admin and paste the code into the import field.
Click the " Import»(Import), your images will be imported, and any interactive details that were added earlier.
These interactive images are good for WordPress SEO and will drive more visitors to your site. However, we recommend compressing images before loading them to improve site performance.
We hope this article helped you learn how to create interactive images in WordPress.
In this article I will tell you about an interesting and unusual plugin that allows you to make an interactive image. I will also add that this plugin is completely free and stable.
An interactive image is a picture on which there are several active areas, clicking on which (or hovering the mouse) triggers an event, for example, going to a link or displaying a hint message.
How to create an interactive image in WordPress
So, download and install the ImageLinks Lite plugin on your website. You can download the plugin from the link below.
To begin with, I'll only talk about how to create an interactive image. And then I will analyze all the plugin settings.
Go to the "ImageLinks" console item that appeared after activating the plug-in, and then to the "Add new" sub-item. Enter a name for your interactive photo in the top field.
Scroll down a bit and click on the Set Image button.
The built-in WordPress media loader will open in front of you, in which select an image that has already been uploaded or upload a new image from your computer that you want to make interactive. And the selected picture will immediately appear in the preview a little higher.
Now let's turn this image into an interactive image. To do this, go below the preview to the Hotspots tab and click on the plus icon to add a new interactive dot on the image.
Then return to preview. You will see a dot appear at the top left.
Grab it with the mouse and move it to the place of the picture where the first interactive point should be.
After that, go back to the options below the preview to set the parameters for the point. Here you need the Hotspot Settings section. Open it and fill in the "Link URL" field, in which you need to specify the link to which the transition will occur when you click on this point on the interactive image. If necessary, you can enable the "Open Link in New Window" option to open the link in a new tab.
Now pay attention to the block of settings "Popover Settings". Here you can set a hint that will appear when you hover the mouse over an interactive point. First, enable the Show Popover option. And then below in the editor, fill in the content of the tooltip.
Now go back to the preview and click on the "Preview" button to see how it will look in practice.
You will see your already working interactive image, where you can check the generated hint and link.
Now it became clear how to add interactive dots to the image. To add another point, click on the button with the plus icon.
You can add any number of points to the picture.
When all points have been added, click the Publish button to save your changes and use the shortcode to publish this live image to your site, posts, and pages.
ImageLinks Lite Plugin Settings
Now that you know in general terms how to make an interactive image, I will look at other settings and features of the plugin. As you may have noticed, all options are divided into two tabs "Generals" and "Hotspots". I'll start with the sections on the first tab:
Image Url. Provides a link to an interactive image. You can specify a picture from another source, and not from your site.
Image Size. Picture size.
You can choose a theme for point hints.
Mobile Animation. Turns animation of points on and off on mobile devices.
Popover Settings. Settings for the appearance of tooltips on points.
Custom CSS. Here you can connect a custom style.
The "Hotspots" tab contains options for each of the points. On the side, on the left side, there is a list of created points with buttons for operations on them - add, delete, copy and move.