This menu allows you to choose from what kind of media, and even from which one, will be loaded this time. This can come in handy when installing the system, installing updates for the BIOS, or if you need to run the LiveCD.
Standard methods
In order to get to the boot menu, there is a set standard keys, in the same way as for entering the BIOS. These are usually buttons f11,f12,Esc... In this menu, you can see all the devices from which you can download at the moment and select the one you need.
As a rule, information about which button should be pressed immediately appears when the computer starts up, if this did not happen and the above options did not help, then other actions will be required.
Features of the boot menu in Windows 8 and 10
If the PC was shipped immediately with one of these systems, then pressing the keys may not work. This is because these systems usually do not turn off, in the usual sense of the word, but rather, go into hibernation... To get into the boot menu, you must completely turn off the computer. To do this, you can hold down the key shift when choosing the item " Shutdown" or reboot device using the button on the front panel.
There is also an option with by disabling fast startup, but it's not worth using it for the sake of one hit in the Boot Menu.
Boot menu on motherboards and Asus laptops
For computers, you log in at pressedf8 immediately after launch. There can be some confusion with laptops. Most of them can also launch the required option when this key is pressed, and some turn it on only when pressedEsс(this usually applies to models whose names start with x or k). 
Lenovo Laptops
Everything is much simpler here, the launch is carried out when pressedf12... There can also be a special key with an arrow icon, which will allow you to perform the same action. 
Boot Menu on Acer
Here, the entrance is also carried out by pressingf12... Only here is a little trick: for correct operation and loading the boot menu using this button, you must first enable the corresponding option in bios. You can get into it by pressing f2. The name of the setting itself is shown in the image, all you need to do is set “ Enabled"At the desired point. 
Other laptop and motherboard models
The manufacturers do not seem to have come to a consensus on which button is better to use for the Boot Menu, and therefore, each of them left the most convenient option for themselves. As a result, it is practically impossible to “guess” the right button from the first attempt without knowing which model the motherboard is. Next, a list will be presented for most common of them. 
In some models of laptops and computers, when entering BIOS settings, you may find an option called “f12 boot menu”. Not everyone knows what it is and what she is responsible for. In this article, you will find answers to these questions, as well as find out whether you need to enable it or not.
What is the f12 boot menu responsible for in BIOS?
To understand the purpose of this option, you first need to translate it into Russian. The translation sounds something like this: “F12 boot menu”. Here F12 stands for a button on the keyboard.
In simple words, the F12 boot menu value can be described as “Activating the boot menu by pressing the F12 key on the keyboard”.
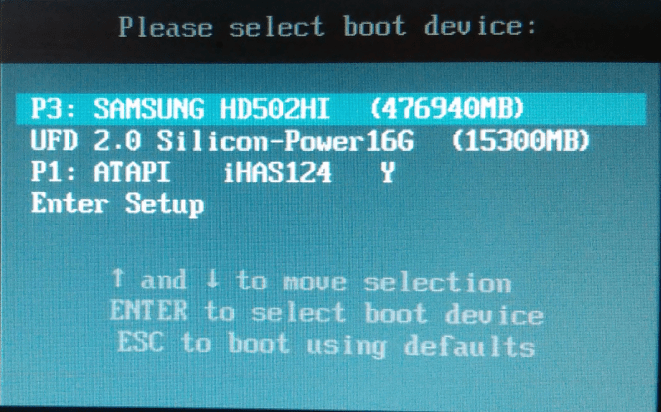
This is what the boot menu looks like
This means that if you translate the value opposite “F12 boot menu” to the “Enabled” position, then you enable the ability to open the list of devices from which the computer can start to boot (flash drives, cd-rom, hard disk, etc.) when you press F12 buttons immediately upon power-up.
Why is this needed?
Activating this option is useful so that before installing Windows from a USB flash drive or, you do not have to adjust boot priorities every time.
Boot menu
When the “F12 boot menu” option is activated, to just press F12 while turning on the computer or laptop, select the USB flash drive in the list that opens and press the “Enter” button.
The BIOS is configured so that it knows to boot from a floppy or disk. This is done mainly to install Windows or another boot program. Read about how to make the ego in this section.
BIOS setup
At this stage, it is necessary to configure the BIOS in order for the computer to boot from the system (boot) floppy disk or disk. By default, the BIOS tries to load the operating system by looking for its bootloader program first on the A: drive (in most computers, it is just a three-inch floppy drive), and then on the first hard drive of the computer.
However, if the BIOS settings have already been changed by someone, as is almost always the case on previously working computers, the boot order may be completely different. Just in case, we'll go through all the BIOS settings to boot the operating system from disk together - it doesn't matter if your computer is already configured the way we need it or not. In any case, the environment from what you learn to handle the BIOS settings will not.

To enter the BIOS settings mode, in most of the replaced motherboards, you must press the Delete key in sequence immediately after turning on the computer, and when you enter the BIOS you will see an image on the monitor similar to that shown in the picture.

It is necessary, using the arrow keys, to go to the Boot menu, as shown in the picture.

If the BIOS is configured in such a way that Hard Drive is selected as the first boot device, you must change this parameter to Removable Devices.
Select item Removable Devices and press the "+" key. Remember to save changes to BIOS: in the Exit menu, press Enter Ha for Exit Saving Changes. In the next menu dialog, you need to confirm the need to save the changes made by pressing the Enter key on the Yes item.
After restarting, the computer will boot from the installation floppy disk or dvd disk, which must be inserted into the drive. After this happens, you can proceed to the next stage of work - to prepare the hard disk.
P.S. In the BIOS settings, you can not only change the boot sequence modes, but also set such primitive parameters as date and time. All other switches must be performed only after reading other instructions for setting up the BIOS, otherwise you can disrupt the computer's performance.
Good day to all.
When installing Windows (for example), it is very often necessary to select a bootable media other than the hard drive. This can be done in two ways:
1) Go to the BIOS and change the boot queue (i.e. put the USB flash drive in the boot queue in front of the HDD - this way the PC will first check the USB flash drive for boot records, and only then the hard drive);
2) Call the Boot Menu and select a specific media to boot at the moment. In my opinion, this option is even better than the first one: it's faster and you don't need to go back and forth in the BIOS to change the boot queue.
To enter BIOS (call Boot Menu) in most cases, the keys are used: F2, Del, Esc, F12 (depending on the manufacturer of the device). You need to press the button immediately after turning on the computer (you can several times so as not to miss the right moment.
By the way, if you look closely at the first screen, which is visible immediately after turning on the computer, then a button is often written on it to enter the desired settings (call the menu). An example is shown below.
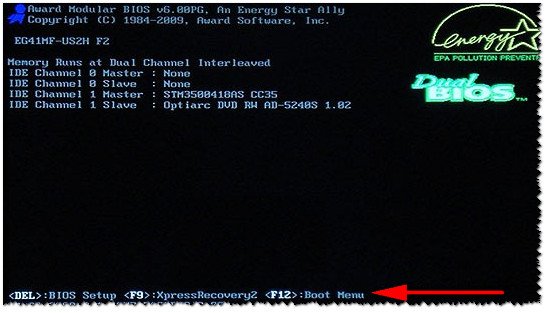
Rice. 1. Dual Bios. DEL button - enter BIOS settings, F12 button - Call the Boot Menu.
Table 1: hotkeys for computers
To use the table - you need to know which motherboard you have, the BIOS version. You can find out this in several ways, I will give the fastest:
![]()
A simple free program that will tell you a lot about your hardware. For example, you can find out information about: processor (CPU), random access memory (Ram), motherboard (Motherboard), video card (Graphics), HDD drives, SSD (Storage), etc. In addition, you can find out and monitor online temperature main components: hard drive, video card, processor.
A screenshot of the operation of this utility is shown in Fig. 2.
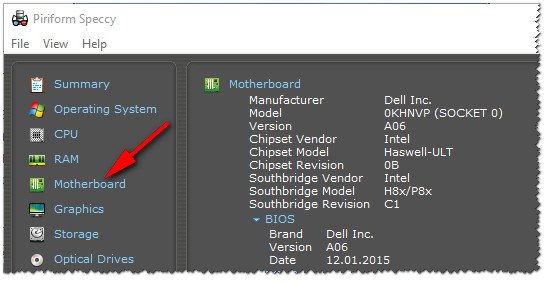
Rice. 2. Speccy - getting information about the motherboard
Table # 1
| Motherboard | BIOS version | Hotkey | Which menu will be open |
|---|---|---|---|
| Acer | Del | Enter Setup | |
| F12 | Boot Menu | ||
| ASRock | AMI | F2 or DEL | run Setup |
| F6 | Instant Flash | ||
| F11 | Boot Menu | ||
| TAB | switch Screen | ||
| Asus | Phoenix-Award | DEL | BIOS Setup |
| TAB | Display BIOS POST Message | ||
| F8 | Boot Menu | ||
| Alt + F2 | Asus EZ Flash 2 | ||
| F4 | Asus Core Unlocker | ||
| BioStar | Phoenix-Award | F8 | Enable System Configuration |
| F9 | Select Booting Device after POST | ||
| DEL | Enter SETUP | ||
| ChainTech | Award | DEL | Enter SETUP |
| ALT + F2 | Enter AWDFLASH | ||
| ECS (EliteGrour) | AMI | DEL | Enter SETUP |
| F11 | BBS POPUP | ||
| FoxConn (WinFast) | TAB | POST Screen | |
| DEL | SETUP | ||
| ESC | Boot Menu | ||
| GigaByte | Award | ESC | Skip memory test |
| DEL | Enter SETUP / Q-Flash | ||
| F9 | Xpress Recovery Xpress Recovery 2 | ||
| F12 | Boot Menu | ||
| Intel | AMI | F2 | Enter SETUP |
Table number 2: hot keys (Bios / Boot Menu, etc.) for laptops
Note: on modern laptops, the key combination in Windows also works: hold down the SHIFT button + select the restart button with the mouse.
Boot Menu is a small window in which using the mouse (arrows on the keyboard) you can select the device from which to boot. An example of such a menu is shown in Fig. 3.
Depending on the manufacturer of your device - the menu may differ slightly, but the principle of operation is the same everywhere.

Table 2
| Laptop manufacturer | BIOS version | Hotkey | Function / menu call |
|---|---|---|---|
| Acer | Phoenix | F2 | Enter Setup |
| F12 | Boot Menu (Change Boot Device, Multi Boot Selection Menu) | ||
| Alt + F10 | D2D Recovery (disk-to-disk system recovery) | ||
| Asus | AMI | F2 | Enter Setup |
| ESC | Popup Menu | ||
| F4 | Easy Flash | ||
| Phoenix-Award | DEL | BIOS Setup | |
| F8 | Boot Menu | ||
| Benq | Phoenix | F2 | BIOS Setup |
| Dell | Phoenix, Aptio | F2 | Setup |
| F12 | Boot Menu | ||
| eMachines (Acer) | Phoenix | F12 | Boot Menu |
| Fujitsu Siemens | AMI | F2 | BIOS Setup |
| F12 | Boot Menu | ||
| Gateway (Acer) | Phoenix | Click mouse or Enter | Menu |
| F2 | BIOS Settings | ||
| F10 | Boot Menu | ||
| F12 | PXE Boot | ||
| HP (Hewlett-Packard) / Compaq | Insyde | ESC | Startup Menu |
| F1 | System Information | ||
| F2 | System Diagnostics | ||
| F9 | Boot Device Options | ||
| F10 | BIOS Setup | ||
| F11 | System Recovery | ||
| Enter | Continue Startup | ||
| Next | F1 | Boot-Menu Call | |
| F2 | BIOS setup | ||
| Lenovo (IBM) | Phoenix SecureCore Tiano | F2 | Setup |
| F12 | MultiBoot Menu | ||
| MSI (Micro Star) | *** | DEL | Setup |
| F11 | Boot Menu | ||
| TAB | Show POST screen | ||
| F3 | Recovery | ||
| Packard Bell (Acer) | Phoenix | F2 | Setup |
| F12 | Boot Menu | ||
| Toshiba | Phoenix | Esc, F1, F2 | Enter Setup |
| Toshiba Satellite A300 | F12 | Bios |
Table 3: recovery from a hidden partition (for laptops)
Most modern laptops have a special hidden partition with the ability to restore Windows using a "pair" of keys (no need to prepare a bootable USB flash drive, download ISO images from Windows, etc.).
As a rule, to start the recovery function - after turning on the laptop, it is enough to press one key (F9, for example, on Asus laptops). Next, a window will appear in which you need to follow the instructions of the recovery wizard.
Note: When restoring information, the system drive "C: \" is often formatted and all information from it is deleted. Make a copy of important data from it in advance.

Rice. 4. ACER Laptop - Recovery Service Utility
Table 3
| Laptop manufacturer | Combination of buttons | Note |
|---|---|---|
| Acer | Alt + F10 | First you need to enter the Bios of the laptop, and enable the D2D Recovery function. In the recovery system, by default, the password is set to 000000 or AIM1R8. |
| Asus | F9 | |
| Dell Inspiron | Ctrl + F11 | |
| Fujitsu Siemens | F8 | |
| HP | F10, F11 | |
| Lg | F11 | |
| Lenovo ThinkPad | F11 | |
| MSI | F3 | |
| Packard bell | F10 | |
| RoverBook | Alt | |
| Samsung | F4 | |
| Sony VAIO | F10 | |
| Toshiba | F8, F11 |
PS
The tables will be replenished (over time). For additions on the topic of the article - a big merci in advance. Good luck to all!
You have a bootable DVD or USB flash drive, now you need to make sure that the computer can boot from them.
There are 2 ways to boot your computer from a DVD or USB flash drive:
- Selecting a device in the boot menu
- Changing Boot Priority in BIOS
Each method has pros and cons.
If you need, for example, to install Windows, then it is more convenient to choose the first method. And if you constantly work with boot disks, then the second method is more convenient.
Features of choosing a device in the boot menu
- On older computers (motherboards) the function is missing. In this case, you will have to change the priority in the BIOS.
- When you select a device in the menu, the computer boots from this device 1 time. This is convenient when installing Windows - you do not need to return the boot from the HDD after the first reboot.
Features of changing the priority in the BIOS
- Works on both new and old computers.
- The priority is constantly changing, i.e. valid until the next change, and not one download as is the case with the menu. This is not very convenient when installing Windows from a USB flash drive, you have to return the boot from the HDD after the first reboot.
How do I enter the boot menu or BIOS?
There is no universal button for entering the boot menu or entering the BIOS. It all depends on the manufacturer of the computer (motherboard), they are all different - the keys are also different. The most correct way to find the right key is to read the instructions from the computer (motherboard). For some of the most common boards - the keys are listed below.
There is only one time when you need to press these keys - during the self-test immediately after turning on the computer (English - Power-On Self-Test or POST). If you do not go into details, POST lasts from turning on the computer until the operating system starts loading (the appearance of a logo or OS selection menu). The POST pass looks like this:
The screen displays a prompt: Press DEL to run Setup which means - press DEL to enter BIOS Setup... DEL is the most common key, but there are many others - more on that below.
During POST, a graphical splash screen may appear with the name of the manufacturer of the computer or motherboard.
Boot Menu Keys and Quick Start Guide
As noted above, each manufacturer has its own key to enter the boot menu. Here is a small list of the most common ones:
The boot menu looks something like this:

You just have to select the desired device from the list. If everything is done correctly, the disk or flash drive is written correctly, the download / installation should start.
BIOS keys and a quick guide to changing the boot priority
To enter BIOS Setup, use the key corresponding to the manufacturer of the computer or motherboard, here is a small list of them:
Acer (Aspire, Altos, Extensa, Ferrari, Power, Veriton, TravelMate): | F2 or Del |
Acer (old models): | F1 or Ctrl+Alt+Esc |
F2 or Del |
|
Compaq (Deskpro, Portable, Presario, Prolinea, Systempro): | |
Compaq (old models): | F1, F2, F10, or Del |
Dell (Dimension, Inspiron, Latitude, OptiPlex, Precision, Vostro, XPS): | |
Dell (old and rare models): | Ctrl+Alt+Enter or Fn+Esc or Fn+F1 or Del or Reset twice |
ECS (Elitegroup) | Del or F1 |
eMachines (eMonster, eTower, eOne, S-Series, T-Series): | Tab or Del |
eMachines (some older models): | |
Fujitsu (Amilo, DeskPower, Esprimo, LifeBook, Tablet): | |
Hewlett-Parkard (HP Alternative, Tablet PC): | F2 or Esc or F10 or F12 |
Hewlett-Parkard (OmniBook, Pavilion, Tablet, TouchSmart, Vectra): | |
Lenovo (3000 Series, IdeaPad, ThinkCentre, ThinkPad, ThinkStation): | F1 or F2 |
Lenovo (older models): | Ctrl+Alt+F3, Ctrl+Alt+Ins or Fn+F1 |
MSI (Micro-Star) | |
F2, F10 or Del |
|
Sony (VAIO, PCG-Series, VGN-Series): | F1, F2 or F3 |
Toshiba (Portege, Satellite, Tecra): | F1 or Esc |
You will find less common hotkeys for entering BIOS.
In addition to the fact that there are several major BIOS manufacturers (AMI, Phoenix - Award), so also computer (motherboard) manufacturers modify the BIOS for a specific model. As a result, it is impossible to create a universal instruction even for changing one function (boot priority); there will be differences on each computer. You can only roughly show how this is done, and look for the exact instructions in the documentation for the computer (motherboard).
To navigate the BIOS and change settings, use the arrows on the keyboard, the Enter and + \- .
AMI
Move the arrows to the tab Boot, go to Boot Device Priority:
In the following figure, we see that the boot is sequentially performed: from the floppy drive (Floppy Drive), hard disk (Hard Drive), and the third device is not used (Disabled).
If we want to boot from a DVD, we need to change the priorities so that the first device is the DVD drive. Use the arrows to switch to the first device ( 1st Boot Device), press Enter and select in the menu that appears CDROM... With a flash drive, everything is the same.
Push F10 and confirm the exit with saving (Save and Exit) by choosing .
Phoenix-Award
We enter Advanced BIOS Features:
If we want to boot from a DVD, we need to change the priorities so that the first device is the DVD drive.
Use the arrows to switch to the first device ( First Boot Device), change to CDROM... With a flash drive, everything is the same.
Push F10 and confirm the exit with saving (Save and Exit).
Do you know other keys or want to clarify? Comments are open!
Enjoy your use!