I already wrote about how to insert your music into . I propose to consider an equally topical issue - how to insert your music into mafia 3. By the way, all three parts of the mafia game differ only in the plot and additional characters. In general, the games are very similar. Therefore, as in the second part, you need to download a special add-on program. With its help, you can create your own radio, that is, make your own playlist with songs.
The program is absolutely free. You can download without registration and SMS. Installation takes no more than 5 minutes. Important: after installation, the program may “request” the computer to be restarted. Don't panic, it's normal! So, how to insert your music into mafia 3: mods for mafia 2, maifa 1 and for 3.
How to insert your own music into mafia 3
In order to create your own radio in the third version of the mafia, you need to download the program Mafia 2 Music Manager 1.3. One of the important functions of the program: you can listen to songs not only during the game, but simply by launching the application. By the way, all your playlists are saved. Therefore, there is no need to update the list again.
How to insert your text into a ready-made frame in LiveInternet? This is not the first time I have been asked this question, so I decided to write a "lesson" on this topic.
Well, for starters, let's start with the fact that you found a beautiful frame with a code that you liked. Now select the code and copy it (Second + C). now go to your diary and click WRITE, in the upper part of the diary.
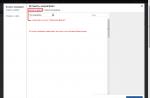
We will open a window in which we are writing a message, put the text editor in ADVANCED mode (if you do not already have it) and click the SOURCE button.
Now paste the frame code Ctrl+V. Where YOUR TEXT is written in the code, insert your text accordingly. If you inserted a verse, then after each line we put a tag
so that the lines are separated from each other (otherwise the verse will be continuous text).
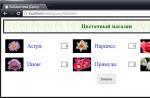
Now we press the SOURCE button again and see how a frame with your text appears instead of the code. If, for example, you want to put the text in the center, but do not understand codes well, then just select the text and press the CENTER button, where the red number 1 is, you can add a style to your text, where 2 - select the font, where 3 is the font size, where 4 is the font color.
|
Maybe you will need it)
Today due to WordPress update the order of editing the uploaded photo has changed. In general, editing is simplified. The procedure for uploading photos from a computer remains the same.
In order to insert a photo on the site or in the text of an article, first put the cursor in the place of your text where you want to place the photo. Then click the Add Media button. It is located between the Article Title and the text editing console. (See pic 1)
(See pic 1)
In the "Insert Media File" window that opens, click the "Upload Files" link (see fig 2)
(pic 2)

In the next window, click the "Select files" button (see Fig. 3)
(see fig. 3)

An additional window will open in front of you. Prepare in advance the photos that you want to place on the site and collect them in a separate folder on your computer. Through an additional window, enter this folder and select a photo by clicking on the image with the mouse once.If you need to paste all the photos at once, then select them all.
After that, click the "Open" button, which is located in the lower right corner of the additional window(see fig. 4)
(see fig. 4)

The selected photo will be uploaded to the site and will be in the "Media Files" tab, and in the future, if necessary, it can be uploaded to other articles on the site, it is no longer required to upload it again from the computer. Enter the required information in the active windows on the right (see fig. 5):
- in the "Header" and "In the alt attribute"- enter the title of your article.
- in the "Description" - print in one sentence what your article is about. The text of the proposal must contain the title of the article (see Fig. 5).
Then click the "Insert into Page" button. If you write the text not in the “Page”, but in the “Post”, then you will have an “Insert into Post” button - click it.
(Fig. 5)

The photo will appear in the place where you put the cursor before. Initially, the photo will not be loaded in the size that will look optimal on the site page (see Figure 6). But this is easily fixable.
(Fig. 6)

To edit an image, move the cursor over it and click the left mouse button 1 time. The image will be covered with a blue background,then click on the image in the upper left corner (see Fig.7)
(Fig. 7)

After you click on the icon, as shown in Figure 7, you will be taken to the photo editing panel (see Figure 8). Here you also need to enter the necessary information to improve the indexing of the uploaded photo:
- in the line "Title" enter the title of your article;
- in the line "Attribute alt" - also enter the title of your article;
Then choose the location of your picture on the site: "Left", "Right", "Center" or "None".
After entering all the necessary information, click the "Advanced" tab in the top line of the additional window "
(fig 8)

On this page, you can set the dimensions of the photo, that is, the width, height and distance of the text indent from the borders of the photo. Set the dimensions slightly smaller than those that will be the default. Then when you look. how the photo will look on the site, the dimensions can be easily changed and set appropriate.
In the active box "Open in a new tab" check the box. If you click on a photo directly on the site, it will open in a new window (see Fig. 9).
(fig 9)

After entering all the necessary information, click the "Update" button in the lower left corner of the additional window. That's it, your photo is inserted into the text. In the editor, it will look like this (see Figure 10).Click the "Save" button.Before publicationclick the "View" tab and see how the article with photo looks on the site. Make adjustments if necessary and resave the page. Then click the "Publish" button.
(fig. 10)

The photo is inserted into the article and looks correct on the site (see Fig. 11)
(fig 11)

If the photo needs to be moved not in the middle, but on the right or left, (see Fig. 12), then proceed as follows.
(fig. 12)

Click on the photo and enter the editing panel. Here select "Alignment" "Left" (see Figure 13)
(fig. 13)

Fill in all the necessary data in the same order and click the "Update" button (see Fig. 14)
(fig. 14)

After you publish the article, the photo on the site will look like shown in Figure 15.
(fig. 15)

I hope you will not have any difficulties in posting photos and drawings on the site. If you find any inaccuracies or incomprehensible moments, please let me know in the comments.
Read the article on this site
There are several ways how to paste an image into another image in photoshop. In this article, I will describe them all in great detail.
Preliminary preparation
First you need to open in Photoshop the main image into which you want to insert another. It is very simple, even if there is a difficulty, then how to do it.
Then open the second picture in the same way.

Thus, two images were opened in the program. They must be on different . The task is to transfer one of them to another. So in my example, I want to place the series logo next to the character's portrait, so it looks like this:

Method number 1: dragging an image from a tab
Most of the time I use this method. It consists in simply dragging an image from one tab to another.
By default, Photoshop shows a panel with tabs on one line:

We need to make sure that all images are visible. To do this, drag the tab with the logo down:
- move the mouse cursor over the logo tab;
- press the left mouse button and, without releasing it, move the mouse down;

- You will see that the tab will take the form of a window, like a window in Windows, which means you can release the mouse button.
As a result, a window with another picture should show off on top of the main picture, like this:

You can move this window anywhere within the program. To do this, move the mouse cursor over the upper part of the window containing the name of this picture and, with the mouse button held down, move the window in any direction.
You can also safely resize this window if it is too big or small. To do this, move the mouse cursor to the lower right corner. When it takes the form of a double-sided arrow, pull this corner to the side. The window will change as you move your hand.
Now we need to connect the two images!
The picture appeared not at all in the size that we would like. It needs to be corrected. To do this, drag the ends of the black frame in the direction of decreasing or increasing. When you're done, click on the checkmark button located on .
To resize the image proportionally, hold down the key Shift.
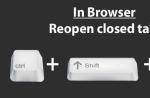
To call up the editable frame again, press ctrl+t.
Method number 4: dragging photos from the OC Windows folder
It would be logical to talk about this method after the first one, when you learned how to drag an image from a tab. By and large, the actions are similar, but the result is different. The result will be exactly the same as if you used "Place" command, that is, as a result, we add a picture .
This method is suitable if the picture you want to insert is saved somewhere on your computer.
Open the folder with the picture and place the window comfortably.

After that, the image will be added as a smart object, that is, what I'm talking about will be repeated.
Noticed an error in the text - select it and press Ctrl + Enter . Thanks!
Every Internet user sooner or later faces a rather trivial task, but one that requires some necessary knowledge: how to put a file on the Internet so that other users can “download” it. Consider one of the ways to solve this problem: upload the file to a file hosting service.
You will need
- - access to the Internet
- - archiving program (WinRAR)
Instruction
First, let's prepare the file for upload. Before you get started, you need to make sure that you have installed a program for archiving and files, such as WinRAR. We will consider archiving using this program as an example, but you can use any other program that is similar to WinRAR in terms of functionality.
Open the folder containing the required file, select it and right-click to display the context menu. Here you need to select the item "Add to archive ...", or "Winrar -> Add to archive ...". If there are several files, then all of them will be required before adding to the archive.
In the dialog box that appears, come up with a name for the archive file (preferably in Latin letters, for example file.zip), the ZIP archive format (the most common) and, finally, the compression method (from this the size of the final archive and its compression speed). It makes sense to compress files of uncompressed formats (for example, tiff, bmp, wav, doc) as much as possible. Compressed formats (for example, jpg, gif, mpg, mp3) will not take up less space during archiving, so in this case it is better to specify a "high-speed" compression method, or a "no compression" method.
After we have specified the compression parameters and clicked on the OK button, the archiving process will begin. This process will take some time, after which a new archive with the name specified in the previous step will appear next to yours. We will post it on the Internet.
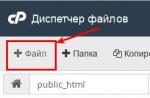
Next, you need to open a browser and go to the address http://rghost.ru. This is one of the file sharing, we use it as an example for instructions. When you open the site, you will immediately see the form for adding a file. First, press the "Browse" button, find and select the archive we created, then confirm the selection with the "Open" button. To start downloading, you must click the "Submit" button.
Immediately after that, the process of uploading the file to the server will begin. You will be able to monitor the progress and speed of the download in real time, and an approximate time for the completion of the operation will be calculated for you.
Done, the file is posted on the Internet. You will see a personal page with information about your file. The "Link to file" field contains the path where your archive will be available on the Internet. It is this link that you can copy and send to other Internet users.
Two more important fields are "Password for download" and "Storage period". In the first field, if necessary, you can set a password for downloading the file to make it difficult for unauthorized persons to access it. The second field is used to change the file storage period (from 1 to 30 days), after which the file is deleted automatically. After changing the password or the expiration date, don't forget to click the "Update" button.
note
It should be borne in mind that each file hosting service has its own restrictions on the size of files. Considered in the article, rghost.ru allows you to upload files no more than 50Mb in size for free, ifolder.ru - up to 100Mb.
In addition, the speed of downloading and uploading files when using such servers is usually low, and it is recommended to be patient.
Useful advice
Archiving files is highly recommended. This is done for the convenience of both the one who uploads the file to the Internet and the one who will need to receive this file. And if you need to put several files on the Internet at once, archiving them is simply necessary, because it is much easier to download and upload one archive instead of a dozen different files or documents.