We are used to not parting with our smartphones throughout the day until we go to bed. Many people can even spend the entire night reading books from their phone or tablet, so scientists, who have always sounded the alarm about spending excessive time on a computer or phone screen, recommend at least always setting the image brightness to a comfortable level to reduce eye fatigue.
Of course, in Android There is a built-in brightness adjustment, which also supports automatic brightness change based on light sensor data. But it suffers not only from an almost complete lack of settings, but also from the fact that manufacturers often overestimate the minimum brightness of the device screen. We have all at least once encountered the fact that the screen light hurts our eyes even at the minimum brightness level in the settings, but we did not know how to reduce the screen brightness - the standard Android settings do not allow this.
But today we will open for you several useful applications that will increase the convenience and provide flexibility in controlling the brightness of the screen of your Android tablet or smartphone: Lux LIte, Twilight, Velis and Backlight Widget.
Lux LIte
The most convenient and fastest application that performs the same function as the native brightness control for Android, but at the same time provides control and configuration options, for example:
- change the brightness when the screen is unlocked, at any time, at specified watch- to choose from
- a convenient widget in the “blind” that allows you to quickly change profiles and adjust the current brightness with an accuracy of 5%,
- ability to reduce screen brightness below the standard minimum value,
- control the color temperature of the screen (this is necessary to interact with human circadian rhythms, which we will discuss below),
- and much more.
All features can be used in the free version, but you can automate the inclusion of some of them only in the full version.
Twilight
This application from the famous developers Urbandroid Team (they, for example, released the best alarm clock for Android) reduces the negative impact of glowing mobile device screens on a person’s sleep.
The fact is that humans have such a physiological feature as circadian rhythms. Scientists have found in numerous studies that prolonged exposure to or observation of cold shades of light (blue, blue) upsets the biological circadian rhythm, leading to problems falling asleep. Therefore, like the f.lux computer program, Twilight softens the light of the screen of mobile devices, gradually turning them into red-orange shades in the evening and at night. If you correctly specify your geographic location when starting, the filter will work automatically based on sunset time data.
Velis Auto Brightness
Velis Works propose to completely replace the standard Android OS settings with their application, which at first glance looks like an airplane control cabin - it has so many different options. But if you go through them carefully, you will have in your hands an excellent means of controlling the brightness of the screen at any time and under any conditions.
This application not only supports brightness profiles, but also knows how to not change it when exception applications are active. In addition, it integrates with Locale and Tasker, automation tools popular among Android users.
Backlight! Widget
Speed up control Brightness can be achieved using a simple Backlight widget! on the desktop, which differs favorably from the standard one in that you can adjust the brightness level you need for each switch position.
Regardless of which of these applications you find most convenient and useful, do not neglect the importance of a comfortable brightness of your mobile phone screen if you spend a lot of time with it.
Provider.Settings.System.putInt(getContentResolver(), android.provider.Settings.System.SCREEN_BRIGHTNESS, bright);
The problem is that it doesn't work. Well, it actually manages to change the brightness setting, but the screen brightness barely changes until I go into the phone's settings, look at the new value, and click Ok.
Is there something I need to do after setting the value to change the brightness?
I had the same problem with changing the screen brightness inside the service and a couple of days ago I successfully resolved it (and updated my Phone Schedule app with the brightness feature ;)). So this is the code you put into your service:
// This is important. In the next line "brightness" // should be a float number between 0.0 and 1.0 int brightnessInt = (int)(brightness*255); //Check that the brightness is not 0, which would effectively //switch off the screen, and we don"t want that: if(brightnessInt<1) {brightnessInt=1;} // Set systemwide brightness setting. Settings.System.putInt(getContentResolver(), Settings.System.SCREEN_BRIGHTNESS_MODE, Settings.System.SCREEN_BRIGHTNESS_MODE_MANUAL); Settings.System.putInt(getContentResolver(), Settings.System.SCREEN_BRIGHTNESS, brightnessInt); // Apply brightness by creating a dummy activity Intent intent = new Intent(getBaseContext(), DummyBrightnessActivity.class); intent.setFlags(Intent.FLAG_ACTIVITY_NEW_TASK); intent.putExtra("brightness value", brightness); getApplication().startActivity(intent);
Note, that in the above code snippet I am using two variables for brightness. One is brightness which is a floating point number between 0.0 and 1.0 and the other is brightnessInt which is an integer between 0 and 255. The reason for this is that Settings.System requires an integer to store system-wide brightness values, and lp.screenBrightness, which you'll see in the next code snippet, requires a float. Don't ask me why not use the same value, it's the way it is in the Android SDK so we'll just have to live with it.
This is the code for DummyBrightnessActivity:
Public class DummyBrightnessActivity extends Activity( private static final int DELAYED_MESSAGE = 1; private Handler handler; @Override protected void onCreate(Bundle savedInstanceState) ( super.onCreate(savedInstanceState); handler = new Handler() ( @Override public void handleMessage(Message msg ) ( if(msg.what == DELAYED_MESSAGE) ( DummyBrightnessActivity.this.finish(); ) super.handleMessage(msg); ) ); Intent brightnessIntent = this.getIntent(); float brightness = brightnessIntent.getFloatExtra("brightness value ", 0); WindowManager.LayoutParams lp = getWindow().getAttributes(); lp.screenBrightness = brightness; getWindow().setAttributes(lp); Message message = handler.obtainMessage(DELAYED_MESSAGE); //this next line is very important, you need to finish your activity with slight delay handler.sendMessageDelayed(message,1000); ) )
This is how you add your activity to AndroidManifest.xml, perhaps the most important role:
A little explanation of what's what.
Android:taskAffinity must be different than your package name! This causes the DummyBrightnessActivity to start not in your main activity stack, but in a separate one, which means that when the DummyBrightnessActivity is closed, you won't see the next activity, whatever that is. As long as I don't include this line, closing the DummyBrightnessActivity will call my main activity.
Android:excludeFromRecents="true" makes this activity unavailable in the list of recently launched apps, which is certainly what you want.
Android:theme="@style/EmptyActivity" defines how the DummyBrightnessActivity is displayed to the user, and this is where you make it invisible. This is how you define this style in the styles.xml file:
This way your DummyBrightnessActivity will be invisible to the user. I'm not sure if all these style options are really necessary, but it works for me this way.
Hope this explains, but if you have any questions just let me know.
I just checked with JB. To set the brightness from the service, just code
Android.provider.Settings.System.putInt(mContext.getContentResolver(), android.provider.Settings.System.SCREEN_BRIGHTNESS_MODE, android.provider.Settings.System.SCREEN_BRIGHTNESS_MODE_MANUAL); android.provider.Settings.System.putInt(mContext.getContentResolver(), android.provider.Settings.System.SCREEN_BRIGHTNESS, brightnessInt);
The first line overrides automatic brightness.
And interesting features hidden from prying eyes.
Why are they hidden? Firstly, so that an inexperienced user does not break anything, and secondly, they are needed in especially rare cases and are not used regularly. Today we will talk about the engineering menu - a section for programmers, testers, geeks, experienced users and those who want to get into the very “heart” of gadget settings.
What is an engineering menu?
We are talking about a special program or system section that developers usually use at the final stage of configuring the software platform of a mobile device. With its help, they make final changes to the operation of the device, check the functioning of various sensors and test system components. Also, the hidden functionality of the service menu is used to obtain a large amount of system information, conduct various tests (about 25 pieces) and configure any Android parameters - various sensors, mobile networks, equipment, etc.
The engineering, service or system menu is available on smartphones and tablets running on a MediaTek processor. On the Qualcomm chipset it is either reduced or absent altogether.
Attention! This section is intended for experienced users who bear full responsibility for the consequences. Careless actions can harm the file system and render the smartphone unusable.
How to enter the engineering menu?
To enter the engineering menu, you need to enter a special command in the dialing application: *#*#3646633#*#*. On some versions the code *#*#4636#*#* or *#15963#* may work.
If the engineering menu code on Android does not work, or there is no dialing application on the phone (relevant for tablets that do not support calls), the MobileUncle Tools or MTK Engineering applications, which can be downloaded for free via Google Play, will help.
After entering the command or launching the application, the desired section will open. It may close immediately - you need to have “Developer Mode” activated on your smartphone. To do this, go to the gadget settings, find the kernel version there and quickly click on it 5-10 times in a row.
Engineering menu functions
The engineering menu is divided into several categories, each of which will be discussed separately.
- Telephony. All settings related to mobile communications are located here. For example, you can activate or disable certain BandModes (frequencies for 2G/3G/4G operation), check the operation of SIM cards, and even disable mobile data transfer in the background.
- Connectivity: Configure Bluetooth, Radio, Wi-Fi and Wi-Fi CTIA settings. For example, in the radio settings you can specify the radio wave, antenna type (you need to use headphones) and sound format (mono or stereo). The radio will play straight from this section.
- Hardware Testing. In this section, you can configure the operation of various components of the device, in simple words, hardware: sound levels of headphones and speakers, adjusting microphone sensitivity, various camera parameters (photo aspect ratio, adjusting ISO, HDR, focusing and much more), operation of the touchscreen, sensors (calibration right there) and so on. This category is very large and global; you need to understand each section separately and have serious knowledge and skills.
- Location. In this category, you can configure GPS operation, see how many satellites the gadget has picked up, and simply conduct testing.
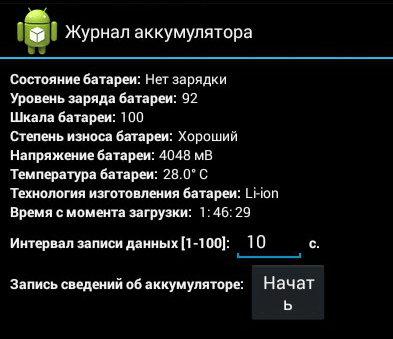
- Log and Debugging. Here, logs (logs) of the battery are kept (percentage of charge, voltage, operating time, temperature) and other functions little known to the average user.
- Others. Contains two functions also unknown to the average user.
Engineering menu settings
The engineering menu opens up enormous possibilities for customizing the phone; we will consider the most interesting ones in detail.
- SAR Test - determining the level of harmful radiation from a smartphone or tablet.
- Connections - testing available wireless connection types: Bluetooth, Wi-Fi, WLAN CTIA and FM receiver.

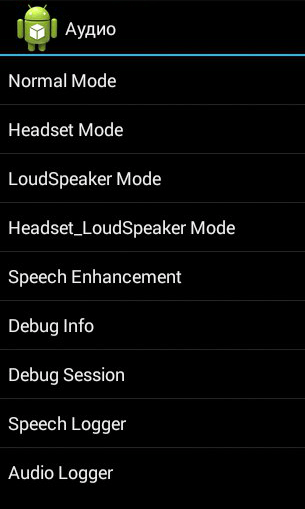
- Audio - adjusts the sound in the speakers, microphone and headphones. About how to increase the Android volume through the engineering menu.
- Camera - configure various camera settings.

- Turning on the current camera - the operating current of the camera is displayed (in our tablet it is 2 mA).
- Load test of the CPU (central processing unit) - checking the stability of its operation, identifying errors in the operation of the processor-memory channel, testing the cooling system and power supply of the processor.
- Device Manager - activate automatic SMS registration, manage configuration parameters.
- Disable detection - adjust the signal frequency.
- Display - Sets the pulse width modulation indicator cycle, which affects the perceived brightness of the screen by quickly turning the backlight on/off; backlight adjustment; controller behind the vertical and horizontal lines of the display.

- Wake mode - its activation will not allow the device to “go” into sleep mode.
- IO - management of data input/output operations.
- Memory - detailed information about the RAM module.
- To a certain extent - detailed information about the battery (the strange name of the section is most likely due to errors in the automatic translation of names in the application, but there is no option to switch to English).
- SD card test - the name of the tab speaks for itself.
- Touch screen - checking the sensitivity and response of the display when pressed, as well as setting its additional settings.
- USB - testing the operation of the USB port.

- UART/USB switch - switching between two data transfer modes.
- Sensor - calibration (adjusting clarity and sensitivity) of the touch screen. Standard methods.
- Location - testing the GPS performance and determining the exact location.
- Battery log - detailed information about the battery and the ability to activate the recording of battery consumption information.
- MTKLogger - collection of system logs (MobileLog, ModemLog and NetworkLog).
- Temperature sensor - shows the battery and processor.
- Font parameter - change the font size.

When installing the application, some features may not be available without .
Xiaomi engineering menu
Despite the fact that our test Redmi 2 runs on a Qualcomm Snapdragon 410 processor, it also has the functionality that interests us. To enter it, you need to tap on the “Kernel version” item several times in a row.

The menu is represented by five items:
- Automatic Test. Automatic test of all device parameters.
- Single Item Test. Each of the 25 tests is taken separately. We will talk about this in detail below.
- Test Report. Report on the completed texts and their results.
- SW add HW version. Information about the smartphone version, IMEI and other numbers.
- Device View. Smartphone hardware data.

Of course, the most interesting point is the Single Item Test, where you can take a huge number of tests.

Let's make a reservation right away that there was no way to configure anything in the device we tested - only a functionality check. At the end of each procedure, you need to note its status: successful (success) or not (failed).
- Key - functionality of physical buttons. Interestingly, it was not possible to complete it successfully, since when checking the power button, the smartphone turns off.
- Backlight - display brightness.

- TouchPanel. The touch screen test includes two procedures: “Crossed calibration” and “Touch panel calibration”. The first one checks so-called “swipes”, the second one checks single taps on the screen. An easy way to calibrate your display.

- TFlash. Testing a memory card with two results: either everything is fine, or the card is damaged.
- Bluetooth. Searches for available devices.
- SIM Card. Test for the presence of SIM cards.

- Vibration. The gadget vibrates - everything is ok.
- RTC (Real Time Clock) - operation of the built-in clock.
- Speaker. Testing the conversational speaker. We didn’t understand how to get through it. We will be grateful if you can tell us in the comments.
- Receiver. Translated as receiver, receiver, but music plays during testing.
- Headset. Testing the 3.5mm jack to detect headphones, play sounds, and support headset control buttons.

- LED. Notification indicator, everything is obvious here.
- FM (radio). Click Search, and if you hear noise in the headphones, then everything is working properly.
- Camera. Everything is obvious: a test of the main and front optics, as well as the flash.
- Battery. An informative section with information about the correct operation of the USB cable (charging), the condition of the battery, its charge level and temperature. Similar data can be obtained more.

- Wi-Fi. Detection of nearby access points. There are no settings.

- Torch (flashlight): shines/does not shine.
- The loopback test includes a test of the spoken microphone. First, click Recording, then Playing.
- LCD. Screen colors.
- GPS. Detection of available satellites.
- Gyro (gyroscope). Three parameters - X, Y, Z - change depending on the position of the device in space.
- G-sensor (Accelerometer). Rotate the gadget in all planes and turn it over. The three parameters should be ok.
- Proximity Sensor. It is usually located near the speaker and is designed to dim the gadget screen during a conversation, thereby eliminating accidental clicks.
- Optical and Magnetic Sensor (optical and magnetic sensors) - points we don’t understand, share your knowledge in the comments.
After passing all tests, you can go to the Test Report section. As you can see, our “animal” is in excellent shape and has passed all the tests, which is very pleasing.

conclusions
Above we have listed the main sections of the engineering menu available on the tested devices. Now let’s summarize what features the user receives during installation:
- Formatting, restoring to factory settings.
- Testing the operation of individual elements of a smartphone or tablet, such as sensors, touch screen sensitivity and calibration accuracy.
- Detailed information about the device and its parts. For example, you can track battery consumption since the last charge and view statistics on the programs used.
- Energy optimization. Alternatively, unnecessary frequency ranges are turned off. In Russia, the standard indicators for working in 2G and 3G networks are 900 and 1800 MHz, while in the USA they are 850 and 1900 MHz.
The screen of any touch screen is the main consumer of battery power. A bright display during a long game or watching a video can “eat up” the entire battery in half a day, and at the most necessary moment you suddenly find your device not working.
If you need to reduce battery consumption without straining your eyes due to a dim screen, then the best solution is to adjust the brightness. Changing the parameters every time is inconvenient and ineffective - it is better to set Automatic brightness. This way you can enjoy a bright picture and not worry about the battery.
1. To dim the screen brightness or set automatic lighting, go to the Settings menu.
2. Select the Device tab.
3. Expand the Screen.
4. Select Brightness.

5. In our version, the brightness is adjusted with a slider. If you select the Intelligent brightness checkbox, the screen brightness will change automatically based on battery charge. When the charger is turned on, the brightness will be maximum.

6. If desired, the checkbox can be unchecked. In this case, the brightness is adjusted manually - from economical to the most energy-intensive mode.
Regardless of how a smartphone is used—whether it’s endlessly updating social network feeds, playing mobile games, or reading books—the user is constantly looking at its screen. That is why it is extremely important that the picture on the device’s display is pleasing to the eye. In this case, we are talking not only about the brightness level, but also about other important parameters. Today we will look at applications that allow you to customize them. What programs are included in this list? Let's find out.
Perhaps each of us uses a smartphone before bed, right? This could be setting an alarm or texting with a loved one. Be that as it may, contact with gadgets is extremely undesirable. The fact is that thanks to artificial light, I am sure that it is day outside and it is too early to sleep.


Can this be fixed? Yes, and you don’t have to throw away your favorite smartphone to do this. It is much easier to try the SunFilter application, which can change the temperature of the image on the display.
Another auto brightness
Quite a strange name, isn't it? Despite this, the application is unlikely to be difficult to understand. Its purpose is to increase user control over the automatic brightness level.

According to our colleagues from phonearena, the brightness range in this application is much wider than that in the function built into the smartphone. Thanks to this, you can not only extend the operating time of the device, but also make using the smartphone more comfortable in poor lighting conditions.
It's hard to underestimate the usefulness of IntelliScreen. With its help, you can prevent the display from dimming in a particular application.

In addition, the application can turn on the display every time you take the device out of your pocket. Convenient, isn't it?
The operating principle of Twilight is somewhat similar to SunFilter. The program forces the screen to adapt to the time of day, protects the user from the blue spectrum and uses a nice red filter.

In addition, the use of material design is important.
Do you correct images on your smartphone? Share your answers in the comments.