A user who decides to install the Bluestacks emulator on their computer may encounter problems with its operation. Most often, it is performance that suffers - a weak PC is not able to handle “heavy” games either in principle or in parallel with other running programs. Because of this, crashes, brakes, freezes and other troubles occur. In addition, it is not always clear where and how to find system settings similar to those found in smartphones and tablets, for example, to create a backup copy. We will deal with all these questions further.
The first thing a user should find out when problems arise with the stability and quality of BlueStax is whether the system requirements of the PC they are using meet those required by the emulator. You can view them using the link below.
Typically, owners of powerful components do not need to resort to performance tuning, but if the hardware configuration is weak, they will need to manually lower some parameters. Since BlueStacks is positioned primarily as a gaming application, it has all the necessary settings regarding the consumption of system resources.
All active users are also encouraged to create backups so as not to lose game processes and other user data that necessarily accumulate while working with the emulator. And connecting to an account will make it possible to synchronize all Google services, including browser data, game progress, purchased applications, etc. All this can be easily configured in BlueStacks.
Step 1: Connect your Google account
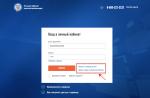
Almost all owners of Android devices have a Google account - without it it is simply impossible to fully use the smartphone/tablet of this platform. When deciding to log into your account via BlueStacks, you can do it in two ways - create a new profile or use an existing one. We will consider the second option.

Please note that you will receive 2 notifications from Google security when you sign in to your account from a new device, one on your smartphone/tablet and one via email.

The BlueStacks emulator is recognized as a Samsung Galaxy S8, so simply confirm that you are the one who logged in.

Step 2: Configure Android Settings
The settings menu here is very stripped down, redesigned specifically for the emulator. Therefore, of these, at the first stage, only connecting a Google profile, enabling/disabling GPS, selecting an input language, and, perhaps, special features will be useful to the user. We won't recommend anything here, as each of you will have your own personalization needs and preferences.
You can open them by pressing the button "More apps" and selecting "Android Settings" with gear icon.

Step 3: Set up BlueStacks
Now let's move on to changing the settings of the emulator itself. Before changing them, we recommend installing them via "Google Play Store" one of the most demanding applications you use and use it to evaluate how well it works with standard settings.
Before launching games, you can also configure their controls, and if you do not want to see this window every time you start, uncheck the item "Show this window at the beginning". You can call it with a keyboard shortcut Ctrl + Shift + H.

To enter the menu, click on the gear icon located at the top right. Select here "Settings".

Screen
Here you can immediately set the desired resolution. The emulator, like any other program, can be scaled manually if you hold and drag the cursor on the edges of the window. However, there are mobile applications adapted for specific screen resolutions. This is where you can set sizes that imitate the display of a smartphone, tablet, or simply expand BlueStacks to full screen. But don't forget that the higher the resolution, the more loaded your PC is. Select the value according to its capabilities.

DPI is responsible for the number of pixels per inch. That is, the higher this number, the clearer and more detailed the image. However, this will require increased resource consumption, so it is recommended to activate the value "Low", if you experience problems with rendering and performance.

Engine
The choice of engine, DirectX or OpenGL, depends on your needs and compatibility with specific applications. The best would be OpenGL, using a video card driver that is usually more powerful than DirectX. You should switch to this option if a game crashes or other specific problems.
Paragraph "Use advanced graphics engine" It is recommended to activate if you play “heavy” games such as Black Desert Mobile and the like. But do not forget that for now this parameter has a postscript (Beta), some disturbances in operation stability are possible.

Next, you can adjust how many processor cores and how much RAM BlueStacks uses. The cores are selected according to their processor and the load level of applications and games. If you cannot change this setting, enable virtualization in the BIOS.
Adjust the size of RAM in the same way, based on the amount installed in the PC. The program does not allow you to set more than half of the available RAM available on the computer. The size you need depends on how many applications you want to run in parallel so that they are not unloaded due to lack of RAM while in the background.

Quick hide
To quickly expand and collapse BlueStacks using your keyboard, set any convenient key. Of course, the parameter is optional, so you don't have to assign anything at all.

Notifications
BlueStax displays various notifications in the lower right corner. On this tab you can turn them on/off, configure general settings and specifically for each installed application.

Options
This tab allows you to change the basic parameters of BlueStacks. They are all quite understandable, so we will not dwell on their description.

Backup and recovery
One of the important functions of the program. A backup allows you to save all user information if you plan to reinstall BlueStacks in case of any problems, moving to another PC, or just in case. You can also load the saved recovery here.

This completes the setup of the BlueStacks emulator; all other features such as changing the volume level, skin, wallpaper are optional, so we will not consider them. You will find the listed functions in "Settings" program by clicking on the gear in the upper right corner.

Jan 31, 2018 12:25
Although BlueStacks is constantly improving, there are no perfect programs in the world. From time to time, users of even the best Android emulator encounter problems that prevent them from playing games, running or testing programs. Let's look at the most common reasons why BlueStacks crashes or doesn't work at all.
Typically, users face four problems when using the BlueStacks Android emulator. Either the program simply does not install, or for some reason it refuses to start, or the Internet does not work, or applications are not installed (or do not work). Let's consider each of the cases in more detail.
Case 1: The emulator does not install
What to do if BlueStacks does not install? The following steps will help:
- Check your system configuration. If it does not meet the minimum requirements of the latest version, you will have to use another computer. An easier option is to install an older edition of BlueStacks.
- Re-download the installation file from the official website - . Check that it is fully pumped.
- Close other programs during installation.
Case 2: Startup problems
Let's say the installation was completed correctly, but BlueStacks still won't start. In this case, you can try the following steps:

This action should also help if error code 2 occurs in BlueStacks. We recommend that you check that the program is working immediately after downloading.
To edit the parameters responsible for the size of the emulator window, you need to enter the Windows registry. To do this, press the keyboard shortcut "Windows + R" (works in Windows XP, 7). In the window that appears, type the command “regedit” and click on the “OK” button.
The Windows Registry Editor will open. The left part of it displays the hierarchy of registry entries, and the right part displays their names and values in a specific branch of the hierarchy. We are interested in the branch "HKEY_LOCAL_MACHINE\SOFTWARE\BlueStacks\Guests\Android" and everything that lies in it. When you click on the folders on the left side of the editor, the registry path appears at the bottom of the window.

Go to the branch "HKEY_LOCAL_MACHINE\SOFTWARE\BlueStacks\Guests\Android\FrameBuffer\0". The “Width” and “Height” parameters will be displayed on the right, which are responsible for the width and height of the emulator window. As you can see, the default width and height of the window are 1280 px and 720 px respectively (you may have different values).

To change the width, right-click on the “Width” parameter and select the “Change” option. In the dialog box that appears, set the "Number system" switch to the "Decimal" position and enter a new value in pixels (for example, 1024).

We repeat the same steps with the “Height” parameter to set a new window height.
Setting up control keys in games
For controls in games (especially in three-dimensional ones), it is not always convenient to click the mouse on the screen; it is more convenient to press keys on the keyboard. To "make" the game understand keyboard commands, you need to add a configuration file to the emulator. By default, the original BlueStacks package already contains a set of files for popular games. I recently installed the game "Muscle Run", for which there was no such file, and it is impossible to control from the screen, since the toy reacts to the tilt of the phone. To be able to play in the emulator, you need to create a configuration file for this game.
If the creation of configuration files described below seems very difficult to you, you can search for ready-made ones for the desired game on the Internet.
First of all, we need to know the "id" of the toy. We go through any browser to the Play Market website and look for a toy for which we want to set up controls. In the address bar, look for the request parameter - “id” and copy its value to the clipboard as shown in the figure (usually this is a set of letters and dots from the “=" sign to “&” or to the end of the line, if there is no last one).

Path in Windows XP:
C:\Documents and Settings\All Users\Application Data\BlueStacks\UserData\InputMapper
Path in Windows 7:
C:\ProgramData\BlueStacks\UserData\InputMapper
A folder with game configuration files will open. Create a new file in Explorer by clicking: “File > New > Text Document” (press the Alt key to display the menu bar in Windows 7 Explorer).

Paste the “id” copied to the clipboard into the file name line and press “Enter”. Thus, the created file will have the same name as the "id" of the application in the Play Market.

Open the newly created empty file with Windows Notepad and paste the following lines into it:
# "Left Arrow" key - Tilt to the left Left = Tilt Absolute (0,-20) Return # "Right Arrow" key - Tilt to the right Right = Tilt Absolute (0,20) Return # "Down Arrow" key - Brake on screen Down = Tap(50.95)
Small clarifications:
The section may not be the only one in the configuration file, but it is the most important and contains instructions for matching the buttons on the keyboard with the virtual commands of the Android device: touching or sliding your finger across the screen, tilting the phone or tablet, etc. A list of all commands and device gestures is described in the file " TEMPLATE.cfg" (in English) in the same folder. As you can see from the comments, the first two instructions are responsible for rotating the device left and right by 20 degrees and assign them to the left and right arrow keys on the keyboard. But the latter is responsible for touching a certain part of the screen. Touch coordinates are determined as a percentage of the screen, first along the X axis, then along the Y axis. As can be seen from the figure, the brake pedal in the game is located at the bottom center of the screen. It is logical that the X coordinate will be 50, but I set it to about 95 by eye.