This note is for those who already know what a neutral density filter is, understand why it is needed in video shooting and now face a choice: buy a variable filter like ND2-ND400 or take filters with a fixed light transmission like ND8, ND64.
So, in a nutshell, we need a neutral darkening filter in order to maintain a constant shutter speed inversely proportional to twice the frame rate at any aperture value and in any lighting conditions. Those. if we shoot at a frequency of 25 fps, then the shutter speed should be 1/50 sec. As you understand, even at ISO 100 on a bright sunny day with these parameters we will just have a white veil in the frame. We need to darken the picture.
Based on my experience, reviews and reviews of products on the Internet on the topic of neutral density filters, I came to 2 conclusions:
1) Do not use cheap ND filters with variable density, buy ones with a constant value instead.
2) With permanent filters, you will never accurately set the desired shutter speed, so the best option would be to buy ND8 or ND64.
Now I will explain each point in more detail.
1) Variable ND is 2 polarizing filters in one design. When one rotates relative to the other, the light transmission changes. Everyone knows that inexpensive polarizers distort color reproduction. Imagine what 2 inexpensive polarizers do on top of each other. In addition to the fact that the sharpness and contrast of the image are completely destroyed, the color characteristics become simply unpredictable, and depend unevenly on the amount of darkening.
For example, I tested an inexpensive Fotga variable ND filter. The drop in sharpness is simply catastrophic:
But that’s not all, on some filters the picture is completely darkened in the form of a cross, and the color of flesh tones ceases to even remotely resemble human skin.
What can I say about “average quality” variable ND filters like Marumi, Kenko, Hoya? The fact that they are better than cheap ones, and are somehow suitable for video (due to the relatively low detail of Full HD - only 2 megapixels). But color rendering problems will not go away. Photographers don't need to use them at all.
High-quality variable ND filters are very expensive. For example, the well-known Philip Bloom recommends one and only filter Heliopan, which completely suits him. I think few people are willing to spend $300 for a filter.
2) Thus, the simplest and 100% working solution in the form of a variable filter turns out to be either too poor quality or too expensive. Even if we forget about a constant shutter speed, then for shooting under the sun with fast lenses (with F less than 2.8) we lack the minimum shutter speed at which DSLRs shoot video - 1/4000. If you are not ready to spend a lot of money and a light strobe on moving scenes does not bother you or the customer, then an ND8 or ND64 filter is quite suitable for you. ND2 and ND4 are absolutely useless.

Inexpensive permanent ND filters are not made of glass (unlike variable ND filters). Plexiglas is used, or even a dark polymer film over plexiglass. Because of this, scratches on such filters appear instantly, and after long use they generally fade. The darkening characteristic can be indicated in 3 options. For example, an ND8 filter may be designated ND0.9, which corresponds to a reduction in light output by 3 stops of exposure:

As you can imagine, even by combining permanent ND filters, you will not be able to achieve the ideal exposure at which all scenes will have the same shutter speed. Therefore, for outdoor shooting, you can buy a single ND64, but be prepared that on cloudy days you will have to raise the ISO. And ND8 or ND16 is suitable for all occasions. Please note that many mid-range and inexpensive manufacturers do not even have ND16, ND32 and ND64 in their lineups. After ND8 comes ND400 and ND1000 (which is used exclusively for shooting the sun). By the way, in movie cameras the standard built-in ND values are ND4, ND16, ND64.
Another interesting option is offered, in particular, by NISI: a combined polarizing and ND8 filter. Because The “polar” itself can eat up about 1.5 stops of exposure, so the result is a total darkening between ND16 and ND32. A very interesting option, but a polarizer is not always needed, and you will have to constantly adjust the exposure depending on the shooting angle in relation to the sun.

As for brands, on AliExpress you can order quite suitable filters for video shooting such as GreenL or Zomei (article about Zomei filters), which will be slightly inferior to the same Marumi, but will cost one and a half to two times cheaper. It is impossible to vouch for all Chinese manufacturers, but personally I would not recommend buying Fotga and completely unknown OEM filters.
A list of all my video equipment can be found at link.
Today we would like to talk about what it is and why it is needed ND filter.
“Its existence contradicts all the fundamentals of photographic technology. The most useless accessory. This piece of glass only reduces the amount of light entering the camera." You have come across similar phrases more than once on social networks and on various forums about one of our favorite filters - neutral gray.
The main task of the camera is to capture a moment; shutter speed is responsible for this parameter. In addition to fairly standard values like 1/30 in low light, or 1/300 when shooting in the sun, digital cameras can take one frame for many hours. The result of this effort is images that can only be achieved with a neutral gray filter. This effect cannot be repeated when processed in Photoshop, which means the filter is unique.
The essence of the filter
The essence of its work is simple: due to too long a shutter speed, a lot of light enters the camera matrix and the image is overexposed; the filter helps reduce the amount of light received, thereby allowing the shutter speed to be longer.
What types of filters are there?
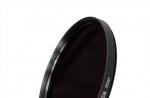
Filters differ from each other only in the amount of light transmitted. The designations ND4 or ND8, which are not clear at first, simply mean that the first transmits 4 times less light, and the second 8 times. By the way, you can also find adjustable neutral gray filters; their darkening density can be changed by turning the ring, but they are much more expensive.
There are also titans like the ND400 on sale; with it, for example, you can photograph buildings in fairly crowded places. Due to the huge shutter speed, people simply will not have time to be exposed in the photo; only a motionless building will remain in the frame. Well, for more mundane purposes, the ND8 would be the best choice. ND4 can be completely replaced with a polarizing filter, because it also blocks some of the light.
Using a light filter in practice
The filter can be used to shoot any moving objects, for example, you can shoot time-lapses at long exposures during the day. It should be noted that to get such good results you need to work in manual shooting mode; automatic camera operating modes will not help here.
Another area of application for neutral gray filters is portrait photography. With an aperture of 1.4 -1.8 on a bright sunny day it will be very useful. By reducing the amount of light entering the camera, you can gain more freedom in choosing settings. The same applies to shooting on a sunny day in the snow or in the desert.
Finally, let's say that the neutral gray filter requires creativity. This is not a filter for every day, and its use requires certain photography skills.
Neutral gray filters block the light flow entering the camera matrix and protect frames from overexposure. The degree to which the light level is reduced depends on the density of the component. At the same time, color rendition is not distorted. Designated as ND.
Neutral gray filters use:
- to reduce the depth of field in too bright light;
- to give a blur effect when objects move;
- to add a shutter speed without losing image quality.
How to choose the right ND filter for your camera
When choosing, you need to take into account the density. It is reflected in the marking and indicates how many times the amount of color passing through the filter will decrease.
It is necessary to take into account the diameter of the element, measured in millimeters. The value should be similar to the camera lens size. The accessory is secured with clamps and has a round thread for mounting directly in front of the lens.
An additional anti-reflective coating reduces the effect of double image and flare. Blackening of fasteners and glass frames neutralizes the vignetting effect.
It is preferable to choose models of neutral gray filters from well-known companies: Polaroid, Hoya, Fujimi, Kenko, JJC, etc.
Have you ever wondered how professional photographers capture motion, creating soft, blurry clouds and misty, misty streams of water? Are you having trouble achieving the same effects with long shutter speeds?
Most likely, because professionals use neutral density filters or, simply, neutral density (ND) filters. Not to be confused with ND Grad filters. The latter darken only part of the frame.
ND filters are designed to absorb light passing through them without affecting color rendering. This property of neutral density filters allows you to increase exposure time. But do you know when to use them?
How to use ND filters?
You'll find ND filters in any professional landscape photographer's bag. However, they are less appreciated by hobbyists. And all because at first glance the ND filter looks like a flat piece of grayish glass!
The neutral density filter does not make visible changes to the image, it simply slows down the time it takes for the photosensitive image sensor to “absorb” the image.
But if you use a filter when shooting moving objects such as water, clouds and even people, it opens up a whole world of creative possibilities. If you “freeze” a waterfall with a normal shutter speed, it will look static and rather boring in the photo. If you take a photo with a long shutter speed, the image of falling water will immediately become blurry. This will bring a sense of movement to the photograph.
On a sunny day, you can use an ND filter to slow down motion to convey a sense of movement. A neutral density filter allows you to take more spectacular pictures at dawn or dusk: you can gain exposure time of a few seconds and depict the splashing of coastal waves as a gentle fog.

There are various types of ND filters available for sale. The easiest to use are round ones with a thread for installation in front of the front lens of the lens. Their disadvantage is that if you make a “layer cake” out of ND filters ( approx. translator - in order to increase density and, as a result, enhance the effect), vignetting problems may occur.
Plate filters require that a frame mount and adapter ring be installed on the lens first. You can then insert a square or oblong filter into the holder. The main advantage of plate filters is that they can be quickly changed or combined by installing several plates together. In this case, the combination can include both neutral density filters and filters of other types.
A relatively recent development is variable density filters. They are screwed in front of the front lens of the lens and have an adjustment ring, by rotating which you can change the density of the neutral density filter depending on the lighting conditions and the desired result.
When to use ND filters?
To show movement, there is no need to photograph a waterfall with a very long shutter speed. The water moves so fast that for shooting in the middle of the day, a neutral density filter is enough, allowing 8 times less light to pass through than would enter the lens without a filter ( approx. translator - in other words, under other unchanged shooting conditions, the exposure will decrease by 3EV). However, if you plan to photograph the surf or clouds, you may need a shutter speed of at least 30 seconds. The movement of these objects is slower than falling water.

With ND filter.

Without ND filter.
The lower the light intensity during the "golden time" of sunrise or twilight, the longer the shutter speed you can choose. And, of course, the nature of the lighting is the key to great photos!
Neutral density filters are used for more than just creating a blur effect. You can make moving people disappear! You'll need to expose for a few minutes, but people walking through the scene won't be visible in the photo. Architectural photographers keep this opportunity in mind when capturing subjects located in tourist hotspots.
ND filters are good for more than just increasing exposure time. For example, let's say you're photographing a portrait on a clear, sunny day and want to achieve shallow depth of field. You probably won't be able to open your aperture wide. A short shutter speed will be required, which is technically not available to your camera ( approx. translator - for example, shorter than 1/8000 of a second).
Use an ND filter. This will open the aperture wider ( approx. translator - set a smaller aperture value).
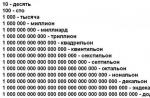
Let's look at the characteristics of ND filters
Manufacturers may indicate filter density differently. Below is a table that will help you choose a neutral density filter with the desired properties:
| Exposure value, EV (“step”, “stop”) | Density (units vary by manufacturer) | Amount of transmitted light,% | |
|---|---|---|---|
| 1 | 0,3 | ND2 | 50 |
| 2 | 0,6 | ND4 | 25 |
| 3 | 0,9 | ND8 | 12,5 |
| 4 | 1,2 | ND16 | 6,25 |
| 5 | 1,5 | ND32 | 3,125 |
| 6 | 1,8 | ND64 | 1,563 |
| 7 | 2,1 | ND128 | 0,781 |
| 8 | 2,4 | ND256 | 0,391 |
- Note translator: pay attention to the third column. The number after the abbreviation "ND» indicates how many times the amount of light passing through the filter will decrease: 2 times, 4 times, etc.
What to look for when choosing an ND filter

Materials and coatings
Several factors influence the quality and, as a result, the cost of filters. The material used is resin, glass or polyester. The last material is the cheapest of the three, but it also distorts the transmitted light to a greater extent. Multiple coatings reduce flare and ghosting, while black alumite mounts and framed glass reduce reflections. The use of thin and low-profile holders results in less vignetting.
Threaded filter or plate filter?
Round filters are small, lightweight and easy to install, but lack flexibility of use: a combination of several filters leads to problems with vignetting, and a single filter only fits a certain diameter of the thread mount on the lens. To use square plate filters, you will need a ring adapter and a holding frame - additional accessories that you will need to carry with you. It is less convenient to deploy the system to install plate filters, but it allows you to quickly and easily combine ND filters and, as a result, increase exposure time. You can combine ND plates with other types of filters: for example, neutral gradient and polarizing.
Adapter and step-down rings.
To easily install plate filters on different lenses, just purchase inexpensive ring adapters for each lens size you use. If you want to use filters with threads, select one filter in the store for your lens with the largest thread diameter. Additionally, purchase reduction rings for your other lenses. Such rings allow you to install the same filter on lenses with a smaller thread diameter.
A neutral density filter can also be called a dimming or ND filter (Neutral Density). If you love long exposure photography, then with a neutral density filter you can do what you love not only at night, but also on a clear afternoon.
A dimming filter does exactly what it says in the name - it darkens, that is, it reduces the light output. This may be useful in the following situations:
- You want to photograph a portrait with an open aperture to create a smaller depth of field, but bright light interferes, forcing you to close the aperture.
- You are trying to take a portrait with flash during the day, but your camera does not have FP sync, and the shutter speed is limited by the camera.
- You want to blur moving objects or take a beautiful photo of a waterfall, but there is too much light for a long shutter speed.
- Get rid of people in a busy square to photograph the architecture.
Here, for example, is an ordinary photograph with a short shutter speed:

Increase the shutter speed:

It can be seen that only a couple remained, who sat on a painted bench and stuck to each other, and a tourist with a map, who was paralyzed.
If you increase the shutter speed further, then there will be no one left at all:

The color and light in these photographs are different because the weather was changing rapidly.
Neutral density filters come in different densities, and it's in the name. The lightest is ND2. The number in the name means the fraction of light that passes through the filter (for ND2 the fraction is 1/2, that is, half). ND4 will be darker, then ND8, for example. If you install several filters in a row, then to understand what you got, you need to multiply the numbers of all installed filters. That is, ND2+ND4=ND8.
However, to take photos with a shutter speed of a few seconds in sunny weather, you will need an ND1000 or larger, and you will also have to use a tripod. By the way, I don’t see much point in buying ND2; a regular polarizing filter will provide you with such dimming.
Regarding polarizing filters, among all neutral filters, filters with variable dimming stand out. The fact is that such filters consist of two polarizing ones, like a sandwich. Moreover, the linear parts of these filters are turned inward, that is, facing each other. This design places high demands on the quality of polarizing filters.
We have already said that there is not much difference between polarizing filters if you use them individually, since the uneven polarization in the photo is usually not noticeable at all. It's a completely different matter if you use filters sequentially, since the uneven polarization of one filter when passing through the second will be expressed in dark stripes in the photo.
That is why, if you decide to buy an adjustable darkening filter, I categorically do not recommend cheap Chinese products, since instead of a filter you will get one disorder.
Kenko NDX is considered a good filter; it allows you to vary the dimming from ND2 to ND1000. Moreover, moire in the form of dark stripes appears only in the most extreme position. During normal use, the dimming is uniform without distortion in color balance. This is a professional technique, so be prepared to shell out a pretty penny.
As the maximum approaches, dark areas begin to appear. In this case, I was lucky, only two corners darkened, as if the photo was taken with a gradient filter:

Everything about Kenko NDX is good, I just didn’t like the box. She is, of course, beautiful, but too fragile and uncomfortable. The filter box should be made of soft plastic and square in shape, not this:

With a sufficiently dark ND filter, especially with Kenko NDX, you can photograph a small nuclear explosion and even sunspots:

Only for this you will need a lens with a focal length of more than 300mm. I shot at 28-300 and, of course, for this it would be nice to have a camera with a resolution at least like the Nikon D800. Don’t forget to clean the matrix, otherwise you will mistake spots on your matrix for sunspots.
There is one more trick. When you photograph with a blackout filter on a tripod, your camera will misjudge the exposure due to the light entering the meter through the open eyepiece. I recommend covering it with your finger to avoid getting a dark photo. On more serious cameras, there is a lever next to the eyepiece that lowers the shutter specifically for these purposes. Usually this lever is on the top left of the eyepiece:

Darkening filters must be used wisely. An ND filter doesn't make your photos better, it just makes them different, and the filter itself is just a way to achieve your artistic intent.
Here is a photo with an ND filter:

But with polarization:

Or so, here the filter would ruin everything:

Thank you for your attention.