Letter. A difficult question for the site administrator and please answer in simple language, so that a simple user can understand.
How to check your hard drive for functionality, and most importantly, is it possible to remove bad sectors from a hard drive, or what are they also called, bad blocks, which, as it turns out, come in several types:
– physical (crumbling magnetic layer of working plates, chips, etc.),
– logical (sector logic errors), logical bad blocks, can also be classified as software bads, that is, soft bads (file system errors).
Before writing to you, I spent quite some time understanding this issue and realized that the average user knows superficial and inaccurate information, namely: many people believe that all bad sectors or bad blocks are removed by normal formatting, but this is not so. It turns out that it is generally impossible to remove physical bads, but logical ones only with the help of special programs, and only software bad blocks or soft bads (file system errors) can be removed using ordinary Windows tools, for example, using or regular formatting. What am I talking about?
Recently I had to contact a service center about strange behavior of my computer. Firstly, there were periodic freezes, lasting several seconds, and sometimes permanently; I had to restart the computer with the Reset button. Occasionally, strange clicks and creaks were heard from the hard drive. Strange folders with no names were found in the system. The simple process of copying a file from one hard drive partition to another took an terribly long time. Also, the operating system often checked the hard drive for errors when turning on the computer, and the last time it showed BOOTMGR is missing on a black screen, I recovered this error using the seven installation disk, but a day later when loading the computer it just showed a black screen, I thought enough was enough and contacted the service center.
At the service center, a technician checked my hard drive using the free HDDScan program.
Unfortunately, the master checking did not explain anything, he showed me only after checking the presence of 12 bad blocks (English: bad sector, bad block, bad sectors - damaged), marked by the program in blue. Another 90 sectors were marked in red; they were not yet bad blocks, but their response time was not good, more than 500 ms.
The wizard also showed me the S.M.A.R.T of my hard drive and recognized it as not very good, since the most important parameter is Reallocated Sector Count - indicating the number of reassigned sectors (when the disk detects a read/write error, the sector is marked “reassigned”, and the data from the damaged sector or in other words, the physical bad block is transferred to the backup area), is almost critical, it is responsible for physical defects of the hard drive that cannot be corrected.
Another parameter, Current Pending Errors Count, which is responsible for the number of sectors that are difficult to read and very different from reading a normal sector, was also marked in yellow, which indicated its poor condition. The expert’s advice was: Transfer all important data from the hard drive and “fix” it in this HDDScan program, but since there are a lot of bad blocks, most likely it will not be possible to fix all of them and it will no longer be possible to install the operating system on it, in In the future, you need to use this hard drive as a file storage or, as they also say, a file trash bin, this is the only way it will survive for some time.

I listened to the technician and left the hard drive at the service center for “treatment” until the evening, and in the evening I was shown the result.
Not a single bad sector (bad block), but there were 12. The number of sectors with a response time of more than 500 ms has become smaller (it was 90, but now 23),

one of the critical S.M.A.R.T indicators is 197 Current Pending Errors Count-responsible, as I already said, for the number of sectors that are difficult to read, has become normal, the parameter 198 Uncorrectable Errors Count-the number of uncorrected errors when accessing a sector also became within the normal range, but the most important indicator, according to him, Reallocated Sector Count, did not change and remained unsatisfactory, so the conclusion is this: the operating system cannot be installed on this hard drive.

And now I have a question for you, please explain in detail, how to check hard drive for professional suitability on my own, how to determine how many bad sectors I have and what they are? How to use programs like HDDScan, and most importantly, how to get rid of bad blocks using it. What exactly does the program do with the hard drive, ridding it of bad blocks, and how long will such treatment of the hard drive help? Is it still possible to install an operating system on this hard drive or not? And the last question, the incorrigible parameter S.M.A.R.T - Reallocated Sector Count can still be fixed and are physical bads really incorrigible at all? Many forums on the Internet say that there are proprietary utilities from hard drive manufacturers that can perform low-level formatting at home. Alexander Anatolyevich. Tomsk.
Friends, let's keep it short - sister of talent, one of my friends, having read this question, answered it like this:- “You can’t cover up a scratch with anything, but a software problem can’t be cured.”
The topic is not simple, but relevant, the article is long, but I tried to make it understandable to the average user. To make everything easier to understand, I suggest, along the way, step by step, using the free HDDScan program, to check the MAXTOR STM3250310AS hard drive installed in the computer that was brought to our service center for repair. The operating system installed on the hard drive freezes from time to time, refuses to boot, displays various errors or just a black screen. The hard drive creaks and clicks (I’ll explain why below). Reinstalling Windows did not help the matter and the owners of the computer do not know what to do.
So how to check the status of a hard drive? This can be done using various tests in the HDDScan program. First, let’s check the S.M.A.R.T indicators of this hard drive, then we’ll test the surface of the hard drive, we’ll find no less than 63 bad sectors and our program will fix them all, how long will last is another question (read on).
- But first, a very brief information about how a hard drive works, if this digression is not made, you simply will not understand the principle of operation of the HDDScan program and other similar programs, much less you will not understand what S.M.A.R.T is, as well as bad sectors (bad blocks) and why some of them cannot be fixed.
The hard drive is made of aluminum or glass plates coated with a layer of ferromagnetic material. A hard drive is primarily a device that operates on the principle of magnetic recording. Magnetic heads that read, write or erase information from a hard disk hover above its surface at a height of 10-12 nm and never touch the surface of the magnetic disk, which is easily damaged.
- At the final stage of hard drive production, low level formatting, that is, tracks are applied to the working plates of the hard drive, each track is divided into sectors. Also, special magnetic servo marks are applied to the magnetic surface of the hard drive; they are needed to accurately place the magnetic head of the hard drive on the tracks of the hard drive. The minimum unit of information on a hard disk is a sector; the volume available to the user is 512 bytes of data. Low-level formatting in the life of a hard drive occurs only once, friends, and only on special and very expensive factory equipment - called Servowriter. Information recorded using this formatting will never be overwritten. Friends, such formatting cannot be done in any service. Therefore, my answer to the question whether it is possible to carry out low-level formatting using the operating system is the answer - no, it is not possible. Low-level formatting can only be done at the factory; it even destroys tracks, sectors and magnetic servo marks. For example, in the program Victoria erases all the information on the hard drive by filling all sectors with zeros, this cannot be called low-level formatting, but it cannot be called formatting either, it is something in between. After Write mode, all sectors of the hard disk are filled with zeros and do not contain any errors, and it can be formatted into a file system using Windows.
- At the factory, only service information is recorded in sectors ( servo information servo service, for example, the physical address of the sector and the address marker that determines the beginning of the sector), this information can be called markings, it is needed for the normal operation of the hard drive, this is information about the numbers of tracks and sectors, necessary for the heads to accurately hit these tracks and sectors when reading information written in them.
After purchasing a hard drive, user data will also later be written to this area (for example, the first sector of the hard drive will contain the MBR master boot record), but User data can be recorded and erased, in contrast to service information, which has much greater magnetization, which is why the read-write heads of the drive can't erase it.
All service information about track and sector numbers will be stored in a special table located in a closed service area, inaccessible to OS and BIOS tools, which is a mini-operating system; together with the Firmware, they control the operation of the hard drive. Sometimes they ask the question - Is it sometimes necessary to update the firmware of a hard drive, the answer is negative, modern hard drives do not need updating. Also in this service area the disk passport, SMART attribute values, as well as a defect table with information about unrecoverable or reassigned bad sectors (bad blocks) will be stored.
So we got to the physical, logical and software bad sectors.
![]()
The fact is, friends, that if the operating system has problems reading data from a sector, then the hard drive controller makes several additional attempts to read the data, if they are also unsuccessful, this sector is recognized as faulty, and then the information is written to the normal sector , located on the backup track, and the problematic sector is recognized as faulty and removed from circulation, this is called (Remapping, in common parlance remap).
- Friends, whether to perform a remap or not is decided only by the hard drive controller during operation, and not by any programs for working with the hard drive (Victoria, MHDD). These programs can only hint with their tests (for example, Advanced REMAP in the Victoria program - an improved algorithm for hiding bad blocks) to the hard drive controller that a remap needs to be done.
The fact that a sector is recognized as faulty is entered into the defect table with information about unrecoverable or reassigned faulty sectors, located in the service area.
By the way, there are two tables of defects, one is the initial P-list (Primary-list), created after the final factory tests; any hard drive, friends, already has several reassigned bad blocks when it leaves the factory. Well, the growing table of defects G-list (Grown-list) is filled in by us as we use the hard drive.
What are bad sectors and how to fix them?
- Physical bad sectors are mechanical defects in the magnetic coating of the hard drive surface (crumbling magnetic layer of working plates, chips, etc.). That is, the sector structure itself is physically faulty; undoubtedly, such a bad block must be reassigned as a normal sector from the backup track. Very often this happens due to an impact caused, for example, by dropping a hard drive on the floor, mechanical damage occurs to the magnetic coating of the hard drive, damage to the magnetic heads, the same can happen due to overheating. Vibration of a hard drive is also dangerous if it is not securely fastened. A dusty room, smoking, despite the filter installed in the hard drive, also play a huge role in the formation of bad blocks; tobacco tar and dust stick to the surface of the hard drive and interfere with reading information.
- Physical bad blocks are not possible cannot be corrected by any formatting, you can only reassign them as spare sectors from the reserve tracks; naturally, because of this, the performance will drop somewhat, since the magnetic head of the hard drive will have to make many additional movements, looking for information on the reassigned sectors from the reserve tracks.
Why does the hard drive squeak? and sometimes clicks when working
When the operating system encounters a bad sector, the hard drive controller makes several attempts to read information from it, while clicks and squeaks may be produced by the hard drive head positioner.
The following reason may also be the cause of clicks and squeaks of the hard drive. When reassigning a bad sector to a normal one from a backup track (which is not always nearby), the magnetic head naturally has to change direction, as many say jump from side to side.
The third reason is that, as I said above, during the manufacture of a hard drive, special markings are made on the magnetic surface of hard drives with special servo marks; these servo marks are used to accurately position the magnetic head on the tracks of the hard drive; it is with the help of servo marks that the magnetic head of the hard drive moves correctly. Sometimes servo tags are destroyed for the same reasons that physical bad blocks are formed and the magnetic head cannot take and hold the position it needs, and clicks and creaks are heard from the hard drive.
- Logical bad blocks(sector logic errors), in turn divided into correctable and incorrigible. In which case logical bad block cannot be fixed? As I said above, each sector, in addition to user information, also contains service information (servo information, for example, the physical address of the sector and an address marker that determines the beginning of the sector), in simple words, markings with the help of which the magnetic head of the hard drive gets to the necessary tracks of the sectors, such markings applied by low-level formatting at the factory during the manufacture of the hard drive. This information is almost impossible to delete since it is highly magnetized, but under certain circumstances, similar to the reasons for the appearance of physical bad blocks (shock, vibration, bearing play, etc.), this information is violated and can only be restored in the factory. Yes, there are special proprietary utilities that overwrite service information, but due to the complexity of their use, this issue is difficult even for specialized specialists and we will not consider it.
- Logical bad blocksthat can be fixed. When writing to the user information sector, a piece of service information is additionally written, the so-called ECC (Error Correction Code) sector checksum; this code allows you to restore data if it was read with an error. But sometimes this code is not written, and accordingly the sum of user data in the sector does not match the ECC checksum. One simple example of why this happens is a sudden shutdown of the computer due to an electrical failure, because of this, information was written to the hard disk sector, but the checksum was not. The next time the operating system accesses this sector and tries to read data from it, but it will not match the ECC checksum, an attempt will be made to read the data again and again without success (so you get freezes and a bad block).
- Software bad blocks(file system errors - for example, an incorrectly marked sector belonging to two files) can be removed using the operating system - more reliably by regular formatting.
You will say that all this is good and understandable, but how can you get rid of bad blocks, transfer data from the hard drive and format it in the operating system installation program?
When formatting using all the methods available to the operating system, the same attempt will occur to read information from the bad sector, then compare them with the ECC checksum, but it does not match, which means that the incorrect information will not be overwritten and the bad sector will remain bad even after formatting. So it turns out that you need a special program, for example МHDD or HDDScan, which will not read anything, but will simply force a rewrite, usually filling the bad sector with zeros, but then it will read what was written down and compare the checksum, after which the sector will return to work.
For example, the HDDScan program has an Erase function - Test in linear recording mode (sector-by-sector erasing of data), carefully all your data will be deleted. Unfortunately, nothing will work without deleting the data, so before this test it must be transferred to another storage medium.

The best thing is to completely remove your hard drive and connect it to another computer that has the HDDScan program, then run the Erase test and check your entire hard drive. You don’t have to remove anything, burn boot disks with MHDD or Victoria programs, boot from them and run these programs with the Advanced remap function, but we will do this in other articles.
Now, friends, let's move on directly to working with the HDDScan program. With the help of this program, we will see the full picture of what is happening with our hard drive, namely, we will find out the S.M.A.R.T of our hard drive and decrypt it, we will also set the number of bad sectors and, of course, we will try to fix them.
Read on to the article.
– one of the most unreliable computer components. With active use, modern hard drives last an average of 3 years. Therefore, in order not to lose your data, it is very important to regularly check the status of the drive (and do not forget to make backup copies). In this article we will look at several ways to check your hard drive for functionality.
Checking the health of the hard drive using S.M.A.R.T.
If you want to check your hard drive for performance, then you should start with data from the S.M.A.R.T. system, which can be viewed in the CrystalDiskInfo program. This program is completely free, and you can.
The CrystalDiskInfo program receives hard drive data from the S.M.A.R.T. system and provides an assessment of its technical condition. If the hard drive is in good condition, you will see a rating of " Good condition e". If there are any problems with the device, you will receive a rating of " Anxiety ". Well, in case of serious problems, you will receive a technical condition rating of “Bad”.
If you wish, you can independently analyze the information from the “S.M.A.R.T.” system. To do this, examine the list of options that is located at the bottom of the CrystalDiskInfo window. As a cheat sheet on the parameters “S.M.A.R.T.” can be used .
Checking the performance of the hard drive under load
If "S.M.A.R.T." does not show any problems, then the hard drive needs to be checked under load. To do this, just try to copy a large number of small files (weighing 2-5 megabytes) to it. For example, you might try to save a large folder of photos to your hard drive. If it is faulty, the following symptoms should appear when copying files:
- A sharp decrease in copying speed;
- Intermittent copy speed;
- The copying process freezes;
- Computer or Windows Explorer freezes;
- Unpleasant sounds (crackling, grinding, squeaking);
- Disabling the drive;
If such a manual check does not reveal any obvious problems, then you can resort to more serious methods of testing the drive.
Checking your hard drive using HD Tune
The next option is to check the disk's performance using HD Tune. This program is free and you can use it. Just don’t confuse it with the paid HD Tune Pro, a link to which is on the same page.
Launch the HD Tune program on your computer and go to the “Error Scan” tab. On this tab, you need to start the test using the “Start” button and wait for it to finish.
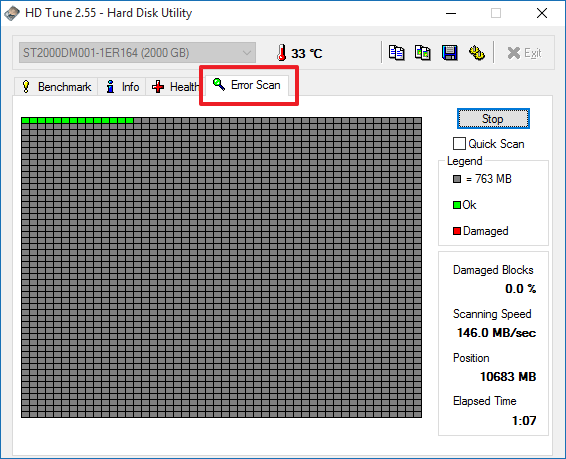
If a large number of errors were found during the scanning process, this means that your hard drive is in poor condition. Perhaps it will fail soon.
Checking the hard drive in Victoria 3.5
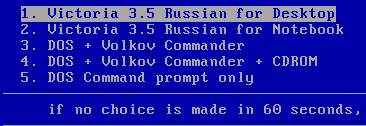
For the most accurate check, you need to use the program, it can be downloaded as an iso file, for example, (here is version 3.5, it is optimal for checking the HDD outside the operating system). The resulting iso file must be written to a CD (or flash drive) and the computer booted from it. After loading from the CD, you will need to select one of the options for launching the Victoria program. If you have a desktop PC, then select “Victoria for Desktop”, for a laptop “Victoria for Notebook” is suitable, the remaining items launch DOS and the Volkov Commander program.
To run a scan of the entire HDD surface, press the F4 key. As a result, a menu will open in which you need to select “Ignore Bad Blocks” and "Linear Reading". Please note that you do not need to use the “Write (erase)”, “Write from file”, or “BB = Erase 256 sect” options, since they delete information from the drive.

In order for scanning to begin, you need to press the F4 key again. After this, you need to wait until the program finishes checking the hard drive. At the end of testing, if the HDD does not have any problems, then you will see this result.

If the drive has any problem areas, orange and red spots will appear in the scanning window. The more such spots, the worse the condition of the drive. If the number of red spots is especially large, then most likely the hard drive is inoperative and it’s time to throw it away. Detailed information about problems will be displayed in the “Defects” block on the right side of the window.
Checking the hard drive in Victoria 4.46 (for Windows)
You can also check the hard drive for functionality using the Victoria 4.46 program from the Windows operating system. In this case, you do not need to burn iso images and you do not need to boot from them. Everything is done right in the Windows environment.
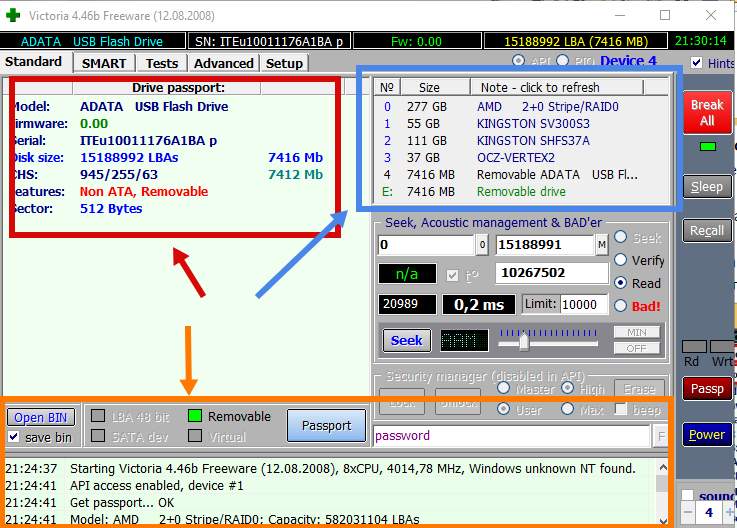
You can download Victoria 4.46 for Windows OS, for example. The downloaded archive will need to be unpacked into any folder and run the program vcr446f.exe. After launch, the main Victoria program window will appear, which looks something like the screenshot below.
First, let's look at the "Standard" tab. Here on the right side of the window are all the drives that Victoria was able to identify, at the top left is information about the currently selected drive (if necessary, you can select another), and at the bottom is a record of all actions, errors and other information.
To test your hard drive, go to the “Tests” tab. Here you first need to click on the “ Passp” button (this will allow you to obtain information about the selected drive), after which you need to start the test using the “ Start” button.
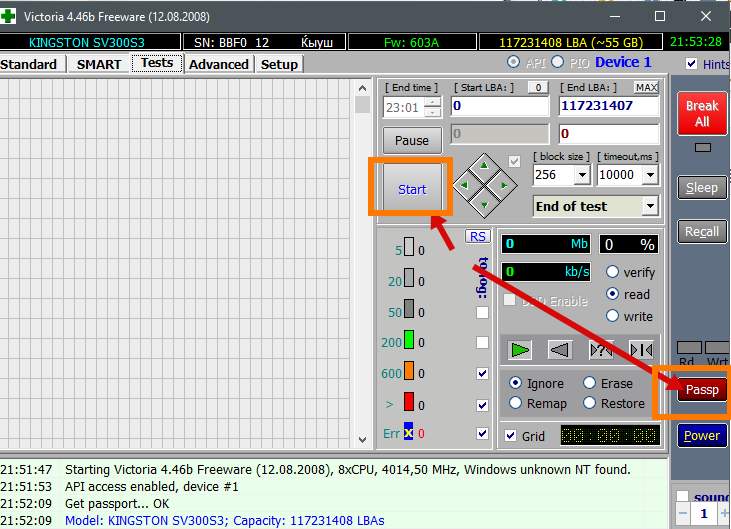
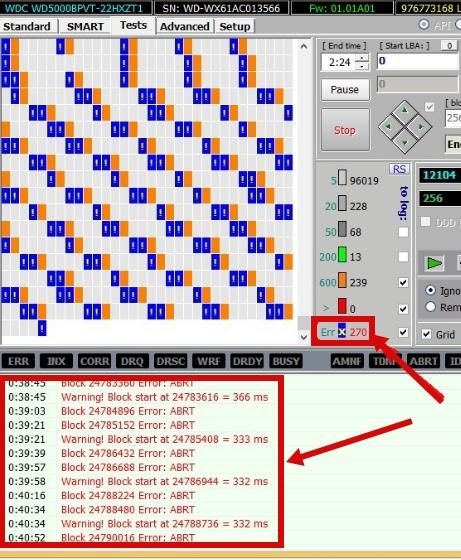
During the scanning process, the program will detect faulty and problematic sectors, the number of which can be seen in the column on the right, as well as at the bottom of the screen.
Do you want to know how to earn 50 thousand monthly online?
Watch my video interview with Igor Krestinin
=>>
Why is the check carried out?
It is necessary to check the operation of the internal memory media then:
- When you purchased a new hard drive for your PC.
- If you notice poor computer performance. This could be: loss of folders and files, lengthy copying and transfer of files from one hard drive storage location to another, frequent application freezes.
- If noise occurs when working with a computer.
The internal memory storage is checked using special programs. The most effective of them are scanning utilities - HDD Scan and Victoria. The first program is capable of fully checking the hard drive and producing a result that will indicate the status of all storage media:
- IDE/SATA/SCSI;
- USB/Firewire (external drives);
- RAID arrays;
- flash cards.
HDD Scan will tell you the series and firmware number of the hard drive that is installed on the PC. The utility is able to scan and find flaws and damage on the internal memory of your PC. HDD Scan will also determine how full the hard drive resource is.
Every student can know how to check a hard drive for functionality using the HDD Scan program. This is the easiest way to identify hard drive damage. You need to download the program to your computer and load the check. The utility offers a simple menu that does not require additional explanation.

You can download the program by clicking on the “Download Version” button. After downloading the utility to your computer, unzip the files. Now go to the program folder, running the executable file. This program does not require mandatory installation, and the file with the multifunctional utility takes up a tiny amount of space on your hard drive.
A method for diagnosing and cleaning a hard drive (Victoria)
As you use your computer's hard drive, its performance characteristics are lost over time. In this regard, so-called “broken sectors” can form on hard drives.
This process foreshadows the aging of the internal storage resource and it is inexorable. These problems are characterized by a decrease in hard drive performance and loss of information from the disk. Having identified a problem, it is necessary to solve it.


Do you want to know what mistakes beginners make? 
99% of beginners make these mistakes and fail in business and making money on the Internet! Make sure you don't repeat these mistakes - “3 + 1 ROOKIE MISTAKES THAT KILL RESULTS”.
Do you urgently need money? 
Download for free: " TOP - 5 ways to make money online" 5 best ways to make money on the Internet, which are guaranteed to bring you results of 1,000 rubles per day or more.
Here is a ready-made solution for your business! 
And for those who are used to taking ready-made solutions, there is “Project of ready-made solutions for starting to make money on the Internet”. Find out how to start your own business online, even for the greenest beginner, without technical knowledge, and even without expertise.
Many PC users hardly think about checking the status of their HDD. Checking the hard drive is, first of all, necessary for early detection of errors in it.
If you manage to identify problems with your hard drive in advance, you will be able to save all the important information stored on it until it finally fails.
In this material, we will describe, using specific examples, the procedure for checking the status of the HDD, and also tell you what to do in a situation if your hard drive is faulty.
How to check the status of your hard drive
You can check the status of your hard drive using various utilities that read the status of your hard drive from its self-diagnosis system SMART. SMART technology is now installed on every hard drive produced. SMART technology was developed back in 1992 and is still being improved to this day. The main goal of SMART is logging the hard drive aging process. That is, information such as the number of HDD starts, the number of spindle rotations and many others is collected. More SMART watches for errors"screw", both software and mechanical and, to the extent possible corrects them. During the monitoring process, SMART performs various short and long tests to identify those same faults. In this material we will look at such programs that can read information from SMART:
- Ashampoo HDD Control 3;
- Defraggler;
- HDDlife;
- Victoria.
Each program on the list, in addition to reading SMART readings, offers a number of functions and tests that, to one degree or another, extend the life of the hard drive. But the most interesting is the program Victoria. The Victoria program, in addition to determining the HDD state, can also produce REMAP of bad sectors. That is, she can hide bad sectors by replacing them with spare ones, if available. Essentially, the REMAP procedure can completely restore the hard drive. It is also worth noting the possibility of fixing the hard drive thanks to the console application “ chkdsk" The console program "chkdsk" can fix file system errors, which will allow you to avoid reinstalling Windows.
Ashampoo HDD Control 3
First we will look at the program Ashampoo HDD Control 3. Let's run this utility on a computer running Windows 10.
The Ashampoo HDD Control 3 window displays the message “ ✓ OK", as well as the inscription " This hard drive has no problems" This information means that the hard drive in question is in perfect order. If when opening the program you see the message “ Error", as well as the inscription " This hard drive has a problem", this means that it has bad sectors or is overheating. To view complete information about the health of the “screw” taken from the smart, you need to click on the footnote “” located in the central block.

In addition to viewing information from the smart device, Ashampoo HDD Control 3 can launch self test S.M.A.R.T. And surface inspection test. You can test these tests in the "" block.

By performing these tests, you can also identify problems with the HDD. In addition to taking readings from smart devices and tests, Ashampoo HDD Control 3 can:
- Perform defragmentation;
- Clean the system of debris;
- Find and delete duplicate files;
- Securely erase files from the HDD, without the possibility of recovery.
The presence of such functionality of Ashampoo HDD Control 3 in monitoring the health of the drive and additional functions puts the utility in first place.
Defraggler
Utility Defraggler primarily intended for defragmentation, but besides this she can read SMART readings. The utility is free and any user can download it from the website www.piriform.com. After launching the utility, you need to go to the “ State».

In the window you can see that the utility displays a message about the status of the screw, like “ GOOD" - this means that he is completely fine. If you see the message " Error" in status, this will mean that the hard drive has bad sectors and it’s time to change it. The utility is quite simple and is suitable primarily for novice PC users who want to monitor the health of the HDD and defragment it. I would also like to note that the utility supports all current operating systems, from Windows XP to Windows 10.
How to check your hard drive using HDDlife
Utility HDDlife It has a nice interface and immediately provides the information we need, which is responsible for the serviceability and breakdown of the screw.

From the image above you can see that in the health block there is " OK!", which means that everything is fine with the HDD. To view smart details, you just need to click on the link “ click to view S.M.A.R.T. attributes».

If you see a message in the health block " DANGER!", this means that your HDD will soon become unusable.

In this case, you need to replace the old hard drive with a new one. The HDDlife utility is, first of all, suitable for novice PC users, since its simplicity will make it easy to monitor the health of the “screw”. In addition to the standard utility, the developer also releases HDDlife for Notebooks, which is designed for laptops. The laptop version has the same functionality as the standard version, but can also perform HDD noise level control. It is also worth noting that the program supports all current operating systems, from Windows XP to Windows 10.
Victoria
Program Victoria is being developed in a version for DOS and by Windows. For our example, we will use the Windows version of Victoria, which can be downloaded from http://hdd-911.com. Victoria is currently available in version 4.47. By launching the Victoria utility, we will be taken to such a window.

Victoria does not have a beautiful interface, as in previous utilities and is written in such old languages as Delphi And Assembler.
In the first tab of the quiz " Standard"is all information about installed hard drives to the computer.
Second tab " SMART» needed for smart reading. To display smart results, you must click the Get SMART button, after which the results will be displayed.

In the hard drive in question, Victoria discovered 1212 bad sectors. This number of BAD sectors is critical, so in this case it is necessary to full backup all data from the HDD. To repair a hard drive using the REMAP test in Victoria, you need to go to the “ Tests" and select the mode " Remap" After these steps, you can begin the procedure of reassigning bad sectors to backup ones with the Start button.

The REMAP test in Victoria can take a very long time. The test time depends on the number of BAD sectors. This test of the Victoria utility does not always help, since there may not be any spare sectors left in the screw.
Please note that using Victoria tests, you can damage the serviceability of the HDD and the information on it.
How to check if a disk is healthy using “chkdsk”
It may happen that by checking the S.M.A.R.T. values. Using the utilities described above, you did not find any problems, but the system still behaves unstable. Instability can manifest itself as blue screens of death and freezes in programs. This behavior of the Windows operating system is caused by file system errors. In this case, the console command “ chkdsk" By running the "chkdsk" command, you can fully restore functionality Windows OS. For this example, we will take a computer with the new Windows 10 operating system. First of all, we will open the console in Windows 10 as an administrator. This can be easily done by right-clicking on the “ Start» and selecting the item we need.

In the running console, execute the following command CHKDSK F: /F /R After checking using the command application “chkdsk”, the result of the check will be displayed in the console.

Now let's look at the command " CHKDSK F: /F /R» more details. Immediately after the command “chkdsk” comes the letter “ F" - this letter local disk, where we correct errors. Keys " /F" And " /R» fix errors in the file system, and fix bad sectors. These keys are almost always used, unlike the others. You can view the remaining keys with the command chkdsk /?

It is also worth noting that in Windows 10 the capabilities of the chkdsk application have been significantly expanded thanks to new keys.
How to check your hard drive's health using DST
Abbreviation DST deciphered Disk Self Test, that is self test disk. Manufacturers specifically integrate this method into the HDD, so that later, using special software, they can perform DST self-diagnosis, which will identify problems. By testing the “screw” using DST you can get information about possible hard drive failure. It is especially convenient to use DST on servers and computers of enterprises, where reliable storage of information plays an important role. Now let's look at using DST using HP laptops as an example. For new HP laptops with support UEFI BIOS There is a special diagnostic menu " Startup Menu" This menu is launched using combination of power key and key ESC.

To run system tests, press the F2 button.

In the window that appears, DST is called Hard Disk Test. After selecting it, a self-test will start.

Other manufacturers also have a DST method, only the launch on a PC from other manufacturers differs from that discussed above.
Checking your hard drive in Linux
For example, let's take a computer based on the Ubuntu 16.04 operating system. To do this, let's launch a terminal in Ubuntu. In the terminal, type the following command: sudo apt-get install smartmontools This command should install console utility Smartmontools.

Now that the Smartmontools utility is installed, you can use the command sudo smartctl -a /dev/sda which will display all the information of the smart hard drive in the console.

If you don't like working in console mode, you can install a graphical utility Gnome-disk-utility. In it you can see everything you need about the HDD and its condition.

Let's sum it up
In this article, we described how you can monitor the status of the HDD, as well as how to fix its sectors and file system, if possible. From the material it becomes clear that monitoring the status of hard drives is very important, as it allows anticipate HDD failure.
If you have discovered that your hard drive is problematic, then do not put off replacing it until later. The problematic “screw” can fail at any moment, and you will lose all the information stored on the computer.
We hope our material will be useful to our readers and will completely help solve the problem of checking a hard drive.
Video on the topic
- 1. How to check your hard drive?
- 2. Utilities for checking the system hard drive
- 3. Other ways to check the hard drive for damage
- 4. Disk analysis using the command line
A computer's hard drive is the main block of its memory, the part responsible for storing, distributing and moving information. Like any physical media, a hard drive has the ability to fail and become damaged, which is critically unacceptable in cases where vital information is stored on it. Checking your hard drive for functionality is the first thing you need to know how to do when purchasing a computer. We will help you understand the intricacies of this process.
How to check your hard drive?
The first thing we need to do is copy the existing important files to another physical medium, be it a Flash card or a third-party HDD. If your SDD or HDD makes strange sounds, clicks, or simply raises doubts about its functionality, you can resort to various methods of checking it before taking it to a specialized service. There are a great many different applications for checking a disk for bad sectors, software compatibility, hardware, etc. Where to start checking? 
Utilities for checking the system hard drive
Microsoft is famous for its large toolkit for working with various system components, and one of them is the standard built-in CHKDSK program for checking and repairing bad sectors. In this case, we can check the disk without installing third-party applications. If the disk file system has errors, chkdsk is our assistant in finding and eliminating them.
Main functions of the built-in utility:
- Finding and fixing errors in NTFS/FAT file systems
- Identification of physically damaged bad sectors
- Checking third-party media (USB flash drives, SD cards, etc.) for faults

Starting a system scan is very simple: open the standard “Run” window in the “Start” menu on Windows, or, if you do not have basic skills in interacting with the command line, find the menu we need through “Explorer”. For this:
- Find the “My Computer” section in Explorer;
- Right-click on the media that requires verification
- Open the section “Properties->Service”;
- Click the top button “Run check”. This command only works if you have administrator rights;

- We restart the computer, while checking the disk, Windows automatically searches for problems and fixes the problems found;
- If there are no problems, the disk will be checked without fixing, but if there are problems, be prepared for the fact that checking the disk will take quite a long time;
- The system checks third-party physical media immediately, without rebooting.
Note that the built-in Windows tool performs only a superficial check, and is far from completely accurate in detecting problems with media. To conduct a more thorough and in-depth analysis, you will need to download and install third-party utilities, the most popular of which we will consider below.
Other ways to check the hard drive for damage
Useful utility utilities for checking disk health and troubleshooting:

Seagate Seatools is an equally useful utility, which, however, does not have the versatility of the previous one, and is only compatible with Seagate hard drives; for other models, the analysis will be fragmentary or completely erroneous. Using Stools is quite simple - you select items for diagnostics, and the program performs automatic testing. If the analysis is completed successfully, PASS will be displayed, in other cases you will see the message FAIL. Issues such as:
- HDD file system errors;
- Problems with the Windows MBR disk boot loader;
- Hardware conflict and Windows driver incompatibility;
- Availability of Bad Sectors;
- The presence of Trojans, viruses and other applications that disrupt the operation of the disk.

In many cases, Seagate Tools automatically fixes problems found; in rare cases, it requires user intervention. It is worth noting that you will need to be patient before checking and correcting errors. A painstaking analysis of a hard drive is not a momentary task, and the duration of the process increases in proportion to the volume of recorded memory.
Disk analysis using the command line

This is how you can verify that your hard drive is working using simple combinations. The disk should be checked when you just bought a new computer, as well as after errors in installing programs or moving a large number of files. If you rarely use your computer, it is worth turning it on sometimes to overclock the physical media - each hard drive has a certain write-overwrite resource, and the method of writing data to a large media does not provide for static storage.
Even if the hard drive is fully operational and the manufacturer is reliable, it is recommended to always save copies of the most important files on third-party media. Although it is possible to recover lost or damaged files using some programs, this method is not absolute, and even a computer service center will not always help you recover erased data from physically damaged media.