You must be able to resize your template if you want to create a good website. By default, many themes offer awkward template skeletal dimensions. Narrow topics are just as bad as too broad. You must have a “sweet spot” that is just right for performing the functions on the site. Only in this way the content of your resource will be displayed correctly, and all the widgets will fit into the sidebar. In this article, you will learn what are the ways to adjust the size of the side columns.
Without a sidebar, the site looks useless. If you want to somehow visually dilute the content of the page, you should change the WordPress template by adding a sidebar of a certain size. It usually has sidebars already installed by default. But the width of the sidebar is not always optimal for a particular project. Let's take a look at the methods of how to change the width and height of the side part of a WordPress site.
What should be the size of the sidebar
You may not need to change anything. Change the sidebar only if it looks “crooked” and unnatural. First, make sure the sidebar is narrower than the main body of the page containing the content. The sidebar is not a key part of the site, so it shouldn't be paid much attention to - at most it can occupy 40% of the visible part of the page. Please note that if you have two (or more) sidebars, their width should not exceed 50% of the entire page width. It is better to use only one side column - it is more efficient this way.
There is a “golden rule” of designers for sites that use only one sidebar. This rule states that if there is only one sidebar on a page, it should not occupy more than 38% of the site's width. Many eminent web designers speak about such a mysterious figure (for example: Jarel Remik).
As for the height, it is important that the sidebar does not stick out from the top of the site. Its height in the upper limit should be the same as the main body of the page. But the lower limit can be changed to make the base part of the site longer. There is no need to try to cram everything that is on the site into the sidebar - only the basic. And if there is really a lot of information, then make two side columns, but you do not need to stretch the sidebar to the footer of the site.
How to resize the sidebar manually
Now let's talk about how to independently resize the sidebars and the template framework itself without using any extras. This method involves changing source code pages. It is in the html tags that the template size parameter is enclosed. Please note that resizing can have negative consequences if you have uploaded a custom sized image as the background. Therefore, it is better to change the parameters of the wireframe at the stage of the site layout.
Sidebar parameters in the code are in the form of a block. To change the size of the entire frame, including the side columns, you need to dig into the code and alternately adjust the digital parameters of the width and height of each element. Namely:
- header - is responsible for the size of the site header;
- bg is the main content, that is, the part of the page on which the articles will be posted (this is the part where the sidebar is located);
- footer is the footer of the site, that is, its footer.
To find out the dimensions of a specific block, you need to click on the wrapper item in the “View page code”. On the side, in the CSS section of the browser, you will see the numeric values for the width of the element in pixels. To resize the entire wireframe, you need to edit the main element, and then make changes to other elements. It is recommended to do this on local server so that your site does not "jump" in front of users. And, in general, it is better to do this even before the launch of an Internet project.
To resize the sidebar, find a line like this
This line is responsible for the parameters of the middle part of the page, that is, for the content block and for the side columns. Don't touch the “main” line - this is the main part of the site. You need to find the tag “mainnav” - this is the sidebar. All you need to do is change the width item in the CSS - enter a different size value. You can shrink or enlarge the sidebar, but remember to follow the dimensioning tips above to ensure your site displays correctly.
In order for the changes made to be saved, they must be made on the server. That is, you can initially test the adjustments on local hosting, but then be sure to copy the edited style.css file and add it to the databases of the main server. Only then will the changes take effect.
Sidebar resizing plugin
If you don't want to wade into the insides of cascading style sheets and look for elements that need to be edited, then you can use the Visual Sidebar Editor for WordPress plugin. This is a special module designed to generate side speakers. It is part of the more global Visual Composer tool.
The Visual Composer plugin is a natural page builder for WordPress. With it, you can create a ready-made template from scratch. The module works with shortcodes and is very easy to install. If resizing the sidebar isn't the only thing you need to do, download the Visual Composer plugin and add the Visual Sidebar Editor as an add-on. If the problem is only with the size of the sidebar of the page, then the Visual Sidebar Editor module will suffice.
The advantage of using a plugin to change the sidebar is that it does everything automatically. That is, you show what you want to change using the Drag & Drop system, and the module independently adjusts the element code based on your requests. If you want to try your hand at editing html tags, then the plugin will provide you with such an opportunity. In addition, it has special shortcodes for making additional functions to the site - more than 40 extensions.
Another plus of using such a plugin for editing pages is saving changes, regardless of the engine version. Even if you update WordPress, the template will not change - it is controlled by the module. Therefore, you can upgrade to older versions or update WordPress - this will not do any harm to the dimension of the sidebar. In addition, the plugin works with convenient import and export - that is, you can copy sidebars from one site and move them to others. And, most importantly, the module works according to an extremely understandable principle - even a beginner will quickly master it.
If you enjoy the work of the Visual Sidebar Editor, consider installing the complete add-on - the Visual Composer module. Then it will be easy for you to edit any element on the portal pages.
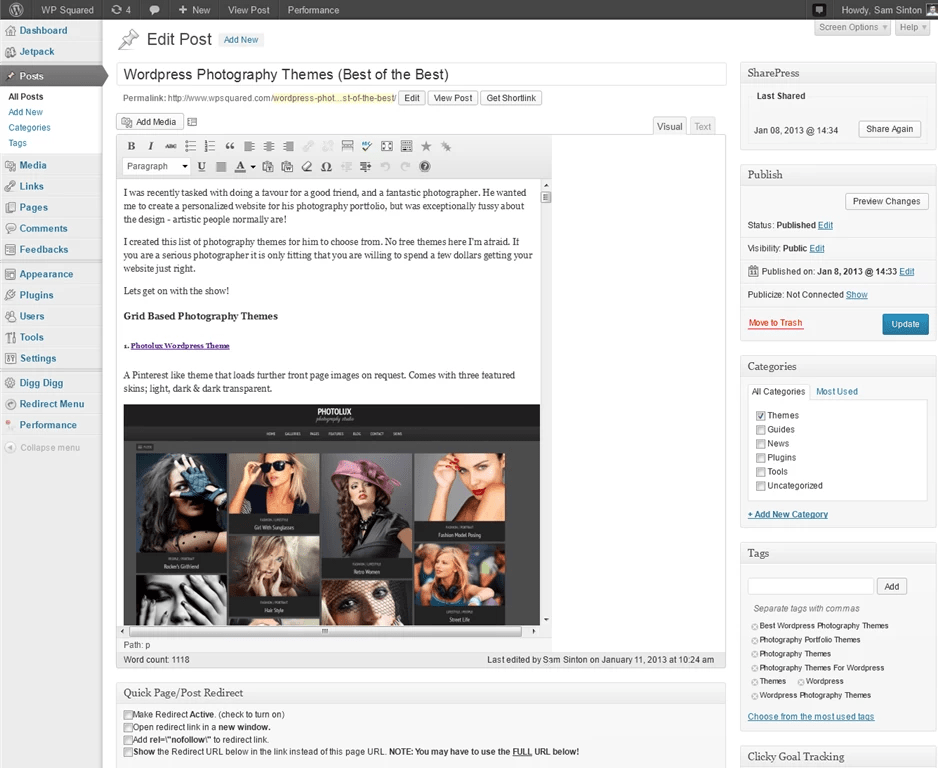
It often happens that a theme you like has a narrow area for entries and its settings do not provide for changing the width. In this case, it can be increased, with minimal knowledge Html and CSS... For example, let's use the popular, free Patagonia theme. You can expand the theme with the help of a wonderful plugin Firefox— Firebug... First you need to install it by downloading it from here. Then turn on plugin, as it shown on the picture - Tools tab — Web development — Firebug — open Firebug:
After that, at the bottom of the screen, it is necessary to select various elements by hovering the cursor and clicking with the mouse. In this case, on the right side, will be displayed CSS styles, and in the area of the page, this or that area will be highlighted - the main one, sidebar, header... We are now interested in the main area that we will get to when we "enter" the tag For example, increase the width main area from 550 pixels to 620 pixels. To do this, you need to make changes to the line width: 550px file style.css... If the theme is already installed, you can edit this file directly from the admin panel, if not, then you need to unpack the archive with the theme and make changes to the file using the editor. In our case, the theme is installed, so go to admin panel— Appearance — Editor- open the style.css file, find the line width: 550px and change the width value 550px to 620px. We press Update file. We go to the site and see that the area of posts has expanded, but in some places "ran over" to the right column. In this case, we need to proportionally narrow this area. For this, we also use Firebug plugin as in the previous case. Find the tag We do the same procedure with editing style.css as in the previous case with the main area, only now we edit the line margin: 0 0 0 580px; Change the padding value in it from 580px to 630px. Now everything is fine. The recording area is wider and does not overlap the area sidebar... It also happens that styles are written not only in the style.css file, but also in the file screen.css. Often, when choosing a wordpress template, a problem arises - this is the insufficient width of the blocks. Many people immediately want to change the width of the template. For those who are well versed in html or php, this will not pose any particular problems. But in order to write in detail about how to make changes to the dimensions of a wordpress template for an untrained person, you will need a whole brochure. The simplest thing is to order, but those who try to do it on their own get knowledge. In the future, he will not have to turn to specialists for every little thing. Knowing the "basis" to do this is quite possible. Before starting any changes, be sure to make a backup copy of all pages of your resource. In case of inaccurate work, you can restore the original appearance of the site without any problems. There are a myriad of wordpress templates, they are all different and each one changes in its own way. But such basic blocks as: width of the main page, header, left and right columns, footer have everything. For work we need: When everything you need is downloaded, installed and ready to work, open the selected template in Mozilla Firefox and launch Firebug by clicking the beetle icon. At the bottom, the plugin panel opens, in which we will work. All changes made will be immediately displayed at the top of the monitor. On the tab on the right, we see the CSS style of the selected element, on the left, the html code of the page. To increase or decrease the width of the template, the first thing we need to do is find out the current size of the canvas. Click on the cursor icon of our plugin. Elements on the page will be highlighted in different colors, and by highlighting each element of the page, you can familiarize yourself in detail with the structure of your site. Having received the name, you will find out the exact dimensions. After the current width is set, left-click on this value. By trial, we create the most suitable width and test its display. Feel free to experiment with any elements and values. Current changes cannot affect your page on the server in any way, they are active only in the plugin window (the current cache of Mozila). When upgrading, all settings are reset. Now it remains to save these changes for the wordpress template. Usually the width of the template is written in style.css. Enter the admin panel of the website → appearance-> editor -> style.css -> line 79, change the width. We save. Do you want to create a full size WordPress page?
Then back to why we are here. This method is recommended if your WordPress theme already comes with a full size page template. If you don't have it, go to the next selection and get it.
First, you must edit the page or create a new one by visiting " Pages> Add New page In the page edit window, select Full width as a template under the page attributes checkbox. After choosing a model Full width You must register your page. You can continue customizing the page to add more content, or click the preview button to see it in action. If you don't have the Full Width - Full Width Template option on your page edit screen, it means that your WordPress theme does not have this page. But don't worry, we'll show you how easy it is to create a full page page without changing WordPress themes.
This method requires you to edit files WordPress themes that you are using and for a basic understanding of PHP, CSS and HTML. By the way, we also invite you to consult with First you need to open text editor, such as Notepad, and paste the following code into an empty file: This code simply detects the filename of the template file and asks WordPress to extract the header template. Then you need the content part of the code. Connect to your site using an FTP client ( or file manager in CPanel) then go to / Wp-content / themes / your-thematic directory / .
Then you should find a file named " page.php". This is the default page template file for your theme. Copy everything after the function " get_header () And paste it into the file Full width.php You created this on your computer. Now you need to look at the contents of the file "full-width.php" and remove this line of code: This line will simply restore the sidebar and display it in your WordPress theme. By removing this, your theme will not display the sidebar when using the template Full width.
You can see this line appears multiple times in your WordPress theme. If your WordPress theme has multiple you will see each sidebar referenced once in the code. You must decide which sidebars you want to keep. Your website is loading slowly, discover If your theme does not display sidebars on your page, you may not find this code in your file. This is how our full-width.php code takes care of the changes. Your code may differ slightly depending on your theme. Then you need to download the file Full width.php In your WordPress theme folder with. You have successfully created and loaded a custom full-width page template for your theme. The next step is to use this template to create a full sized page. Go to your dashboard and edit or create a new page. On the page edit screen, locate the Page Attributes checkbox and click the drop-down menu under the Model option. You will be able to see your model. Go ahead, select it and save or refresh the page. You can now visit your website and you will see the sidebars are gone and your page is displayed as a single column page. It may not be complete yet, but you are now ready to distribute it differently. Make your site popular by discovering You will need to use the Inspect tool to discover the CSS classes your theme uses to define the scope of your content. Then you can adjust its width to 100% using CSS. We used the following CSS code: This is what Twenty Seventeen would look like. That's all for this tutorial, I hope it allows you to create full sized pages. The above methods are free for anyone who can afford and want to quickly create full-width or full-width layouts. You can use other WordPress plugins to give a modern look and optimize the management of your blog or website. Divi Builder is a high quality page builder that is highly regarded Elegant Themes Although it is commonly used as part of the WordPress Divi theme, Divi Builder is also a standalone plugin that can be used in other WordPress themes. Divi Builder allows you to edit your content using a visual front-end as well as a server-side front-end, although most users prefer the former. Basically, instead of sidebars, everything is in popups and floating buttons. It gives you access to 316 predefined templates distributed across 40 different presentation packages, and also allows you to save your own designs as templates. We invite you to discover One of Divi's features has always been the control over the styles it gives you. On three different tabs, you can tweak various settings, including responsive controls, custom spacing, and more. You can even add custom CSS because its CSS editor combines basic validation and autocomplete.One criticism of Divi Builder has always been that it is based on, which means that if you disable it once, it will leave a bunch of shortcodes in your content. While this is a bit depressing, there are now fewer problems with plugins like Shortcode Cleaner. Unsurprisingly, Themify Builder is a proposal from the Themify team. He integrates it into many of his WordPress themes to provide customers with easy customization options. But you can also buy it as a standalone plugin and use it with any WordPress theme. Like Divi Builder and WPBakery Page Builder, Themify Builder lets you create layouts in the frontend or backend.Another good thing is this plugin allows you to customize your responsive breakpoints (but only at the site-wide level). Discover create an online store and sell your products online easily An interesting feature of Themify Builder is that it still allows you to use the standard WordPress editor, while other page builders force you to use the Page Builder interface for everything. Originally launched in 2016, the WordPress Elementor plugin is one of the youngest developers on this list. Despite its late launch, Elementor has quickly amassed over 1,000,000 active installations on WordPress.org, making it one of the most popular WordPress builders out there. If you have any suggestions or comments, leave them in our section WordPress is a fantastic blogging tool, but unfortunately not perfect. Even after many updates and hundreds of new features, some basic user interface improvements are still needed for the usability. I've been writing a lot of long list articles lately and in the process I discovered a problem with the built-in visual post editor in WordPress that I didn't know about before, or it didn't really bother me before. In this quick tutorial, I'll show you how to change the width of the main text column in the visual WordPress post editor. When creating large posts (mostly with pictures), I often had to save and preview the post to make sure the list was formatted correctly. In addition, I often had to write text directly on my image, because the size of the editor window is almost one and a half times larger than any of my images (as well as the main content block on my site): The solution is relatively simple, but you need to know how to implement it. First, you need to find out the current width of the content block on your site. In my case, my blog's block width is 650px. Then you will need to open your file functions.php and add the following code at the bottom of the file: Function fb_change_mce_buttons ($ initArray) ($ initArray ["width"] = "650px"; return $ initArray;) add_filter ("tiny_mce_before_init", "fb_change_mce_buttons"); As a result, you will see a post editor that matches the width of your content block on the site itself. This way, you can be sure that when you create an entry through the admin console, it will look as close as possible to the final result. Remember that some screen resolutions will change your settings and, for example, will only show one column - this will depend on the width of your content.


Plugin panel
Editing style.css

Method 1: using the built-in width template in a WordPress theme
Method 2: how to create a full width page template
Also discover some premium WordPress plugins
We bring you several premium WordPress plugins to help you do just that.
1. Divi Builder
2. Builder
3. Fakir
Problem
Solution
Result