With the growth of the computer park in organizations, there is a growing danger of forgetting which peripheral device is located inside a particular workstation, or even losing one of them altogether. The loss can occur due to the negligence of a technical support employee or due to the malicious intent of an employee who decides to improve the performance of his home computer at the expense of the company. There are several ways for the chief of technical service or system administrator to prevent this kind of incidents. For example, you can seal the case of system units and conduct regular inspections of the integrity of the seals. You can make an inventory of the components every morning (or evening). The installation of visual observation tools can also be effective. All of these methods have their pros and cons. The main disadvantage of these funds is their increased labor intensity, as well as a very serious costly part (visual observation means, seals, increased working time for control). Similar disadvantages are absent in another accounting option - software.
The Total Network Inventory system from Softinventive allows you to keep a complete inventory of software installed on a computer, as well as monitor the hardware of office computers, small and large corporate LANs. Without leaving his seat, the administrator can scan the network and get comprehensive information about each computer. No preinstalled modules are required - they are installed automatically. The program allows you to scan the network both in real time (immediately) and, using a script, at the moment the client connects to the domain.
Total Network Inventory has both an obligatory wizard nowadays, which allows the user to obtain a very impressive result with a minimum of brain strain, and a manual scan mode, which allows the user to configure all the parameters independently. The scanner's capabilities are impressive. Scanning is carried out for three types of information: hardware, installed software, and real-time system information (processes running in the system, services, shared resources, environment variables).
The appearance of the program resembles "Explorer", visually displaying in the left pane the tree of the local network with a breakdown into groups. The group name corresponds to the position of the workstation in the network hierarchy or is selected manually by the user. When you select a computer, information about it is displayed in the central part of the main program window. Details about a particular subsystem are selected based on the marked category in the corresponding panel displayed on the right. The interface of the program is scalable and easy to customize to your taste. A large number of visual themes, customizable panels, tools, as well as the richness of keyboard shortcuts will allow even the most fastidious user to adapt the program interface for themselves.
At the first launch of the program, the user will be offered options for further work: starting the network scan wizard, scanning the current computer, or opening the main window and further work. The main mode of work for the system administrator will probably be working in the main window. However, in order not to add computers manually, in the first step, you can use the Network Scan Wizard. 
The wizard offers two options for working: online scan and logon script. Each option is accompanied by a detailed description indicating which permissions and security policies should be enabled. Which path to take depends on the specific situation.
When scanning computers using a logon script, the administrator gets the opportunity to add a line to call the scanner program to the domain logon script, allowing him to collect information about each computer that connects to the domain using this script (with the WMI service installed and running). The wizard allows you to select a shared folder where the scanner files are placed and a folder to save the scan results. Further, having modified the logon script, the administrator can only wait for users to start connecting to the domain, and from time to time control the information received using the program.
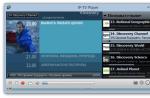
Online scanning has more steps to achieve a result. This type of scan has two options for finding computers: "Network Neighborhood" and "IP Address Range". In the first case, the program looks through the tree of computers visible through the network environment. This option allows the administrator to see the structure of his Microsoft Windows network (workgroups, domains) and visually select the sites to scan. If the network environment is displayed slowly, or the administrator has several subnets to scan, or there is no NetBIOS connection to them, you should choose the second path - "IP address range". This path will allow you to specify one or more ranges of addresses, which will be scanned. In each of the options, you must specify the name of a user with the appropriate privileges (who has rights to work with administrative resources). 
Two options for finding computers - "IP Address Range" and "Network Neighborhood"
The result of the wizard will be a list of groups, domains, nodes, as well as detailed information about them. Additionally, an account card is created for each computer, which contains information about the owner and the computer:
- computer name;
- inventory number;
- registered user;
- the cost of the computer;
- Name of the organization;
- date of payment and installation;
- workgroup or computer domain;
- IP address;
- Personal Information;
- additional information fields.
The program can automatically generate inventory numbers for any newly found computer, and also allows you to create additional information fields containing information about the peripherals connected to the computer (for example, an uninterruptible power supply, scanner, camera).
The completeness of the information collected by Total Network Inventory allows monitoring any hardware or software component of the system, tracking any changes and responding to them in a timely manner. For efficient work with data, the program provides a panel of categories, duplicated by buttons on the toolbar. The user, choosing a category, receives comprehensive information about it. For example, if you select the processor subcategory from the hardware category, the program will display everything about the processor, from its name to the core voltage and the frequency of the L2 cache. 
To organize this entire ocean of information, the system provides a report builder. Using the "Reports" menu or by clicking the corresponding button on the toolbar, the user gains access to the tools associated with reports. The builder is able to summarize data in a convenient form based on user-selected criteria. The selection criteria in the program are conditionally divided into four main groups: general information, equipment, programs, and others. When switching to the mode of generating reports, the administrator gains access to the tools for working with reports, as well as multiple selection of criteria in the corresponding panel. Thanks to this, the operator of the Total Network Inventory program has many opportunities to control the current situation with the technical and software base of an office or corporate network. Depending on the realities of a particular company, the program provides an opportunity to use either pre-installed report schemes, or create your own, which most fully reflects the required picture with equipment. The "Reports" menu contains schemes for displaying reports. They (reports) are divided into two groups: complete and short. For example, a report on the criterion "Computer and motherboard" takes up a full page and contains detailed information. These are information about the system unit, motherboard (manufacturer, name, serial number, version), BIOS information (name, manufacturer, release date, SMBIOS version). In short form, this report takes up a third of a page and it summarizes the same information, but without specifying dates, serial numbers, and so on. 
The builder allows you to generate reports for the entire network, as well as for the computers or groups selected in the Network Browser pane. You can include in the report any number of computers and categories in any combination, that is, select several computers from different networks or groups, combining this with any combination of information categories. The administrator can save the received report in the internal format, as well as in the format of an ASCII text file, HTML, CSV and RTF file. If necessary, the report can be printed.
And finally, the program settings. Depending on the network security settings, as well as the network configuration, the program allows you to configure options for connecting to remote stations. This can be either the use of Named Administrative Pipes over SMB, the connection to the WMI service over RPC, or a combination of both. The settings also allow the administrator to take into account the presence or absence of a DNS server in the network and determine whether to allow IP addresses during scanning or not. Many other settings allow you to very flexibly manage certain parameters of the program, depending on the current need of the administrator or the configuration of the local network.
So, in the matter of remote monitoring, ordering and storing information about the technical and software component of the organization's computer park, this product has been very successful. It has a reasonable price, good performance, an excellent processor of the collected information, as well as all the necessary tools for working in networks of varying complexity. We are confident that Total Network Inventory will save a lot of effort and nerves for the system administrator.
The IT park of any organization often has more than a dozen systems of the most varied configurations. And there will always be a couple of freethinkers who want to breed their bosses for an extraordinary upgrade or install software for personal purposes. Without a system of accounting and control, the administrator risks at least his own premium. Let's consider solutions to simplify this task.
WMI and Powershell
In WinNT 4.0SP4, administrators received a new tool for centralized management and monitoring of the operation of various parts of the operating system - WMI (Windows Management Instrumentation). True, in the first versions of the embedded components were few (only 15). But in subsequent Win2k +, their number increased along with the possibilities. Today WMI is available for all versions of Windows, including Se7en. By polling various WMI classes of local and remote systems, we can obtain all the necessary information on the software and hardware available in the company.
In the examples I suggest not to use VBScript, JScript or other scripting languages, they are too cumbersome and inconvenient, especially since we already have a luxurious PowerShell that can do the lion's share of the work for us (read more about PS in] [09.2009 and 05.2010).
First, let's get a list of BIOSes on slave computers:
PS> Get-WMIObject Win32_BIOS
-computerName synack.ru
As you can imagine, "-computerName" is followed by the hostname. Although, when polling the local system, this parameter can be omitted, which we will do in the future for brevity. Having written a simple script, it is easy to pass a list of systems from which information will be collected to Get-WMIObject. If necessary, save the result to a text file for further analysis.
Similarly, we poll the rest of the parameters. For example, we request information about the CPU:
PS> Get-WMIObject Win32_Processor
A complete list of data, as a rule, is not needed, so we select only the necessary parameters:
PS> Get-WmiObject Win32_ComputerSystem | Select Manufacturer, Model
Let's see what kind of motherboard we have:
PS> Win32_Baseboard | Select Manufacturer, Name, Product | ft -a
The Win32_ComputerSystem, Win32_ComputerSystemProduct, and Win32_ OperatingSystem classes allow you to collect general data on the computer and system:
PS> "127.0.0.1", "synack.ru", "pc01" | Check-Online |
Foreach-Object (Get-WMIObject
Win32_ComputerSystem -computerName
$_ }
We ask for the OS version:
PS> Get-WmiObject Win32_OperatingSystem | Select CSName, Buil
dNumber, ServicePackMajorVersion
PS> Import-CliXML C: \ check.xml |
Out-GridView
A complete list of Win32_ * classes and properties is available in the MSDN documentation "Win32_Classes" (http://msdn.microsoft.com/en-us/library/ aa394084% 28v = VS.85% 29.aspx). An alternative is to use the search function.
For example, let's look at a list of objects with the word disk in their names:
PS> Get-WmiObject -List | where ($ _.
name -match "disk")
Ready-made utilities and applications
If you search the Internet well, you can find more than a dozen ready-made WMI scripts in a variety of programming languages that can be easily adapted to your needs.
What caught my eye was the Hardware Inventory HTA (www.robvanderwoude.com/hardware.php) with a web shell. Just enter the name of the computer and get information about the installed equipment. If necessary, you can edit the raw in a text editor, supplementing it with the necessary parameters (polling of WMI objects is implemented in VBScript).
Third-party developers have created a number of special cmdlets to make scripting easier. The Computer Inventory Script (CompInv) script, which is available on the powershellpro.com website, allows you to get information about the hardware, OS and save all the collected data in an Excel file for further analysis. After starting the script, it will ask several questions, answering which, the administrator chooses data collection mode. The list of computers to check is determined using a special text file, or the script can automatically check all systems or servers included in the domain. Alternatively, the computer name is set manually. By default, the current account is used, but by answering "Yes" to the question "Would you like to use an alternative credential?", you can specify the required account.
In order not to run the created script yourself later, we will entrust it to SchTasks. For example:
> SchTasks / CREATE / TN CheckScript / TR "powershell.exe`
-noprofile -executionpolicy Unrestricted `
-file check.ps1 "/ IT / RL HIGHEST / SC DAILY
As a result, a task called CheckScript is created, which will execute the PS script check.ps1 daily, with the highest priority. Together with the system of inventory of equipment and installed applications NetPoint (www.neutex.net), a set of PS-scripts (GetNet *) is offered, designed specifically for collecting a certain type of data on subordinate systems. For example, let's look at the availability of free space on the hard drive:
PS> Get-NetLogicalDisk -DriveType "Local Disk"
| where ($ _. FreeSpace / $ _. Size -lt .10) | % (
$ _. ComputerSystemName)
Now let's try to collect information about installed programs:
PS> Get-NetProgram -System synack.ru -Uninstalled $ False
| % ($ _. DisplayName) | sort -unique
In total, the delivery includes 20 cmdlets. A free version of NetPoint Express Edition is available, which runs on 32/64-bit WinXP / 2k3 / 2k8 / Vista / Se7en, it can be used on networks of any size. To install NetPoint, you need PS 2.0, IIS and SQL Server (Express Edition is enough).
By the way, the list of installed programs can be obtained by simply reading the required registry key:
PS> Get-ItemProperty HKLM: \ SOFTWARE \ Microsoft \
Windows \ CurrentVersion \ Uninstall \ * | Format-Table
DisplayName, Publisher | Out-GridView
The Out-GridView cmdlet displays data in a separate searchable and sortable window.
Cons of using scripts
While collecting data using WMI / PowerShell is fairly straightforward, all reports and configuration changes have to be manually controlled. Of course, you can complicate your scripts by trying to automate the process, but not everyone wants to spend time on this. It is worth recalling here that Microsoft offers the necessary functionality in SCCM (System Center Configuration Manager), which we already wrote about in numbers 08.2009, 09.2009 and 01-02.2010. But in cases where the administrator also has * nix systems, all kinds of routers and other equipment that must be taken into account, WMI is no longer an assistant. In addition, the problem of the visual presentation of data and reports remains. Here you will have to resort to third-party programs (including those distributed under free licenses), fortunately, there is plenty to choose from.
Myzci Inventory System
Many who have tried the zCI inventory system (zci.sf.net) found it to be a pretty good solution, but it lacked the ability to enter data manually and a localized interface.
Of course, these are not critical moments, but there are other little things. For example, you cannot delete a device via the web interface - you must manually create an SQL query to clear data from tables. The MyZCI Inventory System (sf.net/projects/myzci) is a fork of zCI. The development is carried out by Yuriy Vinnik, he brought zCI to the required condition: the interface has been translated into Russian and Ukrainian languages, new fields have been added to tables (for example, computer placement) and management has been simplified.
To run MyZCI you need any PHP-enabled web server (with PECL, PHP Extension Community Library) and MySQL.
Unpack the archive myzci-1.2.1.zip to the root directory of the web server and specify the MySQL access parameters in the zciconfig.php file:
$ sudo nano zciconfig.php
return dbx_connect (DBX_MYSQL, "local
host "," zci "," zci "," passwd ");
To create tables in the database, we use the mysqlscript.sql script located in the engine directory. The entries inside need to be brought in line with the data:
$ sudo nano mysqlscript.sql
create database zci;
...
grant all on zci. * to
"zci" @ "localhost" identified by
"passwd";
# If you do not plan to access the database with
other systems, comment on the last line
# grant select, delete, insert, update
on zci. * to "zci" @ "%" identified by
"zci";
The interface is localized by setting the “$ Lang” variable to the “ru” value in the langconfig.php file.
Windows Script Host is used to collect information on a Windows system, and lshwclient in Java on Linux. All components are located in the add-ons and engine subdirectory. It also contains MS Windows Scripting Host 5.6 and MS WMI Core 1.5, which are required for the client side to work in Win95 / 98 / NT4. Before deploying to the takedata.js and lshwclient.java files, change the value of the MyZCIpath and MyZCIserver variables to point to the server URL.
The process of configuring the client side on endpoint systems is simplified. For example, the install.sh script used during installation on Linux checks for the presence of the lshw, jdk and read-edid packages (info about the monitor) and, if they are missing, displays an explanatory message. Next, the Java client is built and the cron job is installed. After deploying MyZCI, you need to connect to the server from a remote system and register the computer by clicking the corresponding link on the main page. Information about the new system should appear in the MyZCI database. Download the archive with the client part from the main page and run the installer.
Then the scripts will start sending data to the server. The interface is extremely simple and allows you to display detailed information about the hardware, enter and edit data about computers, group, search for systems according to a specific criterion (for example, the type of video card and monitor), track changes.
The administrator menu allows you to determine the status (assigned, leased) and the location of the system.
OCS Inventory NG system
The OCS Inventory NG solution (OCSNG, Open Computers and Software Inventory New Generation, ocsinventory-ng.org) allows you to make an inventory of components and software installed on computers in the local network, and track their changes, periodically receiving data on system configurations. Another useful feature is the ability to remotely install programs and execute commands. To collect information, an agent program is installed on client computers.
The agent is available for almost all Windows versions from 95 to 2k8R2, Linux, Mac OS X, * BSD, Solaris, IBM AIX, and HP-UX. The agents send all collected data to the management server as an XML stream compressed using the Zlib library. For transmission, the standard HTTP / HTTPS protocol is used, so problems with the firewall usually do not arise. With the help of agents, the "IP discovery" function is implemented, which helps to find all network and peripheral devices working in LAN, including those that cannot install an agent (switches, printers, web cameras, etc.) Agents scan the network looking for such devices and send information about them to the server for analysis.
The Windows version is written in C ++, the * nix version is written in Perl and C.
The OCSNG server side includes four components that do not need to be installed on the same server. This is a DBMS (MySQL) for data collection, as well as a web server that can play one of three roles:
- Communication service - provides HTTP communication between the database server and agent programs (Apache 1.3.X / 2.X with integrated Perl, in Debian / Ubuntu the libapache-dbi-perl package);
- Deployment service - storage of installation files for agent programs (any web server with SSL support);
- Management Console - View collected data in a browser (PHP-enabled web server with ZIP and GD).
The OCSNG server side can be installed on a computer running Win2k / XP / 2k3, Linux, * BSD, Solaris, IBM AIX and MacOS X.
Installing Ocsng
The package you need is in the repositories of most distributions, although this is usually not the most current version. Self-assembly from source code with a careful approach should not cause difficulties. The installation script setup.sh, located inside the archive, will check for the required components and provide recommendations for fixing problems, if necessary.
On Debian / Ubuntu, for manual build, you need to roll packages:
$ sudo apt-get install libapache2-mod-perl2
libdbi-perl libapache-dbi-perl libdbd-mysqlperl
libsoap-lite-perl libxml-simple-perl
libnet-ip-perl libcompress-zlib-perl php5-gd
And XML :: Entities from the CPAN repository:
$ sudo cpan -i XML :: Entities
The installation process will create all the necessary configuration files and aliases for the web server. Since the files that can be distributed using OCSNG are often large, you should set the required values for the post_max_size and upload_max_filesize variables in the /etc/php5/apache2/php.ini files (by default - 8 and 2 MB) and ocsinventory-reports. conf. After all the settings, we call the browser and run the installation script http: //localhost/ocsreports/install.php, where we specify the parameters for accessing the database. During the installation process, an “ocs” account with a password “ocs” will be created to access the ocsweb database. If access to the database is not restricted by the local system, for security reasons, the default password should be changed. To install the agent on Linux, you need some Perl modules (XML and Zlib) and dmidecode.
$ sudo apt-get install libcompress-zlib-perl libnet-ipperl
libnet-ssleay-perl libwww-perl libxml-simple-perl
po-debconf ucf dmidecode pciutils
After that, the agent is installed in the standard way for Perl applications:
$ tar xzvf Ocsinventory-Agent-1.1.2.tar.gz
$ cd Ocsinventory-Agent-1.1.2
$ perl Makefile.PL
$ make
$ sudo make install
Next, the script will start asking a series of questions about the location of the configuration files. We enter the server data, create a tag (for grouping systems), activate the task for cron. When the configuration is complete, the collected computer configuration data is sent to the server. If the connection is established and the response is “Success!”, The installation of the agent can be considered complete. Its details will appear in the web console, in the "All computers" section. An XML file containing the current configuration of the computer will be created in the / var / lib / ocsinventory-agent directory. If there is no connection, start the agent in debug mode:
$ ocsinventory-agent -l / tmp –debug --server http: // ocsng-server / ocsinventory
Usually, the information received is sufficient to diagnose errors. Agent for Windows can be installed in several ways. The easiest is manually or using the included logon script.
After installing the server, the agent installation file can be imported into the OCSNG database. Just select the "Agent" tab and indicate the location of the file, after which it will be available from any computer on the network. The installation is standard: at the last stage, we provide the name or IP-address of the OCSNG server, and in order to immediately generate and send the report, we select the "Immediately launch inventory" checkbox. Next, the agent is registered in startup and starts as a service.
Working with the OCSNG interface
The interface is localized, so it won't take long to figure out how to use it. By default, the All Computers tab displays seven key characteristics of client machines.
The Add column list makes it easy to add up to 23 more fields. It is very convenient that the data lends itself to manual editing. It should also be noted that it is easy to find and remove duplicate systems.
As mentioned earlier, OCSNG has the ability to install applications and run scripts (bat, vbs, etc.) This functionality is very helpful. Create a package in Deployment - Build and fill in the New package building fields: name, Priority (installation order) and action in Action. There are three options:
- Store - copy to the target system;
- Execute - copy and execute with the command;
- Launch - copy and run.
The parameters in User notifications allow you to display a warning to the user and allow him to cancel the task.
After creating the package, it should be activated in Deployment - Activate. Enter the server URL and click Submit. Select the computer on which we will install the package, go to the Customization menu and click the Add package link. We indicate the package and start the process by clicking Affect. The task status is displayed in Customization, general statistics are available in the Activate table.
In OCSNG, the connection is initiated by an agent that connects to the server once a day, sends status information, and receives tasks. If the generated package needs to be installed earlier, the ocsinventory-agent command should be forced on the client.
Conclusion
After setting up and filling the database in the inventory system, you will constantly have at hand the latest information about the current state of computers and will be able to track changes. The reports that it generates make it possible to quickly determine the configuration of a typical computer used in an organization, which will serve well in case of a planned upgrade or OS change.
Localization OCSNG / GLPI
The OCSNG interface is localized, but there are still small problems that lead to the fact that the Russian-language names of programs installed in Windows are displayed incorrectly.
The fact is that OCSNG initially uses ISO-8859-1 encoding (for displaying CP1251), GLPI uses UTF8. When importing OCSNG -> GLPI data, there are also problems with encodings.
There are two known solutions:
- On the fly, when exporting, change the data and used fonts. To do this, you need to correct the export.function.php file and create new fonts that support UTF8 using the ttf2pt1 package.
- Initially teach OCSNG to work with UTF8. For this, patches and rebuilt installation files for Windows are offered. You can download them from ftp://linvinus.ru/ocs. There are also ready-made deb packages for Ubuntu / Debian.
In addition, the line "$ this-> dbenc =" latin1 ";" should be changed in the inc / ocsng.class.php file. to "$ this-> dbenc =" utf8 ";" and in / etc / php5 / apache2 / php.ini check the setting "default_charset =" utf-8 "".
Links
- A complete list of Win32_ * classes can be found in the MSDN documentation "Win32_Classes" - msdn.microsoft.com
- NetPoint project site - neutex.net
- MyZCI project site - sf.net/projects/myzci
- The site of the zCI project - zci.sf.net
- OCSNG project website - ocsinventory-ng.org
GLPI project
GLPI (Gestion Libre de Parc Informatique, glpi-project.org) is another project that enjoys well-deserved popularity among admins. In addition to the tasks of accounting for computers and components, it allows you to store data on the rest of the "household", including consumables. Unlike OCSNG, the administrator fills the device database on his own using a localized web interface.
But this problem is solved by using a plugin that integrates GLPI with OCSNG. Therefore, they are often installed together. To enable support, go to "Settings - General" and switch "Activate OCSNG mode" to "Yes". After that, a new tab "OCSNG mode" will appear in the menu, in which you can synchronize data.
On the basis of GLPI, it is easy to organize a technical support service for users, which is very convenient, because instead of a call, the user leaves a request that is registered by the system. The IT department then processes it. This disciplines users - they stop calling on trifles, and the admins have a database of calls to report on the work done. But GLPI's capabilities don't stop there. It allows you to create a knowledge base consisting of articles, keep records of suppliers, contracts. The system is equipped with a large number of various reports with the ability to export the result to a PDF, CSV or SLK file. Synchronization of the calendar using the iCal, Webcal protocols is supported.
The functionality is easily extended by plugins available on the project website (plugins.glpi-project.org). Besides OCSNG, you can import data from a Cacti or Nagios server.
The GLPI package is available in the repositories of the major * nix distributions. Source installation is standard for PHP applications that require a web server and MySQL.
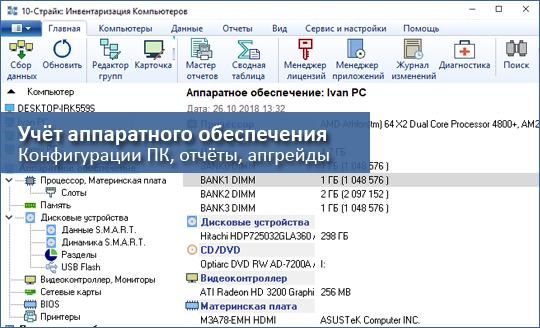
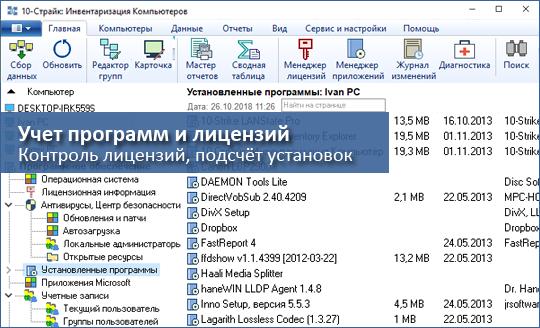


OPPORTUNITIES OF THE PROGRAM
Create reports on the presence of certain programs and their number on computers. Control the correct use of programs and license keys, find prohibited and unlicensed software. Control startup folders, installation of updates and OS patches on computers.
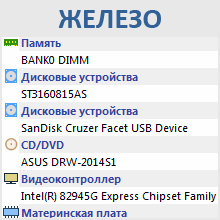
Create reports on the installed hardware on the computers on the network. Track changes in PC configurations. For example, find out where there is less memory, where external drives or USB sticks were connected. Print labels for PC cases with barcodes, configurations, and part serial numbers.
The program monitors all changes in the configurations of remote PCs. If someone has removed or installed a new program, connected or disconnected a device, the program will record this information in the Change Log and you can analyze it. You can also receive email notifications of new changes.
Create a report containing computers with insufficient memory (for example, all PCs with less than 2GB of RAM), small monitors, and older processors. A timely upgrade will save money and improve the productivity of the company's employees.
All data contained in the program can be uploaded to external DBMS for more detailed analysis. The program contains more than 100 ready-made reports, a filtering system and a report designer for selecting data according to conditions and preparing almost any report. If you don't find what you need - contact us. :)
BENEFITS
Background collection of information on a schedule.
Monitoring of software and hardware changes on computers.
Diagnosing problems on network computers and alerting the administrator.
More than 100 ready-made reports, export to PDF, Word, Excel, HTML.
Accounting for computer equipment and office equipment, spare parts warehouse, maintaining the history of computer service.
Supports several methods of collecting information (for domains, workgroups and PCs without a network).
Web interface for remote access to the inventory database.
We have been working in the software market since 1998 (22 years). The development of the inventory program has been going on for 14 years since 2006!
SCREENSHOTS


VERSIONS: CONVENTIONAL AND PRO
Differences table between versions:
If you already have a regular license, you can upgrade to Pro by paying the difference in price between the license you have and the required Pro license.
When you purchase a license, you will receive a subscription to free program and technical updates. support for one year. We do not abandon our project and have been constantly developing it for over 12 years (since 2006).
The program works in Windows XP / Vista / 7 / 8.1 / 10; Server 2003/2008/2012/2016/2019. You can download and try a 30-day trial for free.
ACHIEVEMENTS
Winner of the award "Russian software 2014: innovations and achievements" magazine PC Magazine.
14.12.2014: "PCs are polled in the background, providing the administrator with up-to-date reports on components and programs installed on computers. The package allows downloading information from PCs behind routers and NAT, retrieving data from laptops and Android-gadgets of mobile workers."
Winner of the PC Magazine / RE. Best Software 2013 "
12.12.2013: "Convenient inventory system of IT infrastructure, which is especially useful in SMB companies with their" zoo "of equipment. The system records equipment brands, PC configuration, software versions and licenses. building, missing or replacing components. "
02.10.2007: "A powerful tool for centralized inventory of hardware and software of computers on a local network. Allows you to discover computers on the network and collect information about them in a database ... The ability to select computers in the report, whose configurations satisfy a given condition, simplifies tasks such as planning upgrades . "
Computer technology is used today in every enterprise. Like other fixed assets, it is subject to inventory. This procedure has distinctive features. The procedure for conducting an inventory of property is regulated by: Law on accounting No. 402-FZ dated 06.12.2011, Methodological recommendations, approved. By order of the Ministry of Finance No. 49 of 13.06.1995, Regulations on accounting, approved. By order of the Ministry of Finance No. 34n dated July 29, 1998. Let us consider in detail in the article how the inventory of computers is carried out, what the inspectors need to know about this type of accounting.
Basic inventory concepts
Checking the availability of computer equipment involves an inventory and related components. The main objects of the inventory are presented in the table.
The inventory of computer equipment has the following goals:
- Control over the safety of property;
- Determination of the correspondence of the actual availability to the accounting data;
- Optimization of expenses for the purchase of computers;
- Identification of unused objects;
- Formation of a write-off list;
- Control of changes in the value of property;
- Maintaining the discipline of those responsible for the technique.
Inventory of computers over the network
Currently, there are a large number of special programs that allow you to quickly carry out an inventory of computers. To carry out the inventory in an automated way, it is necessary that all the company's equipment be connected to a single network. The order of further actions is shown in the table.
The use of an automated program has a number of advantages:
- The ability to use template or independently developed reporting forms;
- Background check;
- Saving time;
- No need to detach employees from their duties;
- 100% accuracy of the received data.
The entire volume of data on computer hardware and software products is checked.
A feature of a specialized program for inventory is that you can schedule a scan on a specific schedule. According to the indicated scheme, the program will view the network data and present the final reports. This allows you to find out at the right time the state of the company's computer equipment.
Accounting for inventory of computer equipment
The shortage of computers is written off at the residual value to the 94th shortage account. If the culprit is identified, then he must compensate for the damage. Its value is determined by the value of the property according to the balance sheet. If the guilty person is not found or the court refused to collect funds from him, then the shortage is written off to the financial result. Losses from force majeure circumstances are taken into account in the same way.
Surplus is taken into account at market valuation. It is determined by the price for a similar object, confirmed in writing, for example, by the manufacturer or by the opinion of expert appraisers. The cost must be documented. The corresponding amount is charged to the financial result.
In the income statement, the surplus is shown under the item "Non-operating income".
Example. Vympel LLC lost a computer worth 48,000 rubles on the balance sheet. The amortization amount is 14,000 rubles. The investigating authorities did not identify the culprit and issued an appropriate decision. The object is to be written off to the financial result.
Dt 01.2 Kt 01 48 000 rub. - reflects the original cost of the missing computer;
Dt 02 Kt 01.2 14 000 rub. - wear is taken into account;
Dt 94 Kt 01.2; Dt 91.2 Kt 94 34 000 rub. - the shortage has been written off.
Timing of the inspection
Computers are the main assets of the company. In accordance with the law, their planned inventory is carried out once every 3 years before completing the final financial statements. Management can independently determine the timing and frequency of the audit and reflect this in the accounting policies.
Taking an inventory is mandatory for the following reasons:
- Change of responsible employees;
- Identification of cases of theft and damage to property;
- Liquidation of a company or its reorganization;
- Emergencies and natural disasters;
- In other cases established by law ( p. 1.5, 1.6 of the Recommendations, approved. Order No. 49).
The procedure for conducting computer accounting
Before starting inventory actions, you need to carry out preparatory measures. To simplify the procedure, a label should be attached to each object. It reflects the following information:
- The name of the company;
- Object name according to accounting data;
- Inventory number;
- Responsible officer.
The order of the inventory is shown in the table:
| P / p No. | Stage | Actions |
| 1 | Preparatory | Appointment of a commission, drawing up an inspection plan, issuing an order, printing inventory lists |
| 2 | Examination | Inspection of objects by divisions of the organization in the context of financially responsible persons, filling out inventories |
| 3 | Registration of discrepancies | Documenting surpluses or shortages (memoranda, inventories) indicating the reasons for discrepancies |
| 4 | Registration of results | Drawing up an act |
| 5 | Data comparison | Reconciliation of the received data with the accounting |
The order can be drawn up in the form INV-22 or in any form. The document indicates the reason for the check, the composition of the commission, start and end dates, what property is being inventoried. The data during the inspection are recorded in the inventories (, for intangible assets).
Information in them is grouped by responsible employees and structural divisions. They contain accounting information about the nomenclature, quantity and inventory numbers of objects to be scanned. During the inspection of the equipment, the commission enters into the inventories similar data in fact.
If faulty equipment or its absence is identified, a report is drawn up in the name of the director. It records the names, numbers of equipment lost or unusable for further use. The reasons for the identified defects are also indicated here, the signature of the employee responsible for the safety of values \ u200b \ u200band members of the commission is put. The identified surpluses are drawn up in the same way.
On the basis of these inventories, the commission draws up an act on the results of control. The final stage is the verification of the information received with the accounting data. The necessary adjustments are made, the perpetrators are punished, etc.
Example. In October 2016, in the course of an inventory at Udacha LLC, it turned out that a computer purchased in July last year is in operation. He was not taken into account. The cost of the object is 50,150 rubles, including VAT - 7,650 rubles.
The computer must be registered and depreciated for the entire period of its operation. The service life is determined by the duration of 30 months. Depreciation is charged on a straight-line basis.
1/30 * 100 = 3.33% - depreciation rate;
(50 150 - 7 650) * 3.33% = 1,415.25 rubles. - the amount of depreciation per month.
In October 2016, the accountant made the following entries:
Dt 08 Kt 60 50 150 rub. - computer accepted for accounting;
Dt 19.1 Kt 60 7 650 rub. - VAT included for the purchased object;
Dt 01 Kt 08 50 150 r. - the computer is included in the fixed assets;
Dt 91.2 Kt 02 7 076.25 rub. - reflected depreciation for 2015 (1,415.25 * 5);
Dt 26 Kt 02 14 152.50 rub. - the amount of depreciation for the current year at the time of the error detection was taken into account (1 415.25 * 10).
Automated Inventory Program
In the automated method of inventory, barcode labels are printed from the computer credential database for each object. Subsequently, they are glued to the appropriate equipment. When coding in this way, the 1C "Equipment Accounting" program is used for inventory. On the Internet, you can download a demo version and watch the presentation.
The well-known Hardware Inspector program checks computers by scanning barcodes.
All specialized programs on the market have a similar operating procedure. For example, it's easy to download and use the Network Computers Inventory product. It allows you to detect outdated models, schedule equipment upgrades, select computers whose resource does not match the tasks performed on it, etc.
The IT Invent program has proven itself well. It supports network scanning and collects information for all networked devices. With its help, you can carry out an inventory of network computers in all branches of the company.
The free version contains a limited set of functions; their full list is available in the commercial version of the product. Another program "10-Strike: Computer Inventory" is offered in several modifications. The organization can choose the one that is more suitable for its goals.
Accounting entries for surplus and shortage accounting
To reflect the results of the inventory in accounting, the following standard operations are provided:
Surplus accounting:
Дт 08.3 Кт 91.1 - income in the form of fixed assets is taken into account;
Дт 01 Кт 08 - the object is accepted for accounting at the market price.
Дт 91.1 Кt 99 - the profit from the acceptance of the unaccounted object for accounting is reflected.
Shortage accounting:
If the culprit is not found, the damage is reflected as follows:
Dt 94 Kt 01 - shortage detected;
Дт 02 Кт 01 - depreciation of the missing object was written off;
Dt 91.2 Kt 94 - the loss was charged to other expenses.
If the culprit is found, then the operations are as follows:
Dt 73 Kt 94 - the shortage was written off to the culprit;
Dt 50 Kt 73 - the employee has paid off the debt;
Dt 70 Kt 73 - the debt is withheld from the employee's earnings.
Frequently asked questions and answers to them
Question number 1. What is the maximum amount that can be withheld from the salary of the guilty employee to cover the shortfall following the inventory results?
No more than 20% of earnings can be withheld monthly.
Question number 2. What consequences can an organization face if tax authorities find unaccounted computers?
Such errors in accounting lead to distortion of financial statements. If it is equal to or more than 10%, then the minimum fine will be 5 thousand rubles.
Question number 3. Is it possible to recover the identified shortage from a financially responsible employee who quit before the start of the inventory?
No. According to Art. 232 of the Labor Code of the Russian Federation, termination of the labor agreement with the employee does not relieve him of responsibility for the shortage. To prove that the damage was caused by the employee, an inventory must be taken when he is fired. After a while, it is impossible to prove his guilt and the shortage cannot be collected either.
Question number 4. How to take into account the lack of equipment caused by the fire?
The loss at the carrying amount is charged to the loss of the current year:
Дт 91.2 Кт 94 - damage from force majeure is written off.
Question number 5. Do I need to draw up an INV-1 form for computer equipment leased to other companies?
Not necessary. The tenant should check such property. He sends one copy of the inventory with the results of the inventory to the lessor.
Inventory of computer equipment is necessary to keep track of the number of objects and determine the productivity of their use. The organization uses this procedure to optimize the costs of purchasing computers, hardware and software. Special programs make it possible to carry out it without spending time and labor, to obtain accurate data.