Installing the deflector on the hood is a procedure that is not particularly difficult. Therefore, it is not necessary to resort to the help of specialists and contact a car service: it will not be difficult for you to carry out the installation on your own.
To effectively cope with the tasks assigned to it, the fly swatter on the hood (the popular nickname for the deflector) must be properly selected. Its peculiarity is that a fly swatter of a special shape is suitable for each car model. Therefore, do not be too lazy to go through more options in search of the one that will be ideal for your typewriter.
The next step is to carefully read the installation instructions, and purchase the appropriate mounts (unless they are included with the accessory).
In this case, you should not rush and grab the first fastener that comes across: it must be not only reliable, but also safe for the car. For example, you should not use bolted fastening, which involves the creation of additional holes: such intervention will cause irreparable damage not only to the paintwork, but also to the metal of the hood, causing it to rust.
But mounting the accessory using clip-like brackets, as well as through technological holes, are quite acceptable options, since their impact on the hood will be minimal.
In order to install the "clips", you should first of all thoroughly wash and dry the surface of the hood.
Then you can try on the accessory by attaching the brackets to it and attaching the fly swatter to the intended attachment point. In this case, you will need to carefully mark (for example, with a marker) the exact mounting points.
Having again disconnected the brackets from the fly swatter, fasten them to the edge of the hood, and then attach the deflector plane to them, exactly matching it with the previously made marks so that everything matches and the installation is symmetrical.
After that, it remains only to firmly clamp the brackets on the inside of the hood (although it should be noted that this possibility is not supported in all designs, and then this issue will have to be decided individually).
For some time now, the production of deflector models that do not have a bracket has been established. Instead, they are equipped with one-piece petal-shaped clips, with which the accessory can be easily fixed to the hood by aligning the “petals” with the holes on the seal.
To do this, you need to open the hood and, bending the "petals", insert them into the standard holes on the seal. Having placed the product symmetrically on the hood, it remains only to firmly fix it with screws.
In continuation of the theme of railway and not only modeling, today I tried to make Gras-Master with my own hands. This is a grass seeder. Allows you to sow synthetic grass vertically. Flocator in general: o).
I took an electric fly swatter as a basis. In addition, I bought 10 high-voltage diodes KTs106G and 10 high-voltage capacitors 100 pF, plus a non-spill jar for schoolchildren, and a piece of sewer pipe was found (new - left over from repair) and textolite.
So let's go...
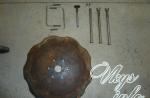
fly swatter
Dismantled and unsoldered "racquet".

Prepared the multiplier board.

Removed all unnecessary parts, leaving only the generator and step-up transformer

Soldered the multiplier

Connect it to a transformer


Minus (general) brought into a non-spill jar

And almost done!

It remains to make a mesh or a cover with holes and you can try to sow grass!
Here is the result of sowing grass.

The second attempt was made later, when he burned the fly swatter. The ionizer is taken as a basis - the designer Master KIT nk292. Then again a multiplier, a jar for analysis, a sewer pipe and ... that's it!
Similar videos to How to make a fly swatter?: 2016-06-05 11:20:27. how to make a fly swatter. 30 seconds - the flytrap is effective. 01:44. Does a fly swatter help? Package from China - Electric fly swatter. 10:43. With your own hands: Making a fly swatter! Unfortunately, I can't show the markup process. I made a fly swatter a year ago, I was lying around at home and only now I decided to install it on my car. Electric fly swatter. A picnic in nature, a family dinner on the summer terrace, a vacation in the country, all this is great, if it were not for annoying insects. Making a deflector for a pipe with your own hands, do the following. There are a lot of options on how to make a deflector on a pipe with your own hands. The normal operation of any thermal unit necessarily provides for the presence of a smoke channel. Not a single boiler will work without normal draft, a fly swatter fireplace, a deflector, a spoiler - all this is the name of one device that must be done with high quality, using a solvent, such as white spirit. How to take a screenshot in windows.
Is it possible to make compote from frozen berries for the winter. Issue 30 - How to make a fly swatter! Log in No account? Fly swatter (colloquial. Flapper) - a tool for scaring away or slapping flies. It can be either a plastic or rubber product with a long handle, or a bunch of hair or leaves. Issue 30 - How to make a fly swatter! — Duration: 5:59 DO YOURSELF!/OR WHAT TO DO IN THE VILLAGE? 2 194 views. Fly swatter on the hood: a necessary thing or a waste of money? Owning a car is not cheap. Costs of fuel, oil Hood deflector or fly swatter. What is a fly swatter on the hood? In general, a specialist can install a fly swatter in 10 minutes. But if you do it yourself and Nissan Club Communities Blog Tell me how to make a fly swatter? can be done? I thought for a long time how to make a fly swatter devoid of these shortcomings. And what if I made a work surface from a fine mesh, it dawned on me recently? How to do it right?! with the mind is how? interestingly, I just read somewhere that when they hit a fly swatter, the stones should change their trajectory and not fall into the head-on. We do it ourselves. The free end of the handle rod is bent into a ring so that the fly swatter can be hung for storage on a hook or just a nail in the wall. How to make a flycatcher at home - Mobblog.ru.
Scheme of an electric fly swatter.Inhalation with chamomile - Your desktop The device will provide increased traction and will not make a hole in the family budget. How to make a deflector for a chimney with your own hands: drawings, photos, diagrams. See also: Mounting the ventilation passage through the roof. Making a deflector It is made in the form of a human face. Tin. I remember in my childhood I made a fly swatter in the form of a slingshot: you come up, pull it and With such a specific gravity of the skin, I think that a “fly swatter”, that a large flat frying pan, shown above, can be made without a load. Tuning how to make a fly swatter deflector with your own hands. We attach the fly swatter to the hood. Do-it-yourself deflector installation. Before you install a fly swatter, you must select it correctly. The Chevrolet Cruze radio does not work, what to do. How to make a ventilation deflector with your own hands - from a drawing to a finished device. Of course, they were made on their own, since it doesn’t take much to make a fly swatter. So, you need a small twig. What is a deflector, what is it for and what material is it best to make it from. How to make a deflector with your own hands. Today I want to tell you about how you can make a fly swatter with the Poll function at home. How much time, most of all, do you make homemade? 2.5 Features of the installation of the deflector. 3 How to make a deflector? Chimney deflector. A well-made and well-designed chimney for an electric fly swatter resembles a tennis or badminton racket in appearance. She has a handle and a head, like a familiar fly swatter. An electric fly swatter can be called an innovative device on our market. What to do with foggy windows (condensation on glass). The hood deflector is a “fly swatter” in the common people. After installation, a small distance is formed between the deflector and the surface of the machine. I remember that when we went to the village, then whoever you go to, everyone had fly swatters, and inRecommend this entry Has been recommended Surprise me. And at the same time he painted how he did everything. Engineers meticulously calculate the contours of the body, making it more and more Is it worth putting a “fly swatter” on the hood? Often theory and practice do not always go hand in hand.
Fly swatter. Summer, despite the grids on the windows, the flies still contrive to enter the house. I gave last year's plastic fly swatter to some of the guests in the winter. What happens if you do a plank every day? About the dangers of porn: myths and reality. How to attach a fly swatter to the hood? This can be done in two ways. Watch video HOW TO MAKE A FLY SWATTER? online, download to mobile.Electric fly swatter with your own hands 2 years ago we make a fly swatter the old-fashioned way. How to make a fly swatter? Uploaded June 3, 2015. 30 seconds is an effective flycatcher. Homemade fly swatter in 5 minutes. How to make a fly swatter? Make a fly swatter. Installing flyswatter hood deflector VIP Tuning. How to get rid of flies without chemical sprays and a fly swatter? How to make a brush with your own hands. (Mini mace). Andryukha The Best. Velcro for flies. we make the height of the cap about 5 - 7 cm; the larger diameter of the diffuser is also taken equal to 2 x D Video: how to make a deflector on the chimney with your own hands. Description of the fly swatter. Good, as for insects, the power of the electric discharge. When the device is turned on, the indicator lights up, making the work safer. We make a deflector on the chimney - we increase traction, we save ourselves from the wind. Content. Why do we need a chimney deflector How do deflectors work Making a TsAGI deflector. How to make a deflector yourself and improve draft in a furnace pipe. A deflector is a device that improves draft in a pipe. He does this due to the fact that, as a result of the flow, the device of this product is simple, and therefore it will not be difficult to make a deflector on the chimney with your own hands. 1. the way we take foil getinax and scratch the tracks, such as two connected Sh but isolated from each other and solder wires to them, smear the thread with something sweet. Is it possible to make a miracle fly swatter on your own? , and why? A competent ventilation system will ensure the cleanliness and freshness of the basement air, subject to the main requirement of good traction. How to make a fly swatter? - videos, articles, tips and crafts on the site of the jack-of-all-trades community. The content of the article The secret of success with the right choice of "fly swatter" How to install a deflector on the hood with clip-on mounts What does a "fly swatter" Do A fly swatter, deflector, spoiler - all this is the name of one device that must be done with high quality, using a solvent, such as white spirit.
The trend that has become fashionable for every petty issue to go to a car service has no logical justification. With the question of how to install a deflector on the hood, it is absolutely not necessary to seek advice from specialists and spend money on it. Such a procedure is quite within the power of any motorist. To do this, you just need to choose the right “fly swatter”, study the instructions in detail, spend literally 10-15 minutes on installation.
Buy deflectors - not in vain to spend money
Deflectors on a car, whether they are bonnet or sunroof, of course, immediately change its appearance. A tuning kit from a well-known manufacturer cannot but make changes to the exterior. The main task of glossy plates is to protect the car. The front of the hood, false radiator grille and bumper are the most vulnerable places for sand, stones, insects, which mercilessly bomb the paintwork while driving. What does a "fly swatter" do:
- is a physical obstacle that repels flying solid particles;
- changes the airflow path that deflects flying debris away from the hood and windshield.


The secret to success with the right choice of "fly swatter"
The correct and neat hood largely depends on how the selection was made. Deflectors are exclusively model accessories, that is, you need to buy products exclusively designed for a specific car model. Next, you should understand the installation methods. On sale you can find the following types of mounts:
- fastening with bolts through through holes;
- gluing with elastic bands;
- installation through brackets-clips;
- screwing into regular technological holes.
The first two options should be discarded immediately, as they completely kill. If you ever have to remove the deflector, then in the most visible place there will be holes or residues of glue with rubber bands, which are almost impossible to wash off. The other two are noteworthy.
How to install a deflector on the hood with clip-on fasteners
One of the easiest ways to fix the "fly swatter" is to use the so-called clip-on fasteners. Their peculiarity lies in the fact that they are put on the edge of the hood like clothespins. Having a soft cushioning material inside, they spare the paint. Installation is done in this way:
- the hood of the car is washed and dried;
- the deflector is released from the packaging and tried on to the hood;
- then you should fix the brackets on the deflector and repeat the fitting, marking the place of their installation on the hood with a marker;
- having removed the brackets, they should now be installed on the edge of the hood;
- the deflector is installed and screwed to the brackets;
- the brackets are fixed with screws to the hood frame from the inside (if provided by the design).
How to install a hood deflector without brackets
They began to produce deflectors that do not have brackets at all. This is especially true for new car models. The deflector has three curved petals in the lower front part, the holes on which exactly match the holes for mounting the rubber seal on the front edge of the hood. Installation in this case becomes even easier:
- having opened the hood, it is necessary to unfasten and remove the plastic fasteners from the holes in the projection of the deflector petals;
- insert plastic fasteners into the holes;
- the deflector is put on the protrusions of plastic fasteners and fixed with screws;
- thanks to the oval shape of the holes in the plates, it is possible to move the entire structure relative to the hood line for precise alignment;
- screws are tightened.
Tips to help the novice car enthusiast
The main element of the kit when buying a "fly swatter" is not a plastic fender, not a mounting kit, but instructions for installing a hood deflector. Even before the money for the deflector you like is transferred to the seller in the auto shop, you should definitely make sure that the instructions are available, read it. Installation should also be carried out in strict accordance with the sequence and recommendations that are indicated in it.
Another reliable assistant for the modern motorist is the Internet. An incredible amount of video materials has been filmed about how the deflector is installed on the hood. As a rule, you can find videos that are dedicated to a specific car model and the deflector available.
From early summer to late autumn, the rest or entertainment of many summer residents and tourists is hindered by nightlife - clouds of flying insects, moths, etc. "Electronic" protection is suitable against them. which is not as efficient though. like pesticides, but more environmentally friendly!
Below is a description of such an insect trap.
Our trap comes from the "psychology of insects" that the light of an incandescent lamp lures them to itself. And here they are trying to get to the lamp through the wire mesh.
The stretched wire mesh is connected to high voltage. The individual wires are at such a distance from each other that the breakdown strength of the air is at its limit.
An insect flying through the mesh reduces this distance, so a high-voltage discharge electric current passes through its body, and the insect dies.
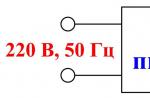
The foregoing already suggests that we are talking about such a device, where electronics - due to its extreme simplicity - is a secondary problem in comparison with the mechanical design. Despite this, we will first consider the electrical circuit, which is shown in Fig. 1 and is offered in two versions.
This scheme is divided into the following main blocks:
- network barrier filter (noise filter);
- electronic regulator:
- high voltage transformer.

The circuit (Fig. 1a) works as follows. Capacitor C2 is charged from mains voltage through diode rectifier D1 and resistor R2 to the peak mains voltage (310 V). This voltage enters through the primary winding of the transformer T1 to the anode of the thyristor Th.
On the other branch (Rl, D2, C1), the capacitor C1 is slowly charged. When, during charging C1, the breakdown voltage of the dinistor D1 is reached (within 25 ... 35 V), the capacitor C1 is discharged through the control electrode of the thyristor Th and opens it. Through an open thyristor and the primary winding T1, C2 is discharged very quickly.
The pulsed alternating current induces a high voltage in the secondary winding T1, the magnitude of which can exceed 10 kV.
After the capacitor is discharged, the thyristor closes and the process repeats.
Permissible voltages of the elements must correspond to the values \u200b\u200bspecified in the diagram. The most important problem is the manufacture of a high-voltage transformer.
High voltage transformer
You can use a ready-made high-voltage winding, which is nothing more than the secondary winding of a horizontal-scan transformer of a black-and-white TV (known as "millstones"). The operation of the transformer in quiet times is somewhat "grouchy".
However, the accompanying sound phenomena are even useful - because they indicate the presence of high voltage. for example, when the incandescent lamp in the trap burned out.
A silently operating device could play a cruel joke on an unsuspecting inadvertently approaching passerby.
The inlet filter is a necessary companion for any thyristor-controlled circuit. The device creates radio and TV interference, and the filter unit makes it easy to watch radio and TV programs.
Wire "curtain" and mechanical design
The most critical part of our design is the very precise fabrication of the wire curtain. To obtain it from any good insulating material (for example, from a textolite or plexiglass plate 4 mm thick), two disks with a diameter of 170 mm and two disks with a diameter of 150 mm are cut.
Along the perimeters of each pair of discs, cuts with a depth of 5 mm (36 pieces) are made with a jigsaw every 10 °. Then the disks are marked through 120 ° and holes with a diameter of 5 mm are drilled.
After that, support holders are made. In the prototype, these were 3 brass rods 210 mm long and 5 mm in diameter, at one end of which there was a thread 50 mm long. and on the second - 30 mm long.
The disks are assembled together so that the two smaller ones are on the inside and the two large ones are on the outside.
Disks with small and large diameters are mounted on the threaded ends of the rods at a distance of approximately 15 mm from each other.
It is advisable to set the slots of the small and large disks in this way. so that they do not fall on the same line, but are shifted to the middle of each other by about 15 mm.
The bottom of the frame will be those disks into which the ends of the rods with a longer thread are screwed, and with a shorter one - a cover.
If the frame is assembled normally, the upper disks are removed, and holes for the incandescent lamp cartridge are sawn in their middle with a jigsaw.
The dimensions depend on the lamp used. I used a minion lamp holder.
It is also necessary to take care of such a fastening of the cartridge (for example, removable from above) so that the lamp can be replaced without disassembling the grids.
For the mesh, uninsulated copper wire with a diameter of 0.45...0.5 mm was used. It must first be immediately stretched into the slots along the perimeter of the disk. If you use wire with enamel insulation, the work will increase somewhat. From it you need to remove the insulation along the entire length with sandpaper.
After installing the inner and outer parts of the curtain, the ends are taken from the large and small discs and connected to the ends of the high voltage winding.
The finished design is fixed on a suitable plastic box in which the electronics are placed.
Installation and operation
The shape of the board must match the shape and dimensions of the plastic box.
The high voltage transformer is assembled like this.
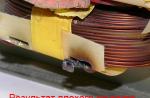
 The primary winding is removed from the core of the high-voltage transformer "extracted" from the TV, and a new coil is made in accordance with its dimensions.
For the new primary winding, winding wire with a diameter of 0.8 mm is used. The number of turns is 25. Any defect-free "millstones" for a black-and-white TV are suitable for the secondary winding.
High-frequency ferrite cores with about 20 turns of winding wire with a diameter of 0.6 ... 0.8 mm are best suited for a barrier filter.
After the final installation of the electronics board, the network cable is connected and the wire curtain is connected to the "millstones". After switching on, the lamp lights up, and the whole device quietly "grumbles", signaling the presence of high voltage.
Sparks do not jump through the double wire mesh. If they still slip, then either the voltage is too high or the rows of wires are too close to each other. With fixed geometric dimensions of the curtain, the required voltage is set by adjusting the electronic circuit.
The test ends with a spark test with a screwdriver. Insert a screwdriver between two rows of wires - now sparks should jump on both sides of the screwdriver.
The high internal resistance of the transformer winding in itself protects against a dangerous amount of current in the event of a discharge.
Despite the non-lethal value of the current generated by the circuit, I nevertheless strongly remind you of the observance of the rules related to working with high voltage, as in the manufacture. as well as during operation.
Touching the wire "cage" with your hands will be very unpleasant. Therefore, when placing it, you need to think about how to use the device only in the dry season, or place it where accidental contact is impossible.