In this article, I'll tell you how to test the performance of different components of your Mac: processor, graphics card, and SSD. The test results will help you understand that it is time to service your computer.
In this article, I'll tell you how to test the performance of different components of your Mac: processor, graphics card, and SSD. The test results will help you understand that it is time to service your computer: . And, of course, compare the performance of your computer with other models.
During tests, you need to monitor the condition of all components. Therefore, first I will talk about two monitoring utilities: Intel Power Gadget And iStat Menus. And then about your favorite test packages: Geekbench, Blender, Cinabench, Prime95, Haven, Vallay And Disk Speed Test.
I will give examples of tests on my computers: a 12-inch MacBook 2015 and a Hackintosh. Here are brief characteristics of the test machines:
 Test MacBook 12 2015 with Intel Core M 1.1 GHz processor
  Hackintosh with Intel Core i7-8700 3.2 GHz processor
 Intel Power Gadget
What is it suitable for?
The program is great for testing temperatures, fan noise, and the computer's ability to handle maximum load. Blender loads all CPU cores and threads at 100% and maintains this load until rendering finishes.
If your computer overheats and starts to throttle the processor, you will see it through the Intel Power Gadget. If everything is good, then the lines will be almost straight.
 My Hackintosh has good cooling, so the frequency and temperature do not change even while running a full Blender test
 Doesn't fit
Blender is not suitable for testing the graphics subsystem in rendering. It has such a function, but it is completely tailored for Nvidia video cards. Rendering on Radeon, which Apple uses, will take longer than on the CPU. So don't even try.
On weaker computers, the test may take more than an hour. In this case, it is better to use Cinabench R20.
Fair, not overpriced and not underestimated. There should be prices on the Service website. Necessarily! without asterisks, clear and detailed, where technically possible - as accurate and concise as possible.
If spare parts are available, up to 85% of complex repairs can be completed in 1-2 days. Modular repairs require much less time. The website shows the approximate duration of any repair.
Warranty and responsibility
Any repair must be guaranteed. Everything is described on the website and in the documents. The guarantee is self-confidence and respect for you. A 3-6 month warranty is good and sufficient. It is needed to check quality and hidden defects that cannot be detected immediately. You see honest and realistic terms (not 3 years), you can be sure that they will help you.
Half the success in Apple repair is the quality and reliability of spare parts, so a good service works directly with suppliers, there are always several reliable channels and your own warehouse with proven spare parts for current models, so you don’t have to waste extra time.
Free diagnostics
This is very important and has already become a rule of good manners for the service center. Diagnostics is the most difficult and important part of the repair, but you don't have to pay a penny for it, even if you don't repair the device based on its results.
Service repairs and delivery
A good service values your time, so it offers free delivery. And for the same reason, repairs are carried out only in the workshop of a service center: they can be done correctly and according to technology only in a prepared place.
Convenient schedule
If the Service works for you, and not for itself, then it is always open! absolutely. The schedule should be convenient to fit in before and after work. Good service works on weekends and holidays. We are waiting for you and working on your devices every day: 9:00 - 21:00
The reputation of professionals consists of several points
Company age and experience
Reliable and experienced service has been known for a long time.
If a company has been on the market for many years and has managed to establish itself as an expert, people turn to it, write about it, and recommend it. We know what we are talking about, since 98% of incoming devices in the service center are restored.
Other service centers trust us and refer complex cases to us.
How many masters in areas
If there are always several engineers waiting for you for each type of equipment, you can be sure:
1. there will be no queue (or it will be minimal) - your device will be taken care of right away.
2. you give your Macbook for repair to an expert in the field of Mac repairs. He knows all the secrets of these devices
Technical literacy
If you ask a question, a specialist should answer it as accurately as possible.
So that you can imagine what exactly you need.
They will try to solve the problem. In most cases, from the description you can understand what happened and how to fix the problem.
Many Mac owners prefer to closely monitor - not only external, but also “internal”. To do this, the standard “System Monitor” is not enough for them: they install 3-4 third-party applications and monitor most parameters with their help. But what if all this was right in the Mac notification center, and even with a cool visual implementation?
And there is such a widget. It arrived on Mac last month and is called MONIT. A telling name, isn't it? It draws information on a variety of indicators - quantity, CPU or RAM load, shows network connection data along with upload and download speeds, and much more.

When you click on the desired option, you will see more detailed information about it.

The program is really convenient and useful - we wanted to find out how busy the processor was, opened the notification center - and everything was visible! But its main advantage is the price. MONIT is distributed absolutely free of charge, you can download it from the link below.
Name: MONIT
Publisher/Developer: Tildeslash Norge Ltd
Price: For free
In-app purchases: No
Compatibility: OS X 10.11 and higher
Link:
Many Mac users like to keep a watchful eye on their system stats, including processor utilization, memory usage, disk activity, network usage, CPU temperature, fan speed, and perhaps battery stats. offers one way to do this, but it’s on a limited basis, so if you’d rather see all kinds of system resource activity in a single control panel you may appreciate these two Notification Center widgets for Mac OS X.
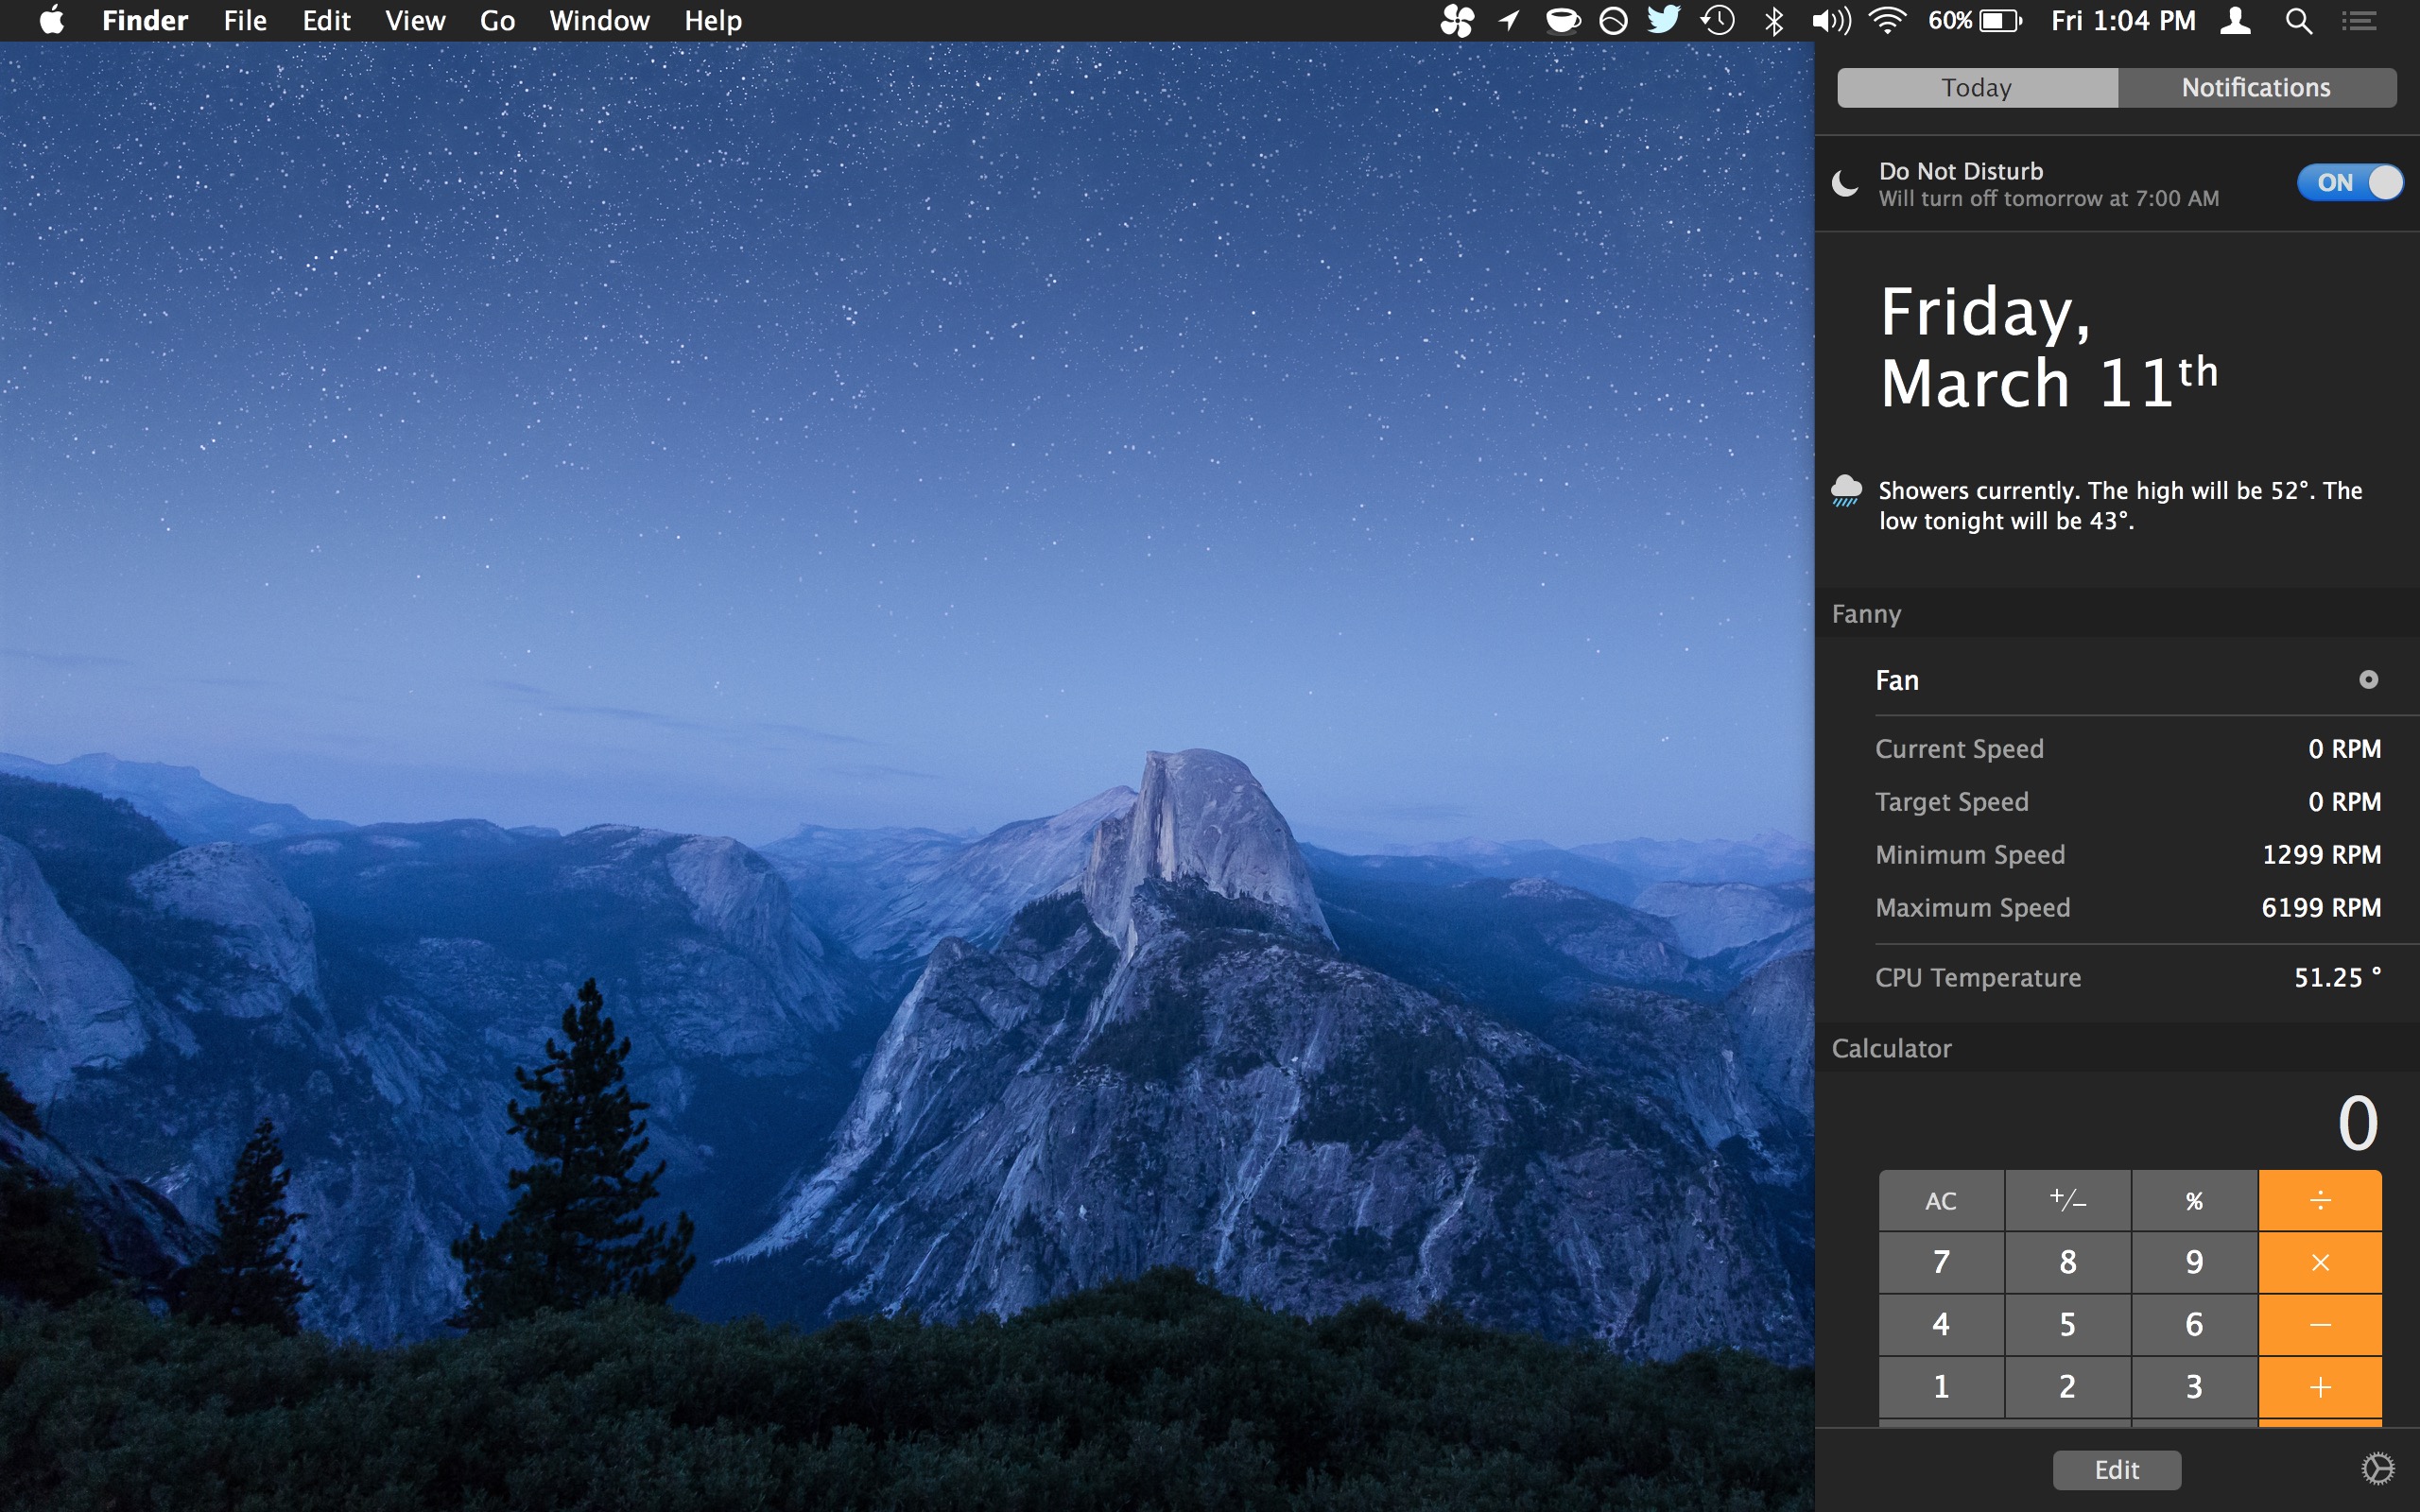
The first is called Monit, and once added to Notification Center it offers a means of quickly seeing an overview of CPU activity, memory usage, disk activity, battery, and network activity. You can then click on any of the little activity icons to get further information about each.
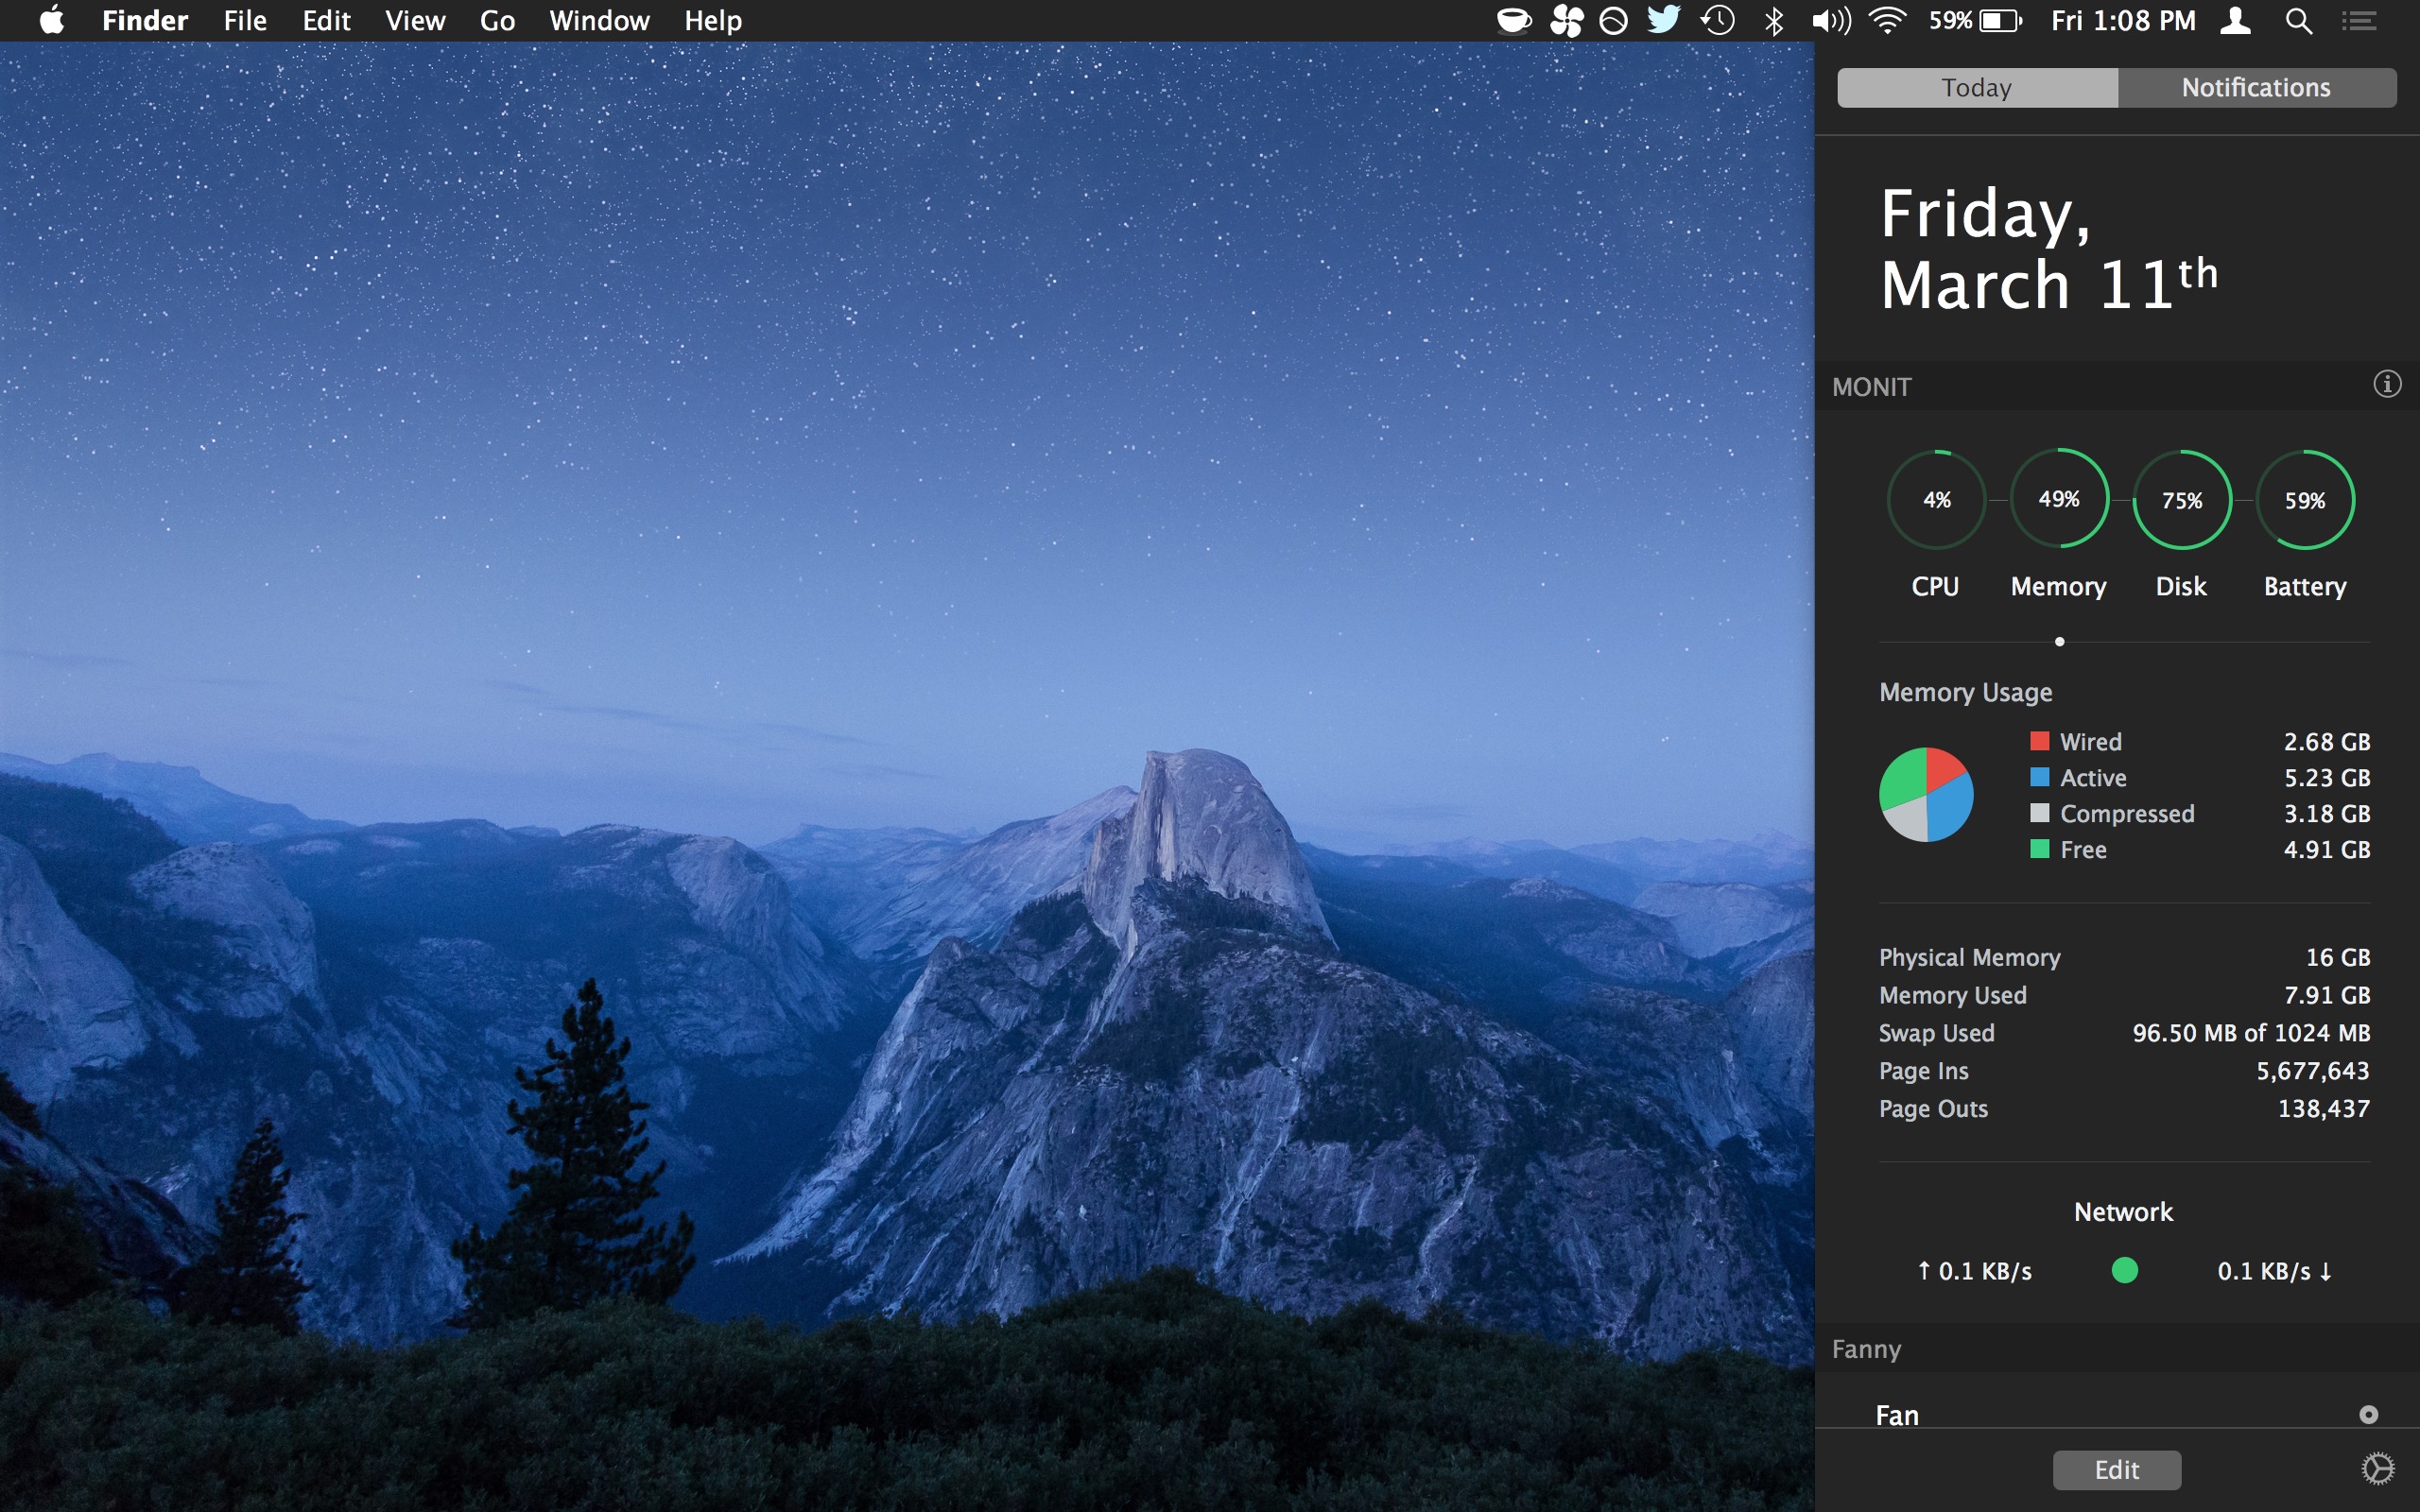
The second utility is called Fanny, and it keeps an eye on fan speed and CPU temperature of the Mac, also within Notification Center. This tool is likely most useful for Mac laptop users but many desktop users like to know what their fan is doing and what temperature the CPU is running.
- (free)
Both of these utilities are installed as usual within Notification Center on the Mac, and after you have opened the individual app you can add the widget to Notification Center by opening the control panel, clicking on “Edit”, then adding the widgets and orientating them within the Notification Center panel as you see fit. You can also uninstall them at any time through the same Edit section of Notification Center.

Do keep in mind that system activity monitoring uses a small amount of CPU itself, so if you’re really pinching for processor or resources you may not want to have these type of widgets going at all. And if you're not the type to want to install third party tools or utilities, and can offer similar functionality without any add-ons in Mac OS X, which is great if you and the whole accompanying widget thing to be a nuisance or useless .
-
I think the OP Ted is referring to the steps one needs to take to install the app, not the feature you mentioned that becomes available only after Fanny is installed.
To install Fanny in Mojave, place the app in your /Applications folder, open the Notifications page on your desktop, scroll down to the very bottom of the page, click on the Edit button you should there, locate the Fanny app in the list of widgets at the top of the same page, then press the green + button to activate Fanny. A small fan icon for Fanny will then show up on the toolbar at the top of your desktop screen, providing a simple dropdown menu.
I’ve just installed Fanny v1.03 on my new Mac mini. The temperature shows up, but the huge fan speeds it lists are totally nonsensical for that machine.
I also tried “Macs Fan Control” and it has the same problem, otherwise it is good.
Best app of this type was Lobotomo Fan Control but it no longer works due to OS X changes. It had automatic fan speed control based on temperature.
So I am using smcFanControl for now, low Idle Wake Ups. But no automatic fan speed control.
I feel that the standard Mac cooling sometimes lets my 2011 Mac Mini get too hot (99C) by waiting too long before increasing fan speed, which is why I am interested in these utilities.
Thanks for this. I never knew about Monit, until now. I’ve been looking for a suitable replacement for, the long-outdated and unsupported, iStat Pro widget. I liked the Dashboard widget and having all of the system stats available at the push of a button. The developer's successor, iStat Menus, never interested me. It just seemed clunkier and I really didn’t want dozens of bars and graphs clogging up my menubar. Swiping open the Notification Center (the Notification Center is, pretty much, the new Dashboard) to view this info is preferable to me. And “free” doesn’t hurt, either. I’m giving this a try to see how I like it.
That's a poorly named app. In most of the English speaking world, N. Americans excepted, “fanny” means “vagina”. Yes we do get quite a laugh about visiting Americans when they talk about their funny packs. I can’t see this being installed on my laptop.
In the USA “fanny” is slang for butt, so yes I agree it’s a poorly named app… even if the Australian or American versions of the word can indeed be windy… OH dear
That’s not my understanding, and I’ll elaborate. For reference, I’m running MacOS Sierra 10.12.6, and I’ve had Fanny for years.
I’ve never received a notification from fanny, but after installation, a teeny little fan icon appeared in the little bar at the top of my screen (to the left of the wifi, battery, and date and time graphics).
If I click that icon, a little drop-down appears giving me the speeds of both my fans and the CPU temp. That dropdown doesn’t auto-refresh, so it’s not perfect, but if you click that icon repeatedly, the dropdown will refresh once per second.
Hope that helps!
I’ve been using iStat Menus for a few years now. It's similar to this. If you don’t know what all of these system stats mean, you’ll drive yourself nuts watching them. The CPU, memory, and other stats frequently go through highs and lows all day, and this is normal. If you don’t understand that, you’ll think something is wrong.
We have prepared a selection of tips that will help you move from the kindergarten of amateur poppy growers to the circle of professional poppy growers. You definitely didn’t know 4 of the 5 techniques described in the collection, but we have already fixed that.
The material will help you quickly use the Emoji panel, set a specific application to open a specific file, find out the temperature of the components inside your Mac, quickly resize images without additional software through Automator, and also add shortcuts to web pages directly in the Dock.
How to Quickly Use the Emoji Smiley Bar

While working on this material, we talked to more than ten experienced poppy growers.
It turned out that most of them do not even know how to properly use Emoji on a Mac, others use a whole labyrinth of system menus to do this, and only one was aware of quick access to them.
First way for beginners, it involves adding access to a menu with symbols and Emoji in the language icon in the macOS system bar.
To do this, first go to "System Preferences", go to the "Keyboard" section and check the box next to "Show Keyboard and Symbols panels in the menu bar."
Now, when you click on the language icon in the system bar, the option “Show Emoji and Symbols panel” will be displayed.
I wouldn’t call this way of using all these signs and emoticons in correspondence really convenient. Moreover, I have another option...
The right way involves quickly adding Emoji and symbols to the text through a special menu, which you see in the screenshot under the title of this item.
To use it you need a key combination ⌃Control + ⌘Command + ␣Space.
I emphasize, in addition to emoticons, this menu contains alphabetic symbols, pictograms, technical symbols and other signs. It is from this menu that I pulled the symbols to represent the keyboard shortcuts in the previous paragraph. Comfortable!
How to always open a file in a specific program

This trick is intended for those who have been using Mac for a short time and still miss Windows computers.
For some reason, few people talk about this, but initially macOS uses a different logic for working with files. If on a PC you initially work with documents that you open in a specific program from Explorer, here, on the contrary, you first launch the application and then select the data to work with. But it's not that important.
To open a specific file not in the default program, but in another application, open an additional menu to work with it, hold down ⌥Option, open “Always open in program” and select the one you need. Unexpected welcome!
That's it, now some other software will be used for a specific file. Moreover, for all other documents of the same type, the default application will still be relevant.
Why is this necessary? For example, you constantly use a template image in Adobe Photoshop, now you can open it in this program instead of “View” with a simple double click.
How to find out the temperature of components inside a Mac

I've never seen an iMac overheat. I think this is due to the fact that few people carry them with them everywhere. MacBook is another matter. From time to time I work on the beach, and on the benches in the park I can collect such collections of advice. The result is a full body of dust, regardless of the regularity of cleaning and overheating.
But it is generally very difficult to determine if a MacBook is overheating by eye. The fact is that the metal body of the laptop acts as one of the tools for heat dissipation for internal components, so it heats up quite well. This is especially noticeable if you work with it on your knees.
Therefore, in this case, what is important to us is not the temperature of the case itself, but the amount of ℃ on the processor, graphics chip and other components. And in the summer all this becomes especially relevant.
All of them are equipped with special sensors that control the activation and acceleration of cooling fans. But you won’t be able to view the temperature without additional software. You need an application like Macs Fan Control, which can be downloaded absolutely free.
In general, this particular program is intended for manual control of coolers, but for our purposes it will also be suitable. The menu on the right here contains all the necessary temperature data; they need to be compared with the recommended ones.
- Critical processor temperature 95℃ (preferably no more than 75℃)
- Searching for graphics temperature 95℃ (try up to 75℃)
- It is better not to overheat all memory above 50℃
If everything inside is too hot, you need to provide access to air for the ventilation holes: remove the MacBook from the bed or sofa, and place it on a hard surface. If the ambient temperature is above 35℃, it is better to at least hide from direct sunlight. If all else fails, you need to go to a service center for cleaning.
How to quickly resize images using Automator

If you regularly work with a lot of images for any purpose, creating a “recipe” for the most common Automator from the standard macOS package will be especially relevant for you.
For example, I constantly change the size of pictures for website materials. Previously, I used clumsy Adobe Photoshop for this simple task. It has an "Image Processor" that hides in the File > Scripts menu. But with Automator this task is simplified.
Step 1. Open Automator and select New Document.
Step 2. From the document type menu, select Service.
Step 3. Select the "Files and Folders" section from the menu on the left.
Step 4. Drag "Get Specified Finder Items" from the list to the menu on the right.
Step 5. Select "Image Files" from the "Service Receives Selected" drop-down menu.
Step 6. Select the "Photo" section from the menu on the left.
Step 7 Drag the “Change image scale” item from the list to the menu on the right and select “Don’t add” in the dialog box that appears.
Step 8 Select the size in pixels or % that your “recipe” will use to process the images.
Step 9 Save the command via File > Save or ⌘Command + S, enter a name for it like “Resize to 1024px.”
That’s it, now in the additional menu for working with images in the Finder there will be a command “Resize to 1024px”, which will instantly change their size to 1024 pixels (this is in my case) in width.
In general, Automator is a very powerful macOS tool that offers so many possibilities that it’s scary to imagine. We Necessarily We will return to its use later.
How to Add Web Page Shortcuts Directly to the Dock

If you constantly visit the site in search of new interesting information, check your social media feeds or visit other sites, I have a great way for you to do it faster and more conveniently.
To do this, just add a shortcut to a web page directly in the Dock.
Step 1. Open Safari and go to the site (for example, website) that you want to add a shortcut to in the Dock.
Step 2. Select the address input field and drag its icon anywhere in the Finder.
Step 3. Select the picture that will be used for the shortcut (the iPhones.ru logo).