Hello everyone to the site. We continue to improve our blogs to make money. I think it's not a secret for anyone that they play a huge role on the site. Of course, not everyone understands how and after what time they begin to influence, but the fact remains. To improve these factors, we need to improve the usability of the site: add, improve the design, make it attractive and simple. Make the correct processing of images on the site. Many would like to know the answer on how to make a picture on the site when clicking on which it enlarged. This increase is implemented on my website. Agree pleasantly enough that you can enlarge the pictures, see all the beauty in full screen.
Today I will try to reveal this secret of magnification to you. In general, a picture can be enlarged by several actions:
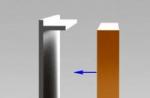
- For example, you can enlarge it by hovering the mouse button
- The second option would be to zoom in when pressed.
Of course, if you use WordPress, then the simplest and easiest option would be to search for a template with the function we need, believe me there are a huge number of such templates on the Internet now. So in 95 percent of cases, you will find exactly a template with an enlarged picture. But what if you like this particular theme and would like to enlarge the picture only on it. Or do you even write your first site on a piece of html, which I doubt very much of course.
We connect Java scripts to enlarge the picture
The final result will be an enlarged picture, by type. Okay, all this is philosophy, in order to enlarge the image, we need to connect the jQuery library. I don’t remember, but it seems that in some lesson I wrote about this library, but if you forgot, I’ll remind you. To connect the library you need to
site insert two codes.It should be understood that there are a lot of jQuery libraries and in different cases different libraries are connected.

If you write your site in bare html, then to insert a picture you will need this code

Please note that in this case you will need to put your image in the images folder and specify your image name. Do not forget that the files of the Java scripts library should be located in the same place as home page site, otherwise just write another path to them. You can download the file library to enlarge the picture on the site. Well, and most importantly now, if you want to enlarge your picture, then add the following properties to it.
Hello dear novice optimizers.
In WordPress, by default, when clicking on an image, the user is taken to the image page. Agree - it is very inconvenient when you are suddenly thrown to another page.
In order for the image to enlarge directly on the page on which it is located, you need to install a special script on the site.
You can see how it works in the picture above or in the pictures in the sidebar.
Finding it on the Internet is not a problem, but unfortunately all offers have one flaw. The script code, when checked in the validator, gives an error.
I had to strain a little and fix this situation, so further we will talk about a script that works perfectly on all templates, and a valid script.
The way to install it is available even for those who do not know anything about scripts, and generally about programming languages.
At the same time, with an excellent result, it allows you to do without a plugin, and involves the obligatory filling of the alt tag with the appropriate text, and this will have a very good effect on site optimization.
It's no secret that plugins slow down the loading speed, as many of them place their scripts in the head block.
And filling in the alt tag is often just not enough time. Right there, whether you like it or not, you will have to enter the appropriate text, since it will be displayed as a signature under the enlarged picture.
You can just set the page numbering if there are a lot of images.
Another feature is that the script does not enlarge everything in a row, but only those images that you point to.
Comfortable? Comfortable. After all, if the picture in its original size fits perfectly on the page, then why enlarge it.
Let's move on to the installation.
You can get a zip with a script for free by simply downloading it from my Yandex Disk. Download
After that, you need to upload it to the root of the site. The core folder is the folder that contains wp-admin, wp-content, and so on.
Download the zip via FTP, unpack it, after which three files and one folder appear in the directory.

The zip folder must be deleted. Also, now you need to remove, if any, the plugin that enlarges images.
The next step needs to be done in the footer.php file. you can, without leaving the server, go through wp-content - themes - your theme - footer.php.
Or you can go to the site console, then Appearance- Editor - footer.php, or Footer. And so and so it is possible.
In this file, at the very end, before the tag, you need to insert the following code:
In three lines, where the address of my site is, you need to replace it with your own, and you can update the file.
With the installation of the script - finished, now how to specify those images that need to be enlarged.
We load the images as usual, through the loader, then in the Text editor mode, we find the link to the uploaded image.

And before the href attribute, we write the following class:
class = "simplebox"
Well, now that's it, the image will be enlarged on click and displayed in the center. We solved two issues at once.
In this article, we will show you how to make a modal with an enlarged image.
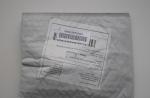
Sometimes it becomes necessary to enlarge the image when you click on it in the pop-up window. As a result, we get an enlarged picture with a darkened background.
It is very easy to do this using the jQuery library. We need three files - index.html, a stylesheet in the css folder called template.css, and a popup_img.js script file. And three more images in the images folder
First, let's write the HTML markup of the page, do not forget to include the stylesheet and the jQuery library:


We also add our images to the page. For each image, we add the image class, with which we will refer to images in the script in the future.
The next step is to write a script that will add a darkened background and an enlarged image.
$ (document) .ready (function () (// Wait for the page to load $ (". image"). click (function () (// Event of clicking on the small image var img = $ (this); // Get the image, which was clicked var src = img.attr ("src"); // Get the path to the picture from this image $ ("body"). append ("
Here everything is described by comments. The next step is to add styles, for which I will not describe comments, it is assumed that you know CSS well.
body (margin: 0;) .image (margin: 30px; float: left; cursor: pointer; max-height: 100px;) .popup (position: absolute; height: 100%; width: 100%; top: 0; left: 0; display: none; text-align: center;) .popup_bg (background: rgba (0,0,0,0.4); position: absolute; z-index: 1; height: 100%; width: 100% ;) .popup_img (position: relative; margin: 0 auto; z-index: 2; max-height: 94%; max-width: 94%; margin: 1% 0 0 0;)
Look at the result of the work on the demo page.
From the garbage and realized - IT'S TIME! It's time to insert pictures on the blog into articles so that when you click on them, they will be enlarged and shown in their original size.
Moreover, so that the enlargement effect is convenient for the user (you), so that I, as an author, do not poke around in codes (settings) for a long time when inserting images into articles and so that the load on the blog is minimal. I don't want to use all sorts of plugins and load the same Mysql database.
I turned to the pros for help and they told me what to do and I set everything up in just 3 minutes. Again, without using any plugins like Auto Highslide, etc. Let's not pull the cat for long ... and get down to business.
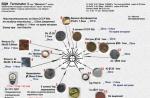
I tried many different variants of scripts to enlarge pictures, but I focused on the script that creates this effect. See an example, click on the picture on the left:
An interesting effect. We click on the image and it does not open in a new window (which is very inconvenient), but opens on the same page in an enlarged form, in a beautiful frame with a cross and below the description of the picture is substituted.
If you like this effect of enlarging images, then you can use it! I will write about him below.
Here again, this effect is simply necessary. There are images in which you need to look very closely in order to see something there. Those who have poor eyesight will not see anything at all. An image enlargement script will come in handy!
So, let's begin. Everything is done in THREE easy steps:
1. Download the script and upload it to your hosting (server)
2. Add a small code to the footer.php file
3. Add images to blog articles.
GOW! Download the script itself... We drop all the content into the root of our blog. The blog root is the main blog directory where folders such as wp-admin, wp-content, etc. are located. Gut! They did it!
The second step is to add special code to the footer.php file of your blog theme. Here it is:
Attention! In the code, replace site.ru with your domain. You need to add code to footer.php before the closing tag