Checking Windows 10 RAM for errors is necessary if any system errors occur. Blue screens of death (BSOD), spontaneous reboots, system freezes and other problems can occur due to RAM problems.
How to check Windows 10 RAM for errors?
Random access memory (RAM) is a system component responsible for the constant processing of system information. Unlike a hard drive, RAM is much faster, but is not intended for long-term storage of information, but rather for processing processor commands.
We won't go into details about the differences and RAM specifications. We need to check the operation of the RAM of a Windows 10 computer. For testing, we will use the following methods:
- Through the “Windows Memory Checker”;
- Using Memtest86;
- Replacing planks.
Check using Windows Memory Tester
Windows 10 has a built-in RAM testing tool that can be used if there are no alternatives. To run it, enter the mdsched command in the search “Diagnostics computer RAM problems” or in the Run window (Win+R).
Testing is carried out only when the computer is rebooted, when there is no significant load on the RAM from Windows and third-party applications. The diagnostic tool makes multiple passes to identify errors. The interface of this tool is primitive and resembles MS-DOS or some versions of BIOS.

Testing can be configured according to several parameters: Test suite (Basic, Normal and Wide), Cache and Number of passes (0-15). The richer the set of tests, the more passes the more accurate the results, but the longer the check will take. Also, the duration of the test depends on the number of strips and their volume.

Once completed, the computer will reboot into Windows (if the system booted previously). The diagnostic results can be found in the event log.
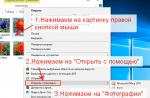
Right-click the Start button (or Win+X) and select Event Viewer. Or in the Run window (Win + R) enter eventvwr.msc.
Next, open Windows Logs and select System.

The results will be available from the MemoryDiagnostics-Results source. There will be written either a negative error search result or they will be found.

Memtest86: the best utility to check Windows 10 RAM

One of the best programs for testing RAM in Windows 10 is Memtest 86. By burning this utility to a CD or USB drive (less than 10 MB), you can start testing your RAM.
To create a bootable USB flash drive with MemTest, follow these steps:
- Download MemTest86 for USB;
- Unzip the memtest86-usb.zip file and open the imageUSB.exe file;
- Then select the desired flash drive (1), select “Write image to USB drive” (2), specify the path to the img image of the utility (3) and click “Write” (4) to start recording.

RAM testing is performed only outside the system so that Windows and its possible errors do not interfere with the test. This is why the Memtest boot image is created.
To start checking, you need to boot from the created flash drive or disk.
Our article describes. Using this article, you can learn how to run a Windows 10 RAM test using Memtest.
The utility itself has two bootloaders: for Legacy and for UEFI mode.
Legacy mode: when loading, it offers several modes and has meager settings, along with the old design.
UEFI mode: richer settings, system information, benchmark, CPU tuning and more
But the most important thing is not the settings, but the functionality. Standard testing settings for UEFI mode are 4 times running all 13 tests. In some cases, it is recommended to perform up to 8 runs to obtain more accurate data. Depending on the volume, number of strips and runs, diagnostics can take up to several hours.
What MemTest looks like without errors:

The inscription “Pass complete, no errors, press Esc to exit” will symbolize the end of all runs and the absence of errors
What MemTest looks like with errors:

During the test, red lines with error addresses may appear. The more there are, the worse. If you encounter them during testing, proceed to the next stage - separate testing of the RAM strips.
Replacing RAM sticks
If we have identified an error on the RAM side, it will be necessary to replace the faulty strip. To do this, you will need to determine which board is faulty. If there is only one bar, then everything is clear, but what to do if there are 2 or more.
For laptop

Depending on the model and manufacturer of the laptop, the location of the modules may vary. In some models, for a more convenient upgrade or repair, a separate “compartment” is provided for quickly replacing the hard drive and RAM. There are cases in which, in order to get to the RAM, you need to disassemble almost the entire laptop.
To remove the strips, gently, effortlessly press the side clips and pull the module up. Make sure there is nothing obstructing the movement and take it out.
You will need to test each module, turning on the computer one by one with only one memory stick. At this point, you can simply test the computer for errors, or you can run the computer by checking the RAM (through the built-in tool or MemTest).
For desktop computer
The motherboard can have up to 8 RAM slots (even more on server boards). Typically 1 to 4 strips are used. It is worth paying attention that the number of strips must be a multiple of the “channel” of your memory. Conventional (for home PC) motherboards use dual-channel modes, so it is better to have 2-4-6 or more RAM modules.
The principle of replacing RAM on desktop PCs is practically the same as on a laptop, only easier to access. Remove the side clips, then gently pull the module up until it is completely removed.
Checking each module for errors is mandatory.
Have a great day!