Windows 10 has an app for viewing and editing photos. It is constantly being improved and new features are added. could have been made from photographs earlier. But it was somehow unfinished. Now it is possible to add video, audio files and 3D objects. You can choose themes, apply filters and insert captions. I tried out these new features of the application. I'll tell you how to create slideshow in Windows 10 and I’ll show you what the result will be.
Photos app Windows 10
The application is located in the same place as all other programs on our computer. Click on the START button and look for “Photos” in the list of programs. Click on it and open this application.

There is another way to access this application. First, select the folder with the images. Click on the picture you want to open using the Photos app.
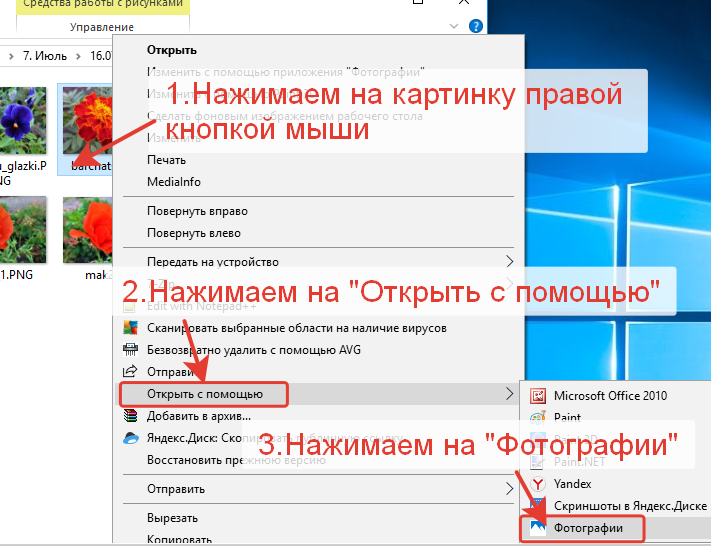
The picture will open in the Photos program for viewing and editing photos. On the top panel of this program there are icons for working with photos. Click on the “Edit and Create” icon.

There is a set of tools for image editing. We can crop photos, change color, brightness and contrast, and apply filters. We can draw something and add 3D effects. And right in this photo editor we can go straight to creating a slideshow. Click on the “Create video with music” button.
How to Create a Slideshow on Windows 10
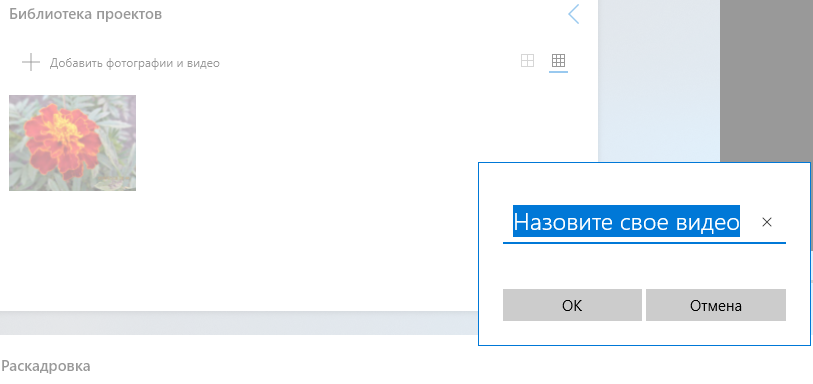
A video creation program window will open. First of all, we are asked to give some name to our video. On the left is a window for adding images and videos. On the right is a window for viewing the video project. At the bottom there is a scale with a storyboard. So far I only have one picture in my project library. I’ll add a few more pictures and write the title of the video “Summer 2018”.
In the window on the left, I click on the plus sign, then on “From this computer” and add more pictures.

In the window that appears, select the desired folder with pictures. I open the folder, select the pictures and click on the “Open” button.

All the photos that I selected opened in the program. Now I can move them to the storyboard timeline. You can move everything at once or select one picture at a time.

If there are a lot of pictures and you move them one at a time, you can get confused and forget which one you moved and which one you didn’t. You won't get confused in this program, because... Moved pictures are marked with a dog-eared corner. Which, of course, is very convenient for working when creating slide shows.

On a timeline with a storyboard of pictures, you can drag pictures from place to place. Change their position as you wish. Just click on the picture, grab it and drag it to another place.
By default, the image display time is set to 3 seconds. We can set our own display time for each picture. Click on the time icon in the picture and select a different value. Three seconds is the optimal display time. Therefore, the program developers initially set this time. Watch the video in the project viewer. Maybe for some pictures you need to reduce the display time. And for some, on the contrary, increase it.

In addition, there are other tools in the storyboard timeline. We can change the size, add filters, write text on the selected picture. To spice up our slideshow we add motion and 3D effects.

If we see black bars around the edges in the video project viewing window, then it is better to resize the pictures. A fully filled window in the finished project will look much better. Click on “Resize”.

We are offered two options to choose from. We can shrink to size or remove black bars. Select the “Remove black bars” option. The picture immediately fills the entire window. Let's edit all the pictures and change their size.

How to Add Text to a Windows 10 Slideshow
If we want to add text, then first click on the selected image. Then click on “Text”. The selected image will open in a new window. On the right in the window we write the text, select the writing style and location. The text can be positioned at the top, bottom, right, left, or center.

The text can be animated. Click on “Movement”. Movement options will appear in the window on the right. Click on them one by one to view. Select the option you like and save. Click on the “Finish” button.

For each picture we can add frame movement. In the same way as with the text, first click on the picture, and then select “Movement”. The same set of movements will open as for text. We look through the proposed options and select the ones we like.

How to Add 3D Effects to Windows 10 Slideshows
Click on the selected picture, then on the 3D effects tab.

The picture will open in a new window. On the right, we select from the set of effects what we like best. And what will be appropriate for our picture. Choose effects and decorate your Windows 10 slideshow.

After adding a 3D effect to a picture, you can change it a little. For example, move to another place, turn at a different angle. Or enlarge it, stretch it beyond the edges. Don't forget to save your changes. Click on the “Done” button.

How to Add Music to Windows 10 Slideshows
At the very beginning of creating the project, we could choose one of the available design themes. On the top toolbar, select the “Themes” tab. Click on it. A window will open with a list of topics. If you click on one of these themes, music will be added along with the theme.

But, if we want to add our own music, then click on the “Music” tab. Next, select the “Change Music” function.
In the window that opens, we can select something from ready-made musical compositions. Or click on the “Your Music” tab and add an audio file from your collection. I left the music that the program offered me.

If we leave the music that the program offers, it will automatically be synchronized with the display of pictures. The display time of some pictures may be reduced. But this does not mean that nothing can be changed. We can set our own time again.
Review the finished project again Windows 10 slideshow. Maybe something needs to be corrected or added. You don't have to click on the tabs on the storyboard timeline. You can simply click on the selected picture and proceed to change the parameters.

How to Save Windows 10 Slideshows
To save the finished Windows 10 slideshow Click on the “Export or Transfer” tab.

A window will open with suggested saving options. Choose the one you need. I chose the first option.