The interface language in Windows 10 is selected when installing the operating system. But after the installation procedure is completed, it can be changed. To do this you will need a language pack.
Why do you need a language pack?
A language pack (hereinafter referred to as “LP” for short) is a set of words and sentences that provides translation of the system into a specific language. For example, by installing a Russian language, you will translate all system messages, applications and settings into Russian. Accordingly, by choosing a language of another language, you will be able to use Windows in the language most convenient for you.
Installation of the language
Windows 10 has several built-in methods that allow you to work with the language. Thanks to them, you can select a language from already downloaded packages, as well as install new languages.
If you need to change the language on one computer, then the easiest way is to use autoload, that is, let the system itself download and install the necessary package. If you need to change the language on several PCs, then it is more convenient to download the language file once, and then transfer it using a flash drive to each of the computers, thereby saving Internet traffic. PL files have the extension .cab. You can download them from third-party resources, since Microsoft does not distribute the language in the form of separate files on its official website.
Installing a language using Windows settings settings
Windows 10 has a built-in Settings utility that allows you to manage system settings. If the OS on your computer has already been updated to version 1803 April Update, then using this utility you can download additional language. If you have an older version of Windows installed, then use any of the methods described below - the result will be the same. To load a language using the “Options” utility, do the following:
Installing a language from the Windows Control Panel
Users who have not yet updated their Windows to version 1803 or later can change the language through the control panel. To do this, do the following:
- Once in the control panel, go to the “Language” section. The control panel can be found using the system search bar.
 Open the Language section in the Windows Control Panel
 - Click on the “Add language” button to select the desired language. A list of languages available for adding will appear. Select the one you want to add.
 Click the "Add Language" button and select the desired language pack
 - Go to the properties of the selected language.
 Click the Properties button for the language you want to add
 - In the language properties window that opens, click the “Download and install language pack” button, after which the download of the language will begin.
 By clicking on the “Download and install language pack” button, start downloading the language of the selected language
 - After completing the language installation process, go to the language properties again and assign it as the main system language.
 Set the selected language as your default Windows interface language
Ready. The new language has been downloaded and applied. You may be asked to log out to apply the changed settings. Agree, then log in to your account again and check the result.
Adding a language from a cab file
If you have a separately downloaded language in cab format, then follow these steps to install it:
- Press the Win + R key combination to open the Run window. Enter the lpksetupe command in it and start its execution by clicking OK.
 Type and run the lpksetup command
 - The YAP installation window will appear. Indicate that you want to download a new language and not delete the existing one. To do this, click on the line “Set interface language”.
 Specify that you need to install a new language pack
 - Open the cab file by clicking the Browse button and finding it on the disk. The line next to the button will display the path to the file. If the file contains several languages at once, select the ones you want to install. Start the installation procedure by clicking Next and wait for it to finish. Then go to the “Settings” window or to the Windows control panel, select the new language as the main one (how to do this is described in the two previous paragraphs).
 Specify the path to the file and select the desired languages
Changing the interface language
Installing a new language does not guarantee that the system language will change. Typically, this requires entering the appropriate command, which will change the interface language. Follow these steps:

Video: working with language packs in Windows 10
Welcome language changes
If you want to see the same language as the interface language when you log in, follow these additional steps:

Installing the language on the Single Language version
There is a special edition of Windows - Single Language. It includes only one language and does not allow you to download additional languages through the control panel or the Settings utility. This was done to prevent an inexperienced user from accidentally translating the system into a language he does not understand.
If you are faced with the fact that the Single Language version is installed on your computer, and you need a new language, then use the method described in the paragraph “Adding a language from a cab file”. You can install the package and start using it by first downloading the cab file from a third-party resource.
Program language changes
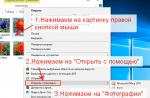
Third-party programs work in the language you chose during installation, but built-in Windows applications and utilities downloaded from the official Microsoft store rely on system settings to determine the interface language. The language they use is selected based on location data.

In earlier versions of Windows 10, language packs are installed through Control Panel, and in recent versions, through System Settings. The universal way is to install the language using a cab file. After the package is installed, go to the regional settings and change the language of the interface, welcome and standard programs.