The Windows 10 recovery disk is a tool that is used if the operating system does not boot or is working with errors, in order to restore its functionality or return it to its previous state using a previously created backup copy.
Starting with Windows 7, when installing the operating system on a computer, in addition to the main partitions, hidden partitions are also created. These partitions cannot be seen in Explorer, they are visible only in Disk Manager - these are:
- System Reserved.
- Untitled (Recovery partition).
The System Reserved section stores the boot store configuration files (BCD) and the system bootloader (bootmgr). In this way, the system protects the boot files of the operating system and uses this partition to enter the system recovery environment.
If, as a result of damage to system files, the operating system becomes inoperable and does not boot, you can restore them using the recovery environment. You can launch it by pressing the F8 key while starting the computer.
After starting the Recovery Environment, select System Restore or Troubleshoot your computer. The names of menu items may vary depending on the version of the operating system and the method of launching the Recovery Environment.
A recovery partition can be created on the hard drive when installing the operating system (as a rule, the latest versions of Windows do this). This partition contains the data necessary to restore the system.
How to restore Windows 10 using a recovery disc?
How to create a Windows 10 recovery disk
Looking for how to create a Windows 10 recovery disk? Follow these steps:
- Insert the disc into the drive.
- Select it as the location to create the system repair disk and create it following the system instructions.

To burn a recovery disc you will need a CD or DVD.
How to create a USB recovery drive for Windows 10
Looking for how to create a recovery flash drive for Windows 10? Follow these steps:
- Go to Control Panel/Recovery.
- Select Create a recovery drive.
- Insert the USB flash drive into the drive.
- Select it as the location to create the system repair disk and create it following the system instructions.

To create a recovery disk, you will need a free USB flash drive.
Where to download the recovery disk image
If for some reason you did not create a system recovery disk, and Windows has lost its functionality, then it can be restored using an operating system recovery disk image.
Such an image can be created immediately after installing the OS and software or at any other time.
You can download a free utility from Microsoft and create an image. To do this, do the following:

Note. Do not run the system repair disc from a working Windows. To use it correctly, install the system image media in the BIOS as the first boot device and reboot the computer.
Important: It is necessary to create an image only on a working system that is not infected with viruses and does not contain errors. After recovery, you will receive an exact copy of the system at the time it was created.
Restore Windows 10 using an installation disc
Looking for a way to restore Windows 10 using an installation disc? Do the following:
- Set the BIOS or UEFI to boot the operating system from a CD, DVD or USB disk (depending on the media of the installation disk).
- Insert the Windows installation disk into the drive (or connect to a USB port).
- Restart your computer and confirm booting from the CD.
- In the proposed menu, select Diagnostics / Computer recovery. Follow the wizard's further instructions. The recovery program will carry out further work automatically.
- Wait for the recovery process to complete and restart your computer.

System recovery disk from the laptop manufacturer
To restore Windows, the same methods apply as for a desktop computer. An additional option for restoring the system on a laptop, unlike a desktop computer, is the ability to return the laptop to its factory state using a hidden Recovery Partition, which is preinstalled by the manufacturer.
When restoring the laptop to factory settings:
- All user data on the system partition of the laptop will be deleted.
- The system partition of the laptop will be formatted.
- All programs and applications preinstalled by the manufacturer will be installed.

To restore your laptop to factory settings:
- Run the factory reset (system reset) program for your laptop. Note. This happens differently for different manufacturers. In some manufacturers, this utility is launched by pressing one or a combination of keys when turning on the laptop, while others carry out the recovery process using their own software (usually preinstalled).
- Select the system restore (or factory settings) function from the proposed menu and follow all system instructions.
- Wait for the system recovery process to complete.
- Restart your computer.
As a result, you will receive the laptop operating system in the form in which you purchased it in the store.
Recover hard drive data
If, as a result of reinstalling or restoring the system, resetting Windows 10 to factory settings, the hard drive was formatted and you lost data, the most effective way is to use the Hetman Partition Recovery program.
For this:
- Download, install and run it. Check out the program's capabilities and step-by-step instructions.
- By default, the user will be prompted to use the File Recovery Wizard. Click “Next” and the program will prompt you to select the drive from which you want to return the files.
- Double-click on the disk and select the type of analysis. Specify “Full analysis” and wait for the disk scanning process to complete.
- After the scanning process is completed, you will be provided with recovery files. Select the ones you need and click the “Restore” button.
- Select one of the suggested ways to save files. Do not save recovered files to the disk from which they were deleted - they can be overwritten.

Recover hard drive partitions
Restoring a deleted, damaged or lost hard drive partition cannot be done using standard Windows capabilities. Using Windows, you can only determine the loss of a partition and create a new partition on top of the lost old one. In this case, Disk Management will detect an unallocated or unallocated area on the disk.

Recover a non-system hard drive partition
Do the following:

Recover the system hard drive partition
If the system partition is lost, it is impossible to boot the computer.
- Disconnect and remove the hard drive with the lost system partition from the computer.
- Connect this HDD to another computer.
- Make sure your hard drive is recognized correctly by the other computer.
- Carry out the steps indicated in the previous paragraph.
Recover your hard drive system partition using LiveCD
If it is not possible to connect a hard drive with a lost or damaged system partition to another computer, you can restore such a partition by starting the computer using LiveCD, an alternative portable version of the operating system.
For this:
- Find and download the LiveCD that suits you to a CD/DVD or USB drive.
- Connect the LiveCD to your computer and turn it on. The computer will automatically boot from the LiveCD.
- Copy files from the system partition to another storage medium (often an external hard drive).
Is your Windows 10 system disk restored? Leave feedback and ask your questions in the comments.
HetmanRecovery.com
How to create a disk (flash drive) in Windows 10 and 8 to restore the system from a ready-made image!
If something happens to the Windows operating system and it does not start, and the problem cannot be fixed in any way, then there is a good way out of the situation - to restore the system from a backup copy (if, of course, you previously created it). However, to restore Windows if it does not boot at all, you will need a special recovery disk, which allows you to load a special shell (program) before starting Windows, where you can start the system recovery process. In this article I will show you how to create recovery disks for the Windows 8 and Windows 10 operating systems using standard tools, i.e. directly from Windows itself.
In both systems, the disk image can be written directly to a flash drive rather than to a disk, which is very convenient. Moreover, discs are becoming less and less popular every year and will gradually cease to be used altogether. After all, now most medium-sized laptops are produced without a disk drive.
After recording the program onto a flash drive, you will need to configure your computer to run from the flash drive, and not from the hard drive. How to configure the computer to boot from the desired device is described in the article: here >>
Creating a recovery disc (CD/DVD and USB) for Windows 10
Windows 10 allows you to create a recovery disk directly using the tools built into it, i.e., without the need to download and install anything additional. Therefore, this is the easiest way to create a recovery disk.
I will show the example of creating a USB flash drive for recovery (if you want to burn a CD/DVD disk for recovery, then read below).
So, the sequence of actions is as follows:

That's it, the flash drive is ready! Now you can use it to restore Windows from an image in case some problem arises and you cannot boot it.
Burning a recovery disc to a CD/DVD disc
If for some reason you still need to burn the recovery disc not to a USB flash drive, but to a CD or DVD, then you need to do the following:

Creating a recovery disc for Windows 8
Through the Windows 8 operating system, only a USB flash drive can be written to using standard means. You cannot burn a CD or DVD for recovery.
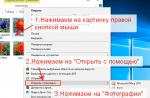
The principle of writing a recovery disk to a flash drive in Windows 8 is exactly the same as in Windows 10 (see above). The only difference is that in the search you need to type “recovery disk” (1) and open the found tool “Create a recovery disk” (2):

Conclusion
Burning a recovery disc can be very helpful if you have already created your own Windows image (i.e., its backup) and have access to this image. In this case, if Windows “falls”, i.e. if it is impossible to boot it by any means, the created Windows backup and the created recovery disk will help you out! It would be better if the flash drive (or disk) for recovery is always with you, wherever you work with the laptop. For example, if you went somewhere with a laptop for work, take a recorded recovery disk with you, but you never know :)
When booting from a flash drive, you can also return to one of the previous states of Windows (to the old checkpoint), i.e., to the moment when there was no problem in Windows yet. This option can also help you bring the system back to life, even without the need to restore from an image.
surfery.ru
Windows 10 recovery flash drive: how to create and why
You never know what will happen to the Windows operating system tomorrow and when you will need to urgently restore it, so you need to prepare for problems in advance and create a flash drive to restore the system.
A recovery flash drive is similar to the media that a user receives when purchasing a computer or laptop with a pre-installed operating system. Previously, computers were sold with CDs or DVDs containing an image of the operating system with factory settings. If problems began with the operating system due to viruses or incorrect user actions, he could easily return the system to its original state, although he would lose all saved data and installed applications. These days, manufacturers install a system image on a computer on a hidden disk partition.
The idea of a Windows recovery flash drive is based on the same idea. It allows you to reinstall the operating system and also offers several troubleshooting tools that can help if your computer won't boot.
Some of these tools were previously part of the operating system. If the computer does not boot, a menu appears that allows you to select Safe Boot Mode or the Last Known Good System Configuration that booted the computer. These features are no longer available in Windows 10. Now these tools should be located on a separate USB drive and every Windows user should have one in case of unexpected problems.
How to create a recovery flash drive and what you can do with it

First you need to purchase a flash drive with a capacity of 8-16 GB. Next, open the Windows Control Panel (just type the word “Panel” in the search next to the Start menu) and type the word “recovery” in the control panel search. Select the line “Create a recovery disk”.
You may be required to enter an administrator password to continue. In the dialog box that appears, select the “Back up system files to a recovery drive” box.

Once the recovery flash drive is created, you need to boot from it to use it. This process may vary on different models of computers and laptops with different motherboards, but usually during the boot process you will need to press the Delete button on your keyboard to open a menu where you can find boot options. Here you need to select boot from USB and restart your computer. When you successfully boot from the flash drive, you will see the following options. Here's what they do:
The first window gives two options: recovery from a flash drive and additional options.
The first option allows you to reinstall Windows. It says that you will lose all user data and installed programs in the process. This is a clean installation of the Windows operating system, not a restore from a backup. This is the most radical solution to Windows problems.
The second option allows you to solve problems with an existing copy of Windows using several methods, the following menu shows.

Additional parameters provide the following options:
System Restore: Use this option to return the system to a previous stable state when it was working without problems. This option does not affect the safety of user data, but it does affect installed programs, replacing registry entries with earlier versions.
System Image Restore: If you have used the Windows 10 image backup tool, this is where it can come in handy. You can restore a system image to the moment when this image was created, with all the data and programs installed at that time.
Startup Repair: This option suggests trying to fix problems that are preventing the system from booting, but it doesn't say what exactly is happening or what the problem was, if it can be fixed. This is the option you should try first because it is the fastest and most unobtrusive.
Command Line: This option can be useful in many cases, including the ability to run the SFC /Scannow command to scan and fix corrupt system files. However, working with the command line requires knowledge and skills, so it is unlikely to be suitable for most users.
Revert to the previous build: This option will return the state of Windows to the latest build, that is, before installing the previous update, which could cause problems.
As you can see, having a flash drive for restoring the operating system is very useful, so it’s worth taking a little time to create it. Read also about backing up and restoring files in Windows 10.
osdaily.ru
Windows 10 Recovery
The new Windows 10 includes many system recovery functions, including returning the computer to its original state, creating a restore point; using a separate Media Creation Tool utility, it is possible to create a complete system image on a flash drive, external hard drive or DVD. In my opinion, using these recovery capabilities is very useful and can help you solve computer problems that may arise in the future.
Resetting your computer to its original state

The first recovery feature you need to pay attention to is “Reset your computer to its original state.” To find this feature, click the notification icon on the taskbar, then select “All settings” -> “Update and security” -> “Recovery”.
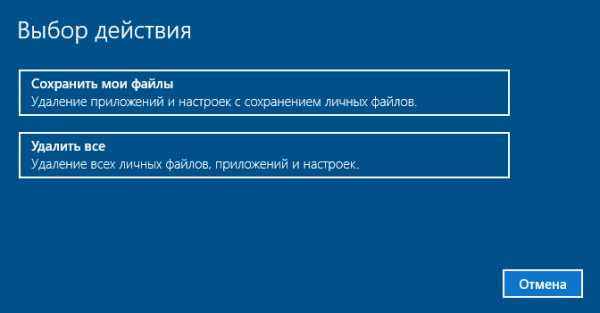
As you understand from the description, if your computer is not working properly, then this function will reset the system to its original state, and you can either save your personal files or delete them.
When you click the “Start” button, you will be asked to either completely remove all personal files, applications and settings, or keep your personal files (installed programs and settings will, however, be deleted).
The advantages of this recovery method are that a system distribution kit is not required, Windows 10 is reinstalled automatically.
The disadvantage of this recovery is that if your hard drive is damaged or the operating system files are seriously damaged, then you will not be able to restore the system this way, but two options can help here - a recovery disk or creating a complete image of the Windows 10 system on a separate hard drive (including an external one) or DVD discs.
Windows 10 Recovery Disk
Let me note right away that by disk here we mean a regular USB flash drive. The Windows 10 recovery disk can contain a full image of the operating system for recovery, that is, you can start a reset from it, as described above, automatically reinstalling the system on the computer.
To write such a flash drive, go to the Control Panel (to do this, press the + R keys and enter the control command)

Then select "Recovery". Already there you will find the item “Create a recovery disk”, and you need to select it.

If, when creating a recovery disk, you check the “Back up system files to a recovery disk” checkbox, then as a result, the USB flash drive can be used not only to manually correct problems that have arisen, but also to quickly reinstall Windows 10 on your computer.

After booting from the recovery disk (you will need to boot from a flash drive or use the Boot Menu, I wrote about this in the article Installing Windows 7), you will see a menu for selecting an action, where in the “Diagnostics” section (and in “Advanced options” inside this item ) You can:
- Try to restore the system using a restore point;
- Use the command line for advanced troubleshooting;
- Restore Windows using a system image file (will be described later in the article);
- Go to BIOS (UEFI Firmware Settings);
- Run automatic startup repair.