The standard ability to create an emergency recovery disk in Windows 10 was inherited from the “seven”. They create such a disk in case there are difficulties in the operation of the OS that prevent loading and contains such tools as:
- Automatic troubleshooting of problems that prevent the system from loading;
- Restoring from a previously created image (backup);
- Return the OS to the rollback point.
How to create a rescue disk using standard Windows 10 tools and how to actually use it in case of problems with loading the system? We will discuss these issues in detail below.
When is a recovery disk necessary?
A recovery disk can only be created for computer devices that include a CD/DVD drive. Unlike bootable media with rescue software from third-party developers, most of which require recording to a flash drive, a rescue disk can only be written to a CD/DVD disc. But this is by no means an infringement on the capabilities of owners of devices without a CD/DVD drive. The fact is that the recovery disk is not the only means of accessing the standard Windows resuscitation capabilities. You can get into the system recovery environment using a Windows 10 installation disk, which can also be created using a flash drive.
To revive the current OS using its installation disk, no financial costs will be required. The distribution kit with Windows 10 on the Microsoft website is available completely free of charge. It is supplied through the Media Creation Tool utility, which you need to download and run.

The utility will download the Windows 10 distribution in a single process and immediately create a bootable USB flash drive. If you encounter problems booting the system, you need to boot from the flash drive and, at the stage of starting the installation of the new OS, select the item indicated in the screenshot below. Access to the toolkit does not require entering a product key.

As you can see, a rescue disk can hardly be called a much-needed tool. However, its presence is welcome if there is no other computer in the house with which you could quickly create a bootable USB flash drive with system installation files.
Preparing to restore Windows
An emergency recovery disk is created for a specific bitness of Windows 10. In this case, the universal rule applies, as for programs installed inside the system - a 32-bit bitness is suitable for both 32-bit and 64-bit Windows 10. While 64-bit The rescue disk is useful only in the case of the 64-bit version.
A rescue disk will be of little use if a rollback point has not been created within the OS itself or a system image (backup copy) has not been prepared.
Creating a recovery disc
The emergency recovery disk is part of the standard toolkit for backing up OS files. This functionality is located in one of the sections of the control panel. You can get to the backup section not by wandering through the control panel, but in the simplest way - using an in-system search. In Windows 10, the search button is located right in the taskbar, so it’s a sin not to take advantage of this convenience.
We enter the key query for the partition we are looking for in the search field and get directly to the system backup parameters.

Click the "Create a system image" button. Select a CD/DVD drive in the drop-down list if there are several of them. Next, click the “Create Disk” button.

We will see a notification that, in particular, talks about the OS bit depth.

Creation is complete.

The Windows 10 recovery disc is suitable for computer devices based on both regular BIOS firmware and UEFI BIOS.

Now you can put the emergency disk somewhere in a secluded place. His further fate is to wait for a critical system failure.
Booting from a rescue disk
Let's say Windows 10 won't boot. The time has come to use emergency means. We take out the recovery disk and set the BIOS to boot from the CD/DVD drive. We confirm by pressing any key that the device is loaded from the CD/DVD.

The interface is Russian, but you can choose any other keyboard layout. In our case, we’ll simply confirm the Russian one.

Select an action – section “Diagnostics”.


In the next window we will see all the available tools for resuscitating Windows 10.
Startup Recovery
You can try to solve the problem with Windows 10 not booting first using the boot troubleshooting method. This is a mode that automatically fixes problems that prevent the OS from starting.

You shouldn't place much hope on this tool. Just like the in-system troubleshooting tool, the boot troubleshooting tool won't do much good. After a short diagnostic of the computer, in most cases it will be stated that it is unable to solve the problem.

Rollback to a restore point
Rollback point is the most convenient tool that allows you to do so with minimal data loss. Naturally, it is necessary that rollback points are periodically created - either manually by the user himself or automatically (using a task scheduler). The process of creating a rollback point takes much less time than the process of creating a system image (backup). And the rollback point saves space on your PC. However, a rollback point is more vulnerable than a backup copy, which can be stored on an alternative hard drive and will be very useful if the main drive fails.
To roll back to an earlier state of the OS in the event of serious problems with the system, boot from the rescue disk, go to the additional parameters and select the first option.
![]()

Select the current rollback point from among the existing ones. The most complete list of them will be available after setting the option to show other points. Click “Next”.

Click “Finish” in the rollback confirmation window.

We further confirm the launch of this process.

Once the system rollback is complete, the computer must be restarted. After the reboot, we will find the system exactly in the state in which it was at the time the rollback point was created.
Restoring from a system image
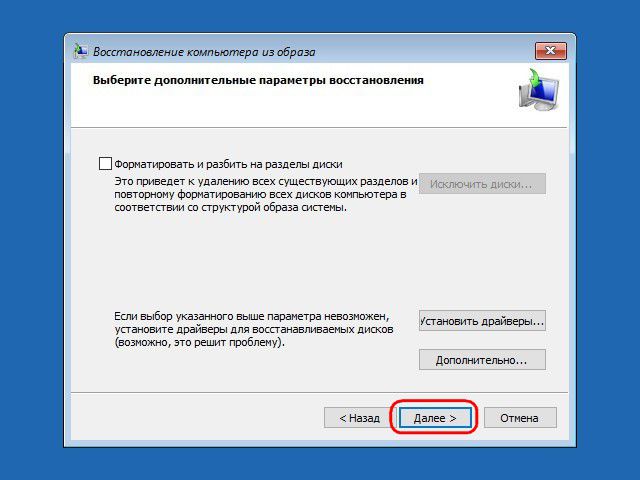
If it was previously created using the standard backup functionality, and the OS suddenly stops loading, it’s time to use this image by booting from the recovery disk. Having reached, as indicated above, the menu of additional parameters, accordingly, select the second option.

We leave the default image found by the system or select another using the appropriate option in the first window. Click “Next”.

Click “Finish”.

Confirm the decision with the “Yes” button.

As with the rollback point, the system will be returned to the state it was in when the image was created.
Have a great day!