And other design options, including the mouse pointer. Now let's look at how to change the mouse cursor on Windows 7, 8, install a new one, and also enable the pointer change settings.
All standard cursors are stored in the Cursors folder, which is located in the Windows folder. Going to the Cursors directory, you will see files with extensions ani (animated) and cur (normal). A set of several such files forms a scheme, which, when selected, sets the cursor style, including all the states of the pointer, depending on your actions. You can also manually set a separate cursor state without changing the schema.
Changing the mouse cursor on Windows 7, 8
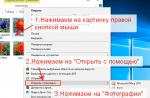
To change the mouse cursor to Windows 7, 8, you need to go to the mouse properties. , select the small (large) icons view. Among the options, find "mouse", click it.
Next, visit the "pointers" tab, here you will configure the appearance of the cursor. At the top of the window you will see the current scheme, clicking on which will drop down a list of all available schemes. Choose any other scheme and below in the "settings" field you will be able to get acquainted with all the states of the cursor.
If you did not find your favorite scheme, then you can change the state of the selected scheme that you did not like. In the "settings" field, double-click on the state with the left button or select it and click "browse". Then select one from the list of standard cursors, click "open".
You can set a shadow for the pointer to your liking, as well as allow or forbid themes to change the mouse cursor. Check or uncheck these options according to your requirements.

To expand the list of cursors, copy the ani, cur files to the Cursors directory (download from the Internet). After changing the schema, click "save as", give a unique name, then click OK. Optionally, you can delete the created schemes, except for the standard ones.

After all the changes, click OK in the mouse properties window to immediately see the cursor change to Windows 7, 8.
Note: if after restarting the computer, you observe the old cursor. Follow the steps above again and save the current theme again.
Installing new cursors for Windows 7, 8
Everything standard gets boring over time, so in this part of the material we will learn how to install mouse cursors for Windows 7, 8. There are several ways to install fresh pointers.
2. Download the archive with diagrams or on a third-party resource, unpack the archive. Go through the folders, select the set of cursors you like. In the same folder, find the element, which is inf, right-click on it and click "install".

The files will be moved to the desired directory, after which you can change the mouse cursor to Windows 7, 8 in the way described in the first part by selecting a new scheme.
3. If there is no inf file in the schema, then drop the folder with the pointer files into the Cursors directory. Then set each cursor manually for each state (read the first section).
Important: download cursor files only from trusted sources in order not to catch malware.
Enabling Pointer Change Settings
If it is not possible to change the cursor to Windows 7, 8 and the "pointers" tab is not available in the mouse settings, then it is disabled by the administrator. There are 2 ways to get it back.
1. Download the archive, unzip it. Double-click, run the reg file, click "yes", "yes", OK. So, you activate the missing tab.
2. Open the Group Policy Editor. Type in gpedit.msc, then hit Enter. Select the "personalization" section (see screenshot below). In the right pane, double-click the option to disable mouse cursor changes.
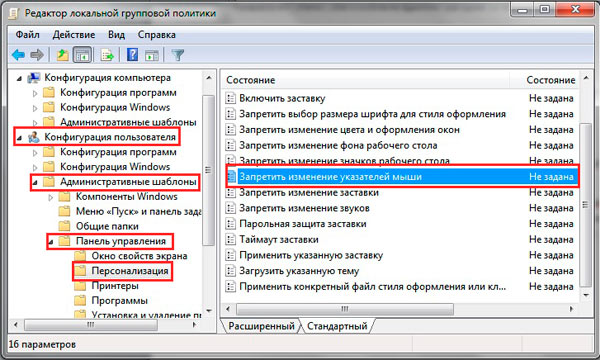
In the open window, set either "not set" or "disable". Then click OK.

Now you know how to change the mouse cursor on Windows 7, 8 and set new pointers. Many aspects of OS transformation were captured here, in addition to these, you can read in order to transform the OS.