Hello, my dear subscribers. I’m sure that you rarely come across Microsoft’s built-in browser, but sometimes setting up Internet Explorer in Windows 10 is necessary for the full functionality of some applications. In addition, in this article I want to talk about ways to completely remove this program.
At the time of writing this post, the latest version of the standard software was explorer 11. Despite the critical opinions of many users, this software over the years has managed to acquire more or less adequate outlines and sufficient functionality.
If for some reason this application is not available on your PC, you can do so on our website.
When the page launches, you will be prompted to add Yandex elements. You can agree (if you need it), or you can uncheck this option and install clean IE.
Launching the downloaded installer takes some time, during which all additional files are downloaded from the network. At some point, the screen will ask you to restart your PC to complete the installation.
First launch and setup
If you are launching Internet Explorer for the first time, a window for selecting recommended settings will first open. For beginners, I recommend turning on Smart Protection to ensure security when visiting suspicious sites. If you have already installed reliable anti-virus software, then you can “Do not use recommended settings.”

After clicking on the “OK” button, the initial page will launch with some information about the main elements. It is also suggested to view the list of available add-ons with the ability to enable/disable them. This window shows the launch time of modules that slow down the loading of the site. You can select the most “braking” elements and remove them (if necessary):


Now we can move on to more specific settings. To do this, click on the gear-shaped icon, which is located in the top right corner.

A window will open with many tabs. But there's nothing wrong with that. For example, in the “General” section they most often provide a link to the start page. Here you can clear your browsing history and cookies.

You can specify a Protected View policy for specific sites or entire regions on the Security tab:

But the “Confidentiality” section is of particular importance because it contains several useful parameters:
- Managing cookie acceptance;
- Setting rules for providing data about your location;
- Blocking pop-up content.
By the way, similar options are available in the new Edge browser.
The screenshot shows the optimal settings that I use:

If you have children, the “Content” tab will allow you to create a list of sites that should be blocked. Just click on the “Parental Controls” button and make the required changes.

By the way, you can. This is a very functional tool that opens up a lot of new possibilities for users. I advise you to become more familiar with this topic by reading my article.
- We launch the editor using the gpedit.msc command, which we enter into the console (Win + R)
- In the left part of the window that opens, you need to click on the “User Configuration” folder, then go to the “Administrative Templates” - “Control Panel” directory.
- There should be an "Internet Settings" item in the drop-down list. Right-click on it and select the desired version of the browser for which we will configure:

The window we are already familiar with will open:
If you compare these two methods, it becomes obvious that the first one is simpler. But many who like to tinker with system settings get more pleasure from the second method (using group policies). Choose the option at your discretion, the result will be the same.
Downgrade or downgrade
Sometimes after updating the browser, various problems appear in its operation. Pages take longer to launch, videos do not play, and your settings change. In this case, a rollback to previous versions (downgrade) will help, which is performed as follows:
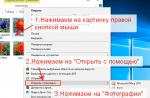
- Open the “Control Panel”. The easiest way to do this is by right-clicking on the “Start” button and selecting the appropriate item in the context menu.
- In the window that opens, find and launch “Programs and Features.” On the left, select “View installed updates.”
- The right side of the window contains a list of updates. In the list we find the name of Internet Explorer for which we need to downgrade the version.
- Select and click on the “Delete” button. We do not pay attention to the “terrible” warning about the consequences of such an action.
- Restart the PC and enjoy the result.
Attention! If you need to downgrade several versions, you will have to repeat this procedure as many times as necessary until you remove all the problematic updates.
Removing IE from Windows
Very often, Windows 10 users want to simply uninstall IE. This is done very simply.
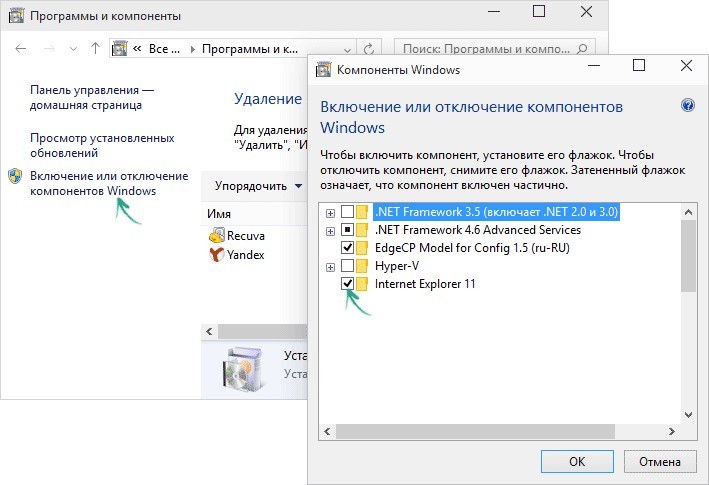
- As in the previous example, you need to open the “Programs and Features” window, and in it select the item (on the left): “On/off. components".
- Select Internet Explorer from the list and click OK.
- Don't forget to restart your PC to confirm the changes.
As you can see, there is nothing difficult in setting up a standard application for surfing the Internet, which Microsoft offers us. But if you have any questions, I look forward to your comments.